

IN THIS ARTICLE
A crucial part of developing applications is focusing on user experience. Delivering a truly progressive app experience, companies have come to realize that their overall growth increases in every category, from engagement to conversions. We know this by looking at the relatively new outline set out by Google that says a progressive web application should follow these three simple characteristics:
- Reliable
- Fast
- Engaging
The key thing that we’re going to look at is how we can make our web app more engaging. Of course, we can’t make it perfect but we can start off by creating a project that can become a skeleton for a bigger project.
Under the umbrella of creating an engaging web app, we have a couple of other examples as defined by Google.
- Worthy of being on the home screen
- Work reliably, no matter the network conditions
- Increased engagement
- Improved conversions
At the moment we won’t be trying to cover all of these sections of a web app, instead, we’ll focus on how we can increase engagement by integrating push notifications into our web app.
If you want to learn how to make your site more engaging and improve conversions, check out my article on creating a chat assistant. Another way of making an app worthy of being on a home screen is by having beautiful components, I go through how to make beautiful chart component with PubNub in this article.
The full GitHub repo for this article is available here.
Increasing Engagement with Push Notifications
Let’s begin by creating a React template and changing into that directory.
npx create-react-app pubnub-pwa && cd pubnub-pwa
Now, inside of our project, we’re going to install the react client for PubNub. This is going to streamline our development.
npm i pubnub-react --save
Now we can go src/App.js and import the PubNub react SDK.
import PubNubReact from 'pubnub-react';
From here we’re going to now initiate our connections to our channels by adding in our publish and subscribe keys. But first, you’ll need to signup for PubNub.
constructor(props) {
  super(props);
  this.pubnub = new PubNubReact({
    publishKey: 'your pub key',
    subscribeKey: 'your sub key'
  });
  this.pubnub.init(this);
}
componentWillMount() {
  this.pubnub.subscribe({
    channels: ['PWA']
  });

  this.pubnub.getMessage('PWA', (msg) => {
    this.notifyMe(msg.message.text);
  });
}
On top of this, we’re going to add a notification function which displays the incoming notifications.
notify(message) {
  if (!("Notification" in window)) {
    alert("This browser does not support system notifications");
  }
}
Currently, the function takes in a message and checks if the browser has the ability to show push notifications. The next step is to ask permissions if notifications are available or do something in the case that they aren’t. Adding that functionality then leads our function to look like this.
notify(message) {
  if (!("Notification" in window)) {
    alert("This browser does not support system notifications");
  }
  else if (Notification.permission === "granted") {
    if(typeof message === 'string' || message instanceof String){
      var notification = new Notification(message);
    }else{
      var notification = new Notification("Hello World");
    }
  }
  else if (Notification.permission !== 'denied') {
    Notification.requestPermission(function (permission) {
      if (permission === "granted") {
        var notification = new Notification("Hello World");
      }
    });
  }
}
Now we can add a button to test out our functionality before we hook check out our notifications on PubNub.
render() {
    return (
      <div className="App">
        <button onClick={this.notify}>
          Send Notification
        </button>
      </div>
    );
} 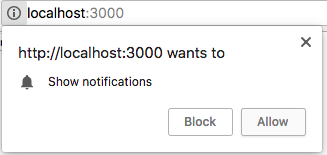
Now when we refresh our page, we should get an alert that asks us to allow notifications. Let’s hit the allow button so we can see our beautiful notification. And just like that, we’ve got our notification showing up on the top right of our screen.

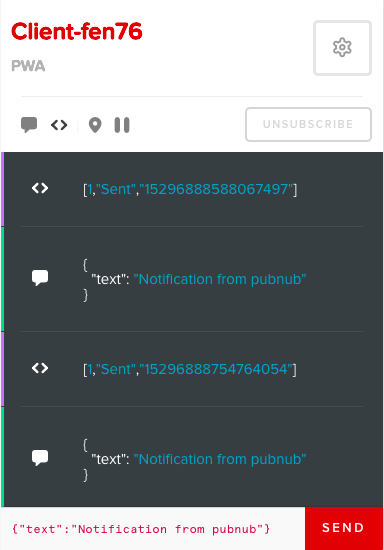
So how does this work on PubNubs side? We can head over to the admin panel and go to the debug console to see our custom notification.
Wrapping Up!
Just like that we have our application be able to send push notifications. The next steps would be to be able to send these notifications in the background. You can do this by creating a service worker and pushing messaged from PubNub Functions.
Try PubNub today!


