IN THIS ARTICLE
Welcome to our series on Android development with Fabric! In previous tutorials, we’ve shown you how to create apps with technologies like Android or PhoneGap. In this blog entry, we highlight a new toolkit, Twitter Fabric, that accelerates mobile app development and helps you build an app with several realtime data features that you’ll be able to use “as-is” or employ easily in your own data streaming applications:
- Log in with Twitter auth (Login): using the Twitter plugin for Fabric allowing easy user authentication.
- Send chat messages to a PubNub channel (Chat): using the PubNub plugin for realtime messaging and Publish/Subscribe API.
- Display current and historical chat messages (Chat): using the PubNub plugin and History API.
- Display a list of what users are online (Presence): using the PubNub plugin and Presence API.
In recent years, the dominant trend of mobile applications has been towards realtime apps, given its clear wins for user experience and monetization. Would Twitter or Slack work if they were email-only and produced a daily digest (like email lists of the past)? How do you call Uber or Lyft with only an email API and a daily static list of drivers? As you can see, there’s a huge disruptive force that comes from seeing vehicle locations in realtime. And as time goes on, there will be more and more adoption of realtime messaging: it is critical for applications in the IoT (Internet of Things) space, where a thermostat must provide the temperature and ability to control right now, not even 5 or 10 minutes ago. Emerging applications in the commercial and industrial IoT space have even greater demands around realtime – there is little margin of error in robot and vehicle control.
Android, as we all know, has grown up a lot in the past 5 years. It can literally boast an installed base of billions of devices across everything from smartphones to tablets to wearables (glasses/watches) to automobiles.
PubNub provides a global realtime Data Stream Network with extremely high availability and low latency. You can exchange messages between devices (and/or sensors, servers… essentially anything that can talk TCP) in less than a quarter of a second worldwide. And of that 250ms, a large part comes from the last hop – the data carrier itself! As 4G LTE and cloud computing gain traction, those latencies will decrease even further.
Twitter Fabric is a dev toolkit for Android that gives developers a powerful array of options:
- Familiar dev toolkit for iOS, Android and Web Applications: a unified developer experience that focuses on ease of development and maintenance.
- Best-of-breed SDKs all in one place: taking the pain out of third-party SDK provisioning and using new services in your application.
- Streamlined dependency management: Fabric plugin kits are managed together to consolidate dependencies and avoid “dependency hell.”
- Rapid app development with task-based sample code on-boarding: You can access and integrate sample code use cases right from the IDE.
- Automated Key Provisioning: sick of creating and managing yet another account ? So were we! Fabric will provision those API keys for you.
- Open Source, allowing easier understanding, extension and fixes.
Okay, so admittedly, that was a lot to digest. How do all these things fit together exactly?
- We are building an Android app because we want to reach the most devices worldwide.
- We use the Fabric plugin for Android Studio, giving us our “mission control” for plugin adoption and app releases.
- We adopt Best-of-Breed services ( like PubNub ) rapidly by quickly integrating plugin kits and sample code in Fabric.
- We use PubNub as our Global Realtime Data Stream Network to power the Chat and Presence features.
- In addition, we’ll use Twitter’s API for Fabric to provide user authentication (we could also easily use Twitter’s other APIs if that content is relevant to the application).
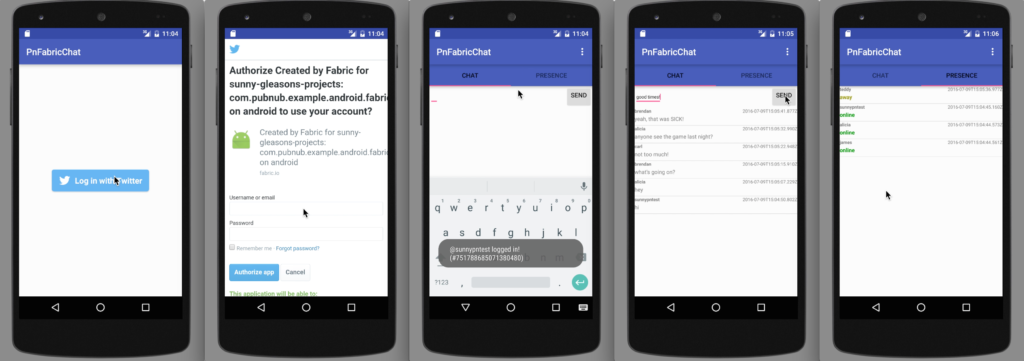
As you can see in the animated GIF above, once everything is together, we have built an application very quickly that provides a great feature set with relatively little code and integration pain. This includes:
- Log in with Twitter (or your own alternative login mechanism).
- Send & receive chat messages (or whatever structured realtime data you like).
- Show a list of users online (or devices/sensors/vehicles, etc.).
This all seems pretty sweet, so let’s move on to the development side…
Sign up with Fabric
If you haven’t already, you’ll want to create a Fabric account like this:
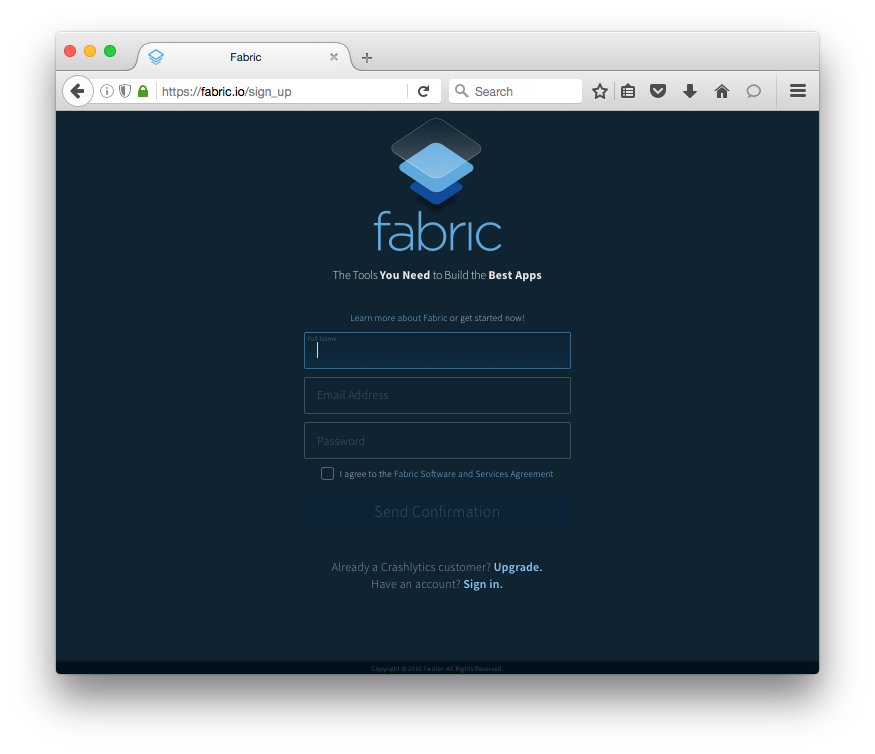
You should be on your way in 60 seconds or less!
Android Studio
In Android studio, as you know, everything starts out by creating a new Project.
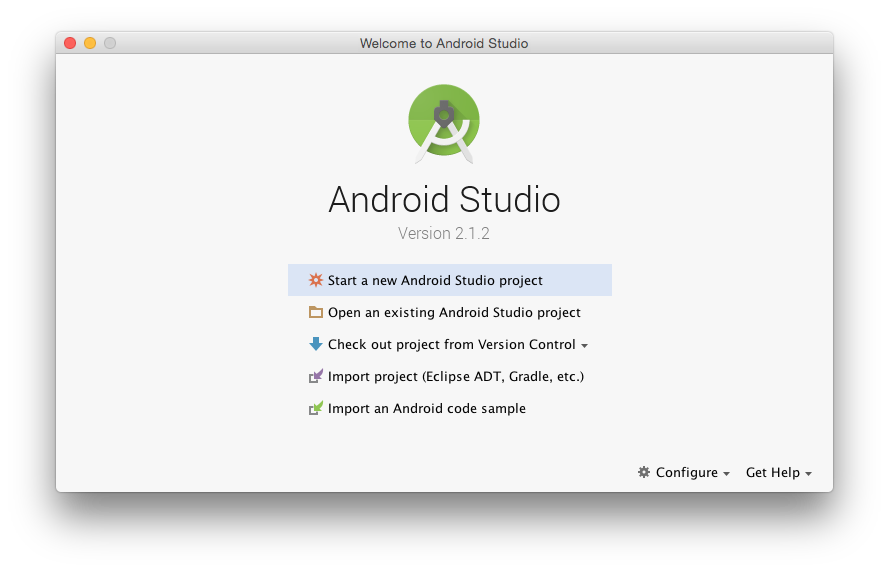
In our case, we’ve done most of the work for you – you can jump start development with the sample app by downloading it from GitHub ,or the “clone project from GitHub” feature in Android Studio if prefer. The git URL for the sample app is:
https://github.com/sunnygleason/pubnub-android-fabric-chat.git
Once you have the code, you’ll want to create a Fabric Account if you haven’t already.
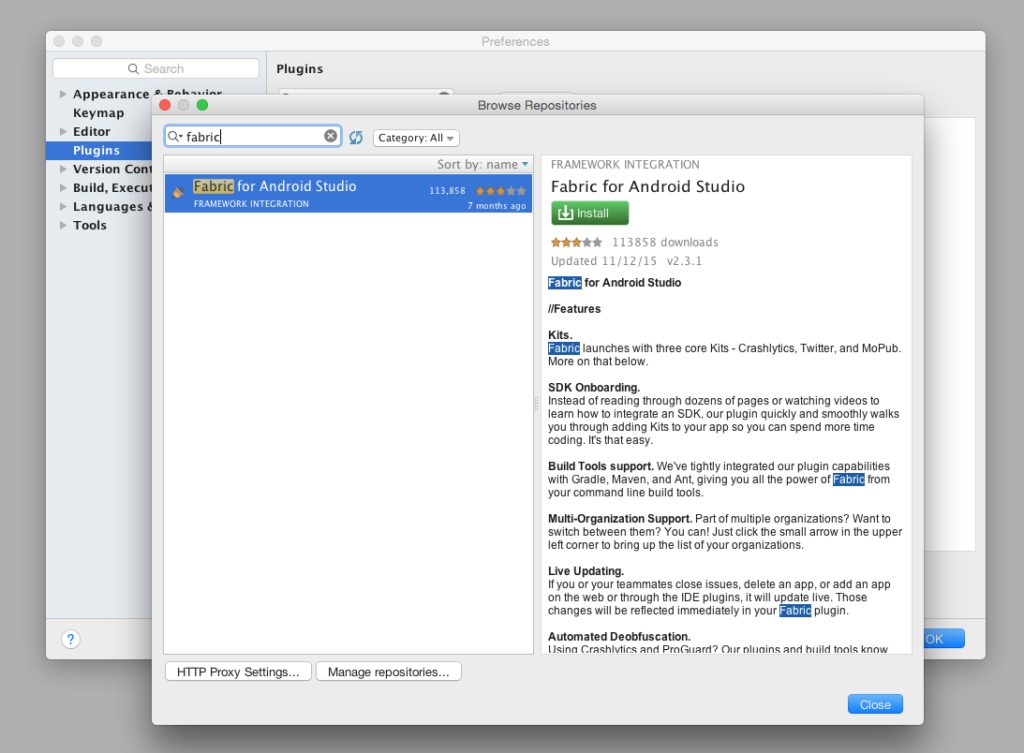
Then, you can integrate the Fabric Plugin according to the instructions you’re given. The interface in Android Studio should look something like this, under Preferences > Plugins > Browse Repositories:
Once everything’s set, you’ll see the happy Fabric Plugin on the right-hand panel:
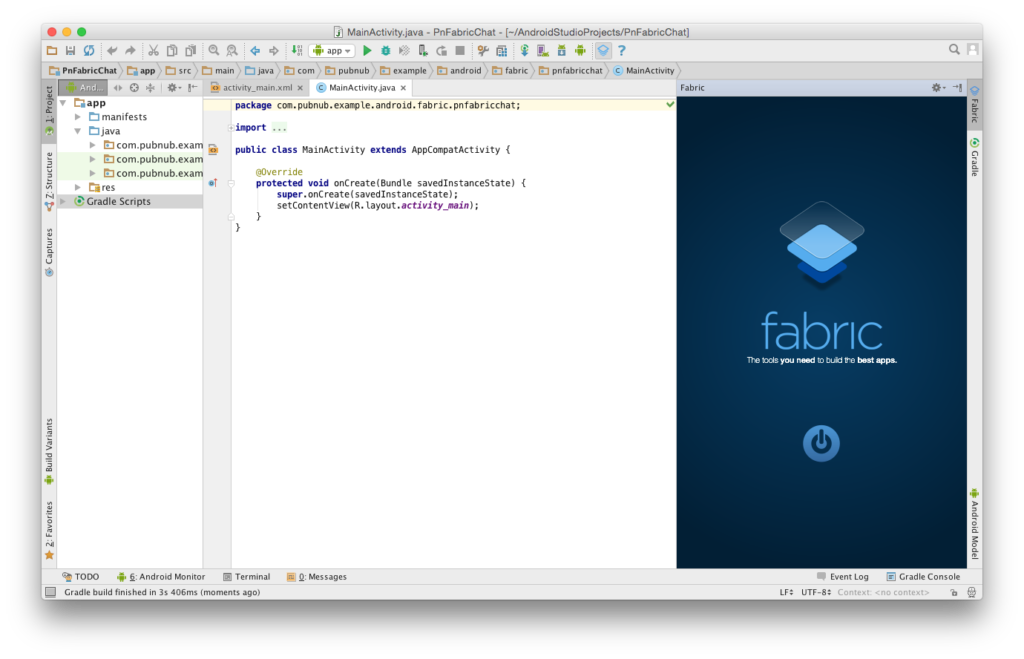
Click the “power button” to get started, and you’re on your way!
Twitter SDK Integration
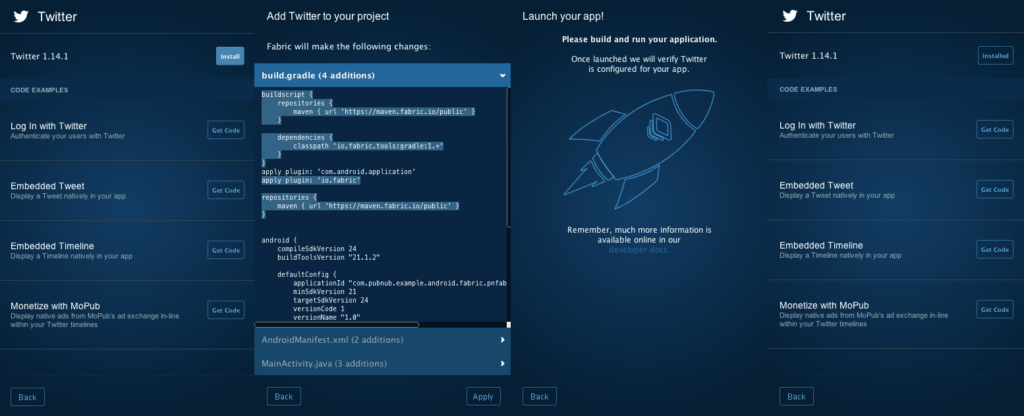
Adding Twitter is an easy 3-step process:
- Click to Install from the list of Fabric kits
- Integrate any Sample Code you need to get started
- Launch the App to verify successful integration… and that’s it!
Here’s a visual overview of what that looks like:
PubNub SDK Integration
Adding PubNub is just as easy:
- Click to Install from the list of Fabric kits.
- Enter your PubNub keys or have Fabric create a new account.
- Integrate any Sample Code you need to get started.
- Launch the App to verify successful integration.
Look familiar? That’s the beauty of Fabric!
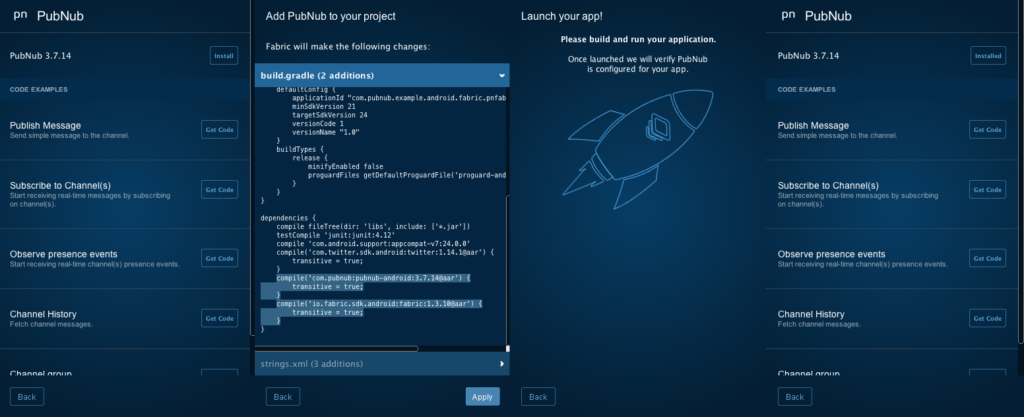
Using this same process, you can integrate over a dozen different toolkits and services with Fabric.
Navigating the Code
Once you’ve set up the sample application, you’ll want to update the publish and subscribe keys in the Constants class, your Twitter API keys in the MainActivity class, and your Fabric API key in the AndroidManifest.xml. These are the keys you created when you made a new account and PubNub application in previous steps. Make sure to update these keys, or the app won’t work!
Here’s what we’re talking about in the Constants class:
package com.pubnub.example.android.fabric.pnfabricchat;
public class Constants {
    ...
    public static final String PUBLISH_KEY = "YOUR_PUBLISH_KEY";            // replace with your PN PUB KEY
    public static final String SUBSCRIBE_KEY = "YOUR_SUBSCRIBE_KEY";        // replace with your PN SUB KEY
    ...
}
These values are used to initialize the connection to PubNub when the user logs in.
And in the MainActivity :
public class MainActivity extends AppCompatActivity {
    private static final String TWITTER_KEY = "YOUR_TWITTER_KEY";
    private static final String TWITTER_SECRET = "YOUR_TWITTER_SECRET";
    ...
}
These values are necessary for the user authentication feature in the sample application.
And in the AndroidManifest.xml :
<?xml version="1.0" encoding="utf-8"?>
<manifest xmlns:android="http://schemas.android.com/apk/res/android"
    package="com.pubnub.example.android.fabric.pnfabricchat">
    ...
    <application ...>
        ...
        <meta-data
            android:name="io.fabric.ApiKey"
            android:value="YOUR_API_KEY" />
        ...
    </application>
    ...
</manifest>
This is used by the Fabric toolkit to integrate features into the application.
As with any Android app, there are 2 main portions of the project – the Android code (written inJava), and the resource files (written in XML).
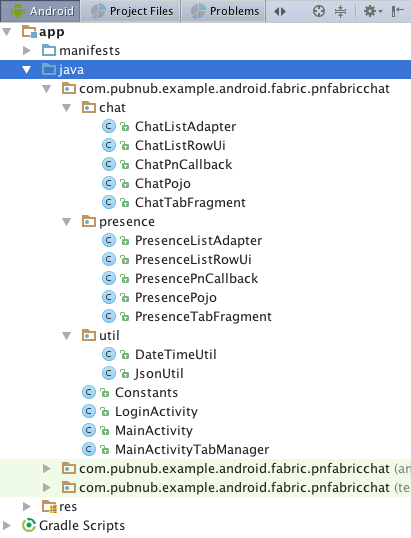
The Java code contains 2 Activities, plus packages for each major feature: Pub/Sub messaging, Presence, and Multiplexing.
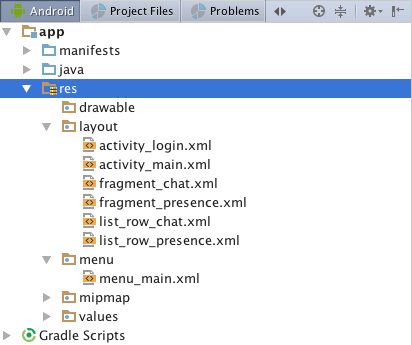
The resource XML files include layouts for each activity, fragments for the 2 tabs, list row layouts for each data type, and a menu definition with a single option for “logout.”
Whatever you need to do to modify this app, chances are you’ll just need to tweak some Java code or resources. In rare cases, you might add some additional dependencies in the build.gradle file, or modify permissions or behavior in the AndroidManifest.xml.
In the Java code, there is a package for each of the main features:
- chat: code related to implementing the realtime chat feature.
- presence: code related to implementing the online presence list of users.
For ease of understanding, there is a common structure to each of these packages that we’ll dive into shortly.
Android Manifest
The Android manifest is very straightforward – we just need one permission (INTERNET), and have 2 activities: LoginActivity (for login), and MainActivity (for the main application).
<?xml version="1.0" encoding="utf-8"?>
<manifest xmlns:android="http://schemas.android.com/apk/res/android"
    package="com.pubnub.example.android.fabric.pnfabricchat">
    <uses-permission android:name="android.permission.INTERNET" />
    <application
        android:allowBackup="true"
        android:icon="@mipmap/ic_launcher"
        android:label="@string/app_name"
        android:supportsRtl="true"
        android:theme="@style/AppTheme">
        <activity android:name=".MainActivity">
            <intent-filter>
                <action android:name="android.intent.action.MAIN" />
                <category android:name="android.intent.category.LAUNCHER" />
            </intent-filter>
        </activity>
        <meta-data
            android:name="io.fabric.ApiKey"
            android:value="YOUR_API_KEY" />
        <activity android:name=".LoginActivity"
            android:screenOrientation="portrait"
            android:configChanges="orientation|keyboardHidden">
        </activity>
    </application>
</manifest>
Hopefully this all looks familiar – most of it was auto-generated, with a couple small additions from the Fabric code on-boarding.
Layouts
Our application uses several layouts to render the application:
- Activity: the top-level layouts for
LoginActivityandMainActivity. - Fragment: layouts for our 2 tabs,
ChatandPresence. - Row Item: layouts for the 2 types of
ListView,ChatandPresence.
These are all standard layouts that we pieced together from the Android developer guide, but we’ll go over them all just for the sake of completeness.
Activity Layouts
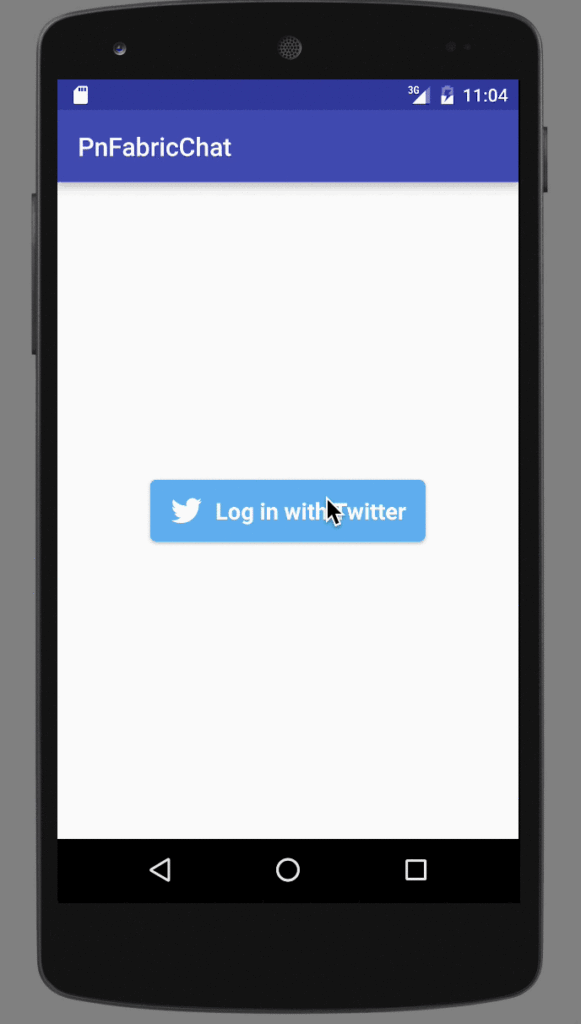
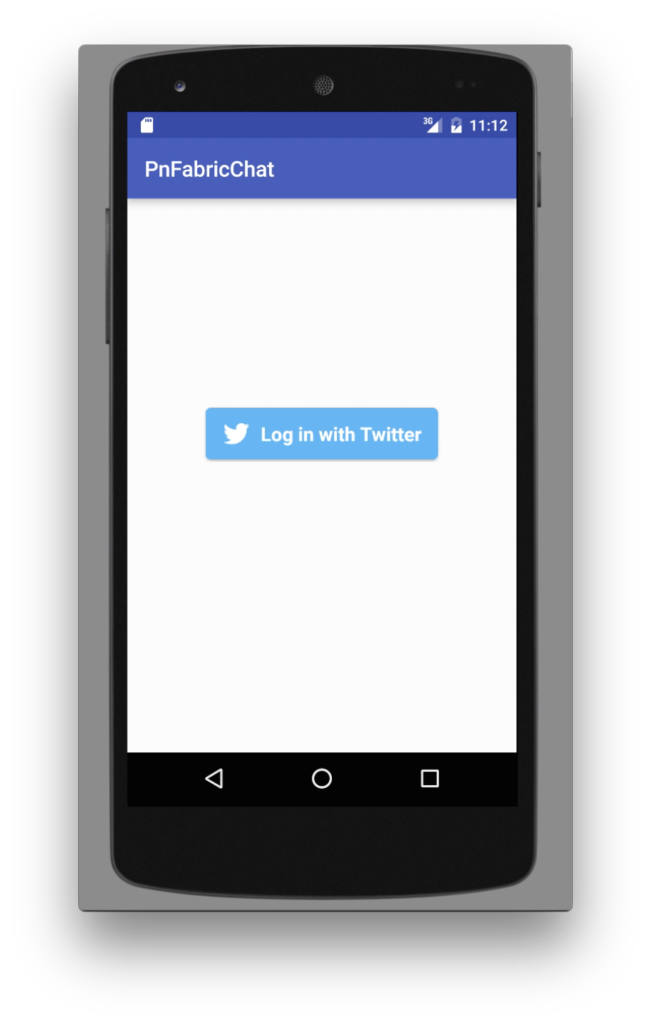
The login activity layout is super simple – it’s just a single button for the Twitter login:
<?xml version="1.0" encoding="utf-8"?>
<RelativeLayout xmlns:android="http://schemas.android.com/apk/res/android"
    xmlns:tools="http://schemas.android.com/tools"
    android:layout_width="match_parent"
    android:layout_height="match_parent"
    android:paddingBottom="@dimen/activity_vertical_margin"
    android:paddingLeft="@dimen/activity_horizontal_margin"
    android:paddingRight="@dimen/activity_horizontal_margin"
    android:paddingTop="@dimen/activity_vertical_margin"
    tools:context="com.pubnub.example.android.fabric.pnfabricchat.LoginActivity">
    <com.twitter.sdk.android.core.identity.TwitterLoginButton
        android:id="@+id/twitter_login_button"
        android:layout_width="wrap_content"
        android:layout_height="wrap_content"
        android:layout_above="@+id/textView"
        android:layout_centerVertical="true"
        android:layout_centerHorizontal="true" />
</RelativeLayout>
It results in a layout that looks like this:
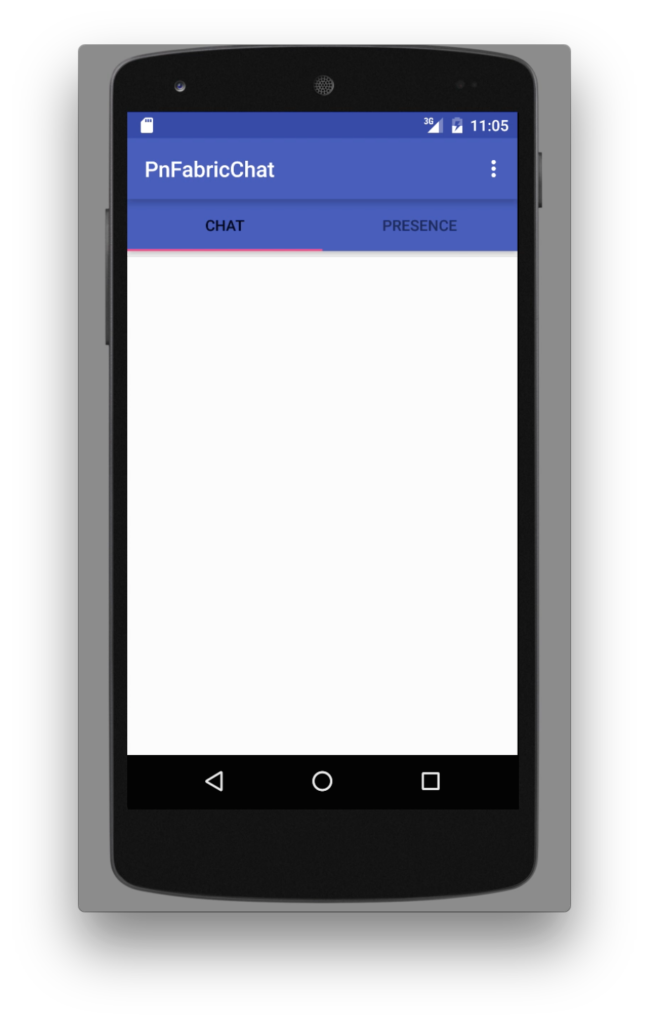
The Main Activity features a tab bar and view pager – this is pretty much the standard layout suggested by the Android developer docs for a tab-based, swipe-enabled view:
<?xml version="1.0" encoding="utf-8"?>
<LinearLayout xmlns:android="http://schemas.android.com/apk/res/android"
    xmlns:tools="http://schemas.android.com/tools"
    android:orientation="vertical"
    android:layout_width="wrap_content"
    android:layout_height="match_parent"
    android:paddingBottom="0dp"
    android:paddingLeft="0dp"
    android:paddingRight="0dp"
    android:paddingTop="0dp"
    tools:context=".MainActivity">
    <android.support.design.widget.TabLayout
        android:id="@+id/tab_layout"
        android:layout_width="match_parent"
        android:layout_height="wrap_content"
        android:background="?attr/colorPrimary"
        android:elevation="6dp"
        android:minHeight="?attr/actionBarSize"
        />
    <android.support.v4.view.ViewPager
        xmlns:android="http://schemas.android.com/apk/res/android"
        android:id="@+id/pager"
        android:layout_width="match_parent"
        android:layout_height="match_parent" />
</LinearLayout>
It results in a layout that looks like this:
Fragment Layouts
Ok, now that we have our top-level views, let’s dive into the tab fragments.
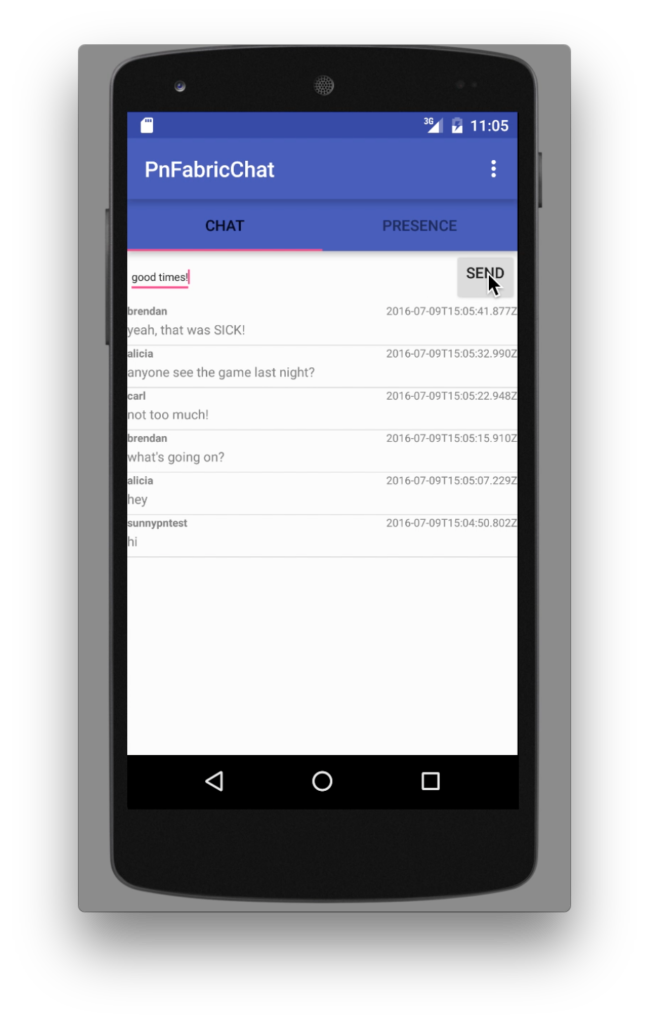
The chat tab layout features a bar for sending a new message (that’s what theRelativeLayout named “relativeLayout” is for, to create a “send message” section),with a scrolling ListView below.
<?xml version="1.0" encoding="utf-8"?>
<RelativeLayout xmlns:android="http://schemas.android.com/apk/res/android"
    android:orientation="vertical" android:layout_width="match_parent"
    android:layout_height="match_parent">
    <RelativeLayout
        android:layout_width="match_parent"
        android:layout_height="wrap_content"
        android:orientation="horizontal"
        android:id="@+id/relativeLayout">
        <EditText
            android:layout_width="wrap_content"
            android:layout_height="wrap_content"
            android:id="@+id/new_message"
            android:textSize="10sp"
            android:layout_centerVertical="true"
            android:layout_alignEnd="@+id/sender">
            <requestFocus />
        </EditText>
        <Button
            style="?android:attr/buttonStyleSmall"
            android:layout_width="wrap_content"
            android:layout_height="wrap_content"
            android:text="Send"
            android:id="@+id/sendButton"
            android:gravity="end"
            android:onClick="publish"
            android:layout_centerVertical="true"
            android:layout_alignParentRight="true"
            android:layout_alignParentEnd="true" />
    </RelativeLayout>
    <ListView
        android:id="@+id/chat_list"
        android:layout_height="match_parent"
        android:layout_width="match_parent"
        android:layout_below="@+id/relativeLayout" />
</RelativeLayout>
Combined with the ChatListRowUi layouts, it will create a view that looks like this:
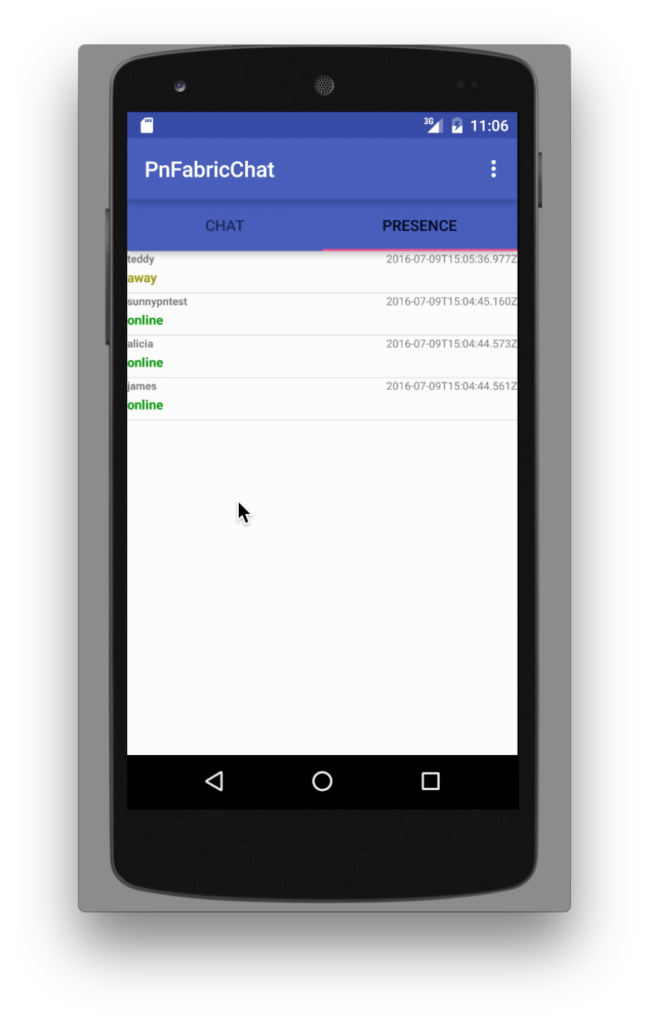
The presence tab layout is even simpler, just a list of presence rows.
( Presence tab layout omitted for brevity’s sake )
Combined with the ChatListRowUi layouts, it will create a view that looks like this:
Row Layouts
A chat row contains very few data attributes: just sender, timestamp, and the message itself:
<?xml version="1.0" encoding="utf-8"?>
<LinearLayout xmlns:android="http://schemas.android.com/apk/res/android"
    android:orientation="vertical" android:layout_width="match_parent"
    android:layout_height="match_parent">
    <RelativeLayout
        android:layout_width="match_parent"
        android:layout_height="wrap_content"
        android:orientation="horizontal">
        <TextView
            android:id="@+id/sender"
            android:text="Remote Device UUID"
            android:textSize="10sp"
            android:textStyle="bold"
            android:layout_width="wrap_content"
            android:layout_height="wrap_content" />
        <TextView
            android:id="@+id/timestamp"
            android:text="20160601T110000.000Z"
            android:textSize="10sp"
            android:layout_alignParentRight="true"
            android:layout_alignParentEnd="true"
            android:gravity="end"
            android:layout_width="wrap_content"
            android:layout_height="wrap_content" />
    </RelativeLayout>
    <TextView
        android:id="@+id/message"
        android:text="this is a sample realtime message from the data stream network"
        android:textSize="12sp"
        android:paddingTop="2dp"
        android:paddingBottom="6dp"
        android:layout_width="match_parent"
        android:layout_height="wrap_content" />
</LinearLayout>
Similarly, the presence row contains just a few data attributes: sender, timestamp, and the presence value.
( Presence item row layout omitted for brevity’s sake )
Hopefully that all wasn’t too crazy! Now we can dive into the Java code, where there’s more interesting stuff happening (or, at least we think so).
Java Code
In the code that follows, we’ve categorized things into a few areas for ease of explanation. Some of theseare standard Java/Android patterns, and some of them are just tricks we used to follow PubNub or other APIsmore easily.
- Activity: these are the high-level views of the application, the Java code provides initialization and UI element event handling.
- Pojo: these are Plain Old Java Objects representing the “pure data” that flows from the network into our application.
- Fragment: these are the Java classes that handle instantiation of the UI tabs.
- RowUi: these are the corresponding UI element views of the Pojo classes (for example, the
senderfield is represented by anTextViewin the UI). - PnCallback: these classes handle incoming PubNub data events (for publish/subscribe messaging and presence).
- Adapter: these classes accept the data from inbound data events and translate them into a form that is useful to the UI.
That might seem like a lot to take in, but hopefully as we go into the code it should feel a lot easier.
LoginActivity
The LoginActivity is pretty basic – we just include code for instantiating the viewand setting up Twitter login callbacks.
public class LoginActivity extends AppCompatActivity {
    private TwitterLoginButton loginButton;
    ...
    @Override
    protected void onCreate(Bundle savedInstanceState) {
        super.onCreate(savedInstanceState);
        setContentView(R.layout.activity_login);
        loginButton = (TwitterLoginButton) findViewById(R.id.twitter_login_button);
        loginButton.setCallback(new Callback<TwitterSession>() {
            @Override
            public void success(Result<TwitterSession> result) {
                TwitterSession session = result.data;
                String msg = "@" + session.getUserName() + " logged in! (#" + session.getUserId() + ")";
                Toast.makeText(LoginActivity.this, "", Toast.LENGTH_SHORT).show();
                Toast.makeText(getApplicationContext(), msg, Toast.LENGTH_LONG).show();
                SharedPreferences sp = getSharedPreferences(Constants.DATASTREAM_PREFS, MODE_PRIVATE);
                SharedPreferences.Editor edit = sp.edit();
                edit.putString(Constants.DATASTREAM_UUID, session.getUserName());
                edit.apply();
                Intent intent = new Intent(LoginActivity.this, MainActivity.class);
                startActivity(intent);
            }
            @Override
            public void failure(TwitterException exception) {
                Log.d("TwitterKit", "Login with Twitter failure", exception);
            }
        });
        ...
    }
    @Override
    protected void onActivityResult(int requestCode, int resultCode, Intent data) {
        super.onActivityResult(requestCode, resultCode, data);
        loginButton.onActivityResult(requestCode, resultCode, data);
    }
}
We attach the login event to a callback with two outcomes: the success callback,which extracts the username and Twitter ID and moves on to the MainActivity todisplay a Toast message; and the error callback, which does nothing but Log (for now).
MainActivity
There’s a lot more going on in the MainActivity. This makes sense, since it’s the place where the application is initialized and where UI event handlers live. Take a moment to glance through the code and we’ll talk about it below.
public class MainActivity extends AppCompatActivity {
    ...
    private Pubnub mPubnub;
    private ChatPnCallback mChatCallback;
    private ChatListAdapter mChatListAdapter;
    private PresencePnCallback mPresenceCallback;
    private PresenceListAdapter mPresenceListAdapter;
    private SharedPreferences mSharedPrefs;
    private String mUsername;
    @Override
    protected void onCreate(Bundle savedInstanceState) {
        super.onCreate(savedInstanceState);
        TwitterAuthConfig authConfig = new TwitterAuthConfig(TWITTER_KEY, TWITTER_SECRET);
        Fabric.with(this, new Twitter(authConfig));
        mSharedPrefs = getSharedPreferences(Constants.DATASTREAM_PREFS, MODE_PRIVATE);
        if (!mSharedPrefs.contains(Constants.DATASTREAM_UUID)) {
            Intent toLogin = new Intent(this, LoginActivity.class);
            startActivity(toLogin);
            return;
        }
        this.mUsername = mSharedPrefs.getString(Constants.DATASTREAM_UUID, "");
        this.mChatListAdapter = new ChatListAdapter(this);
        this.mPresenceListAdapter = new PresenceListAdapter(this);
        this.mChatCallback = new ChatPnCallback(this.mChatListAdapter);
        this.mPresenceCallback = new PresencePnCallback(this.mPresenceListAdapter);
        setContentView(R.layout.activity_main);
        TabLayout tabLayout = (TabLayout) findViewById(R.id.tab_layout);
        tabLayout.addTab(tabLayout.newTab().setText("Chat"));
        tabLayout.addTab(tabLayout.newTab().setText("Presence"));
        tabLayout.setTabGravity(TabLayout.GRAVITY_FILL);
        final ViewPager viewPager = (ViewPager) findViewById(R.id.pager);
        final MainActivityTabManager adapter = new MainActivityTabManager
                (getSupportFragmentManager(), tabLayout.getTabCount());
        adapter.setChatListAdapter(this.mChatListAdapter);
        adapter.setPresenceAdapter(this.mPresenceListAdapter);
        viewPager.setAdapter(adapter);
        viewPager.addOnPageChangeListener(new TabLayout.TabLayoutOnPageChangeListener(tabLayout));
        tabLayout.addOnTabSelectedListener(new TabLayout.OnTabSelectedListener() {
            @Override
            public void onTabSelected(TabLayout.Tab tab) {
                viewPager.setCurrentItem(tab.getPosition());
            }
            @Override
            public void onTabUnselected(TabLayout.Tab tab) {
            }
            @Override
            public void onTabReselected(TabLayout.Tab tab) {
            }
        });
        initPubNub();
        initChannels();
    }
    @Override
    public boolean onCreateOptionsMenu(Menu menu) {
        getMenuInflater().inflate(R.menu.menu_main, menu);
        return true;
    }
    @Override
    public boolean onOptionsItemSelected(MenuItem item) {
        int id = item.getItemId();
        switch (id) {
            case R.id.action_logout:
                logout();
                return true;
        }
        return super.onOptionsItemSelected(item);
    }
    public void logout() {
        disconnectAndCleanup();
        Intent toLogin = new Intent(this, LoginActivity.class);
        startActivity(toLogin);
    }
    @Override
    protected void onStop() {
        super.onStop();
    }
    @Override
    protected void onDestroy() {
        super.onDestroy();
        disconnectAndCleanup();
    }
    public void publish(View view) {
        final EditText mMessage = (EditText) MainActivity.this.findViewById(R.id.new_message);
        final Map<String, String> message = ImmutableMap.<String, String>of("sender", MainActivity.this.mUsername, "message", mMessage.getText().toString(), "timestamp", DateTimeUtil.getTimeStampUtc());
        try {
            this.mPubnub.publish(Constants.CHANNEL_NAME, JsonUtil.asJSONObject(message), new Callback() {
                @Override
                public void successCallback(String channel, Object message) {
                    MainActivity.this.runOnUiThread(new Runnable() {
                        @Override
                        public void run() {
                            mMessage.setText("");
                        }
                    });
                    try {
                        Log.v(TAG, "publish(" + JsonUtil.asJson(message) + ")");
                    } catch (Exception e) {
                        throw Throwables.propagate(e);
                    }
                }
                @Override
                public void errorCallback(String channel, PubnubError error) {
                    try {
                        Log.v(TAG, "publishErr(" + JsonUtil.asJson(error) + ")");
                    } catch (Exception e) {
                        throw Throwables.propagate(e);
                    }
                }
            });
        } catch (Exception e) {
            throw Throwables.propagate(e);
        }
    }
    private final void initPubNub() {
        this.mPubnub = new Pubnub(Constants.PUBLISH_KEY, Constants.SUBSCRIBE_KEY);
        this.mPubnub.setUUID(this.mUsername);
    }
    private final void initChannels() {
        try {
            this.mPubnub.subscribe(Constants.CHANNEL_NAME, this.mChatCallback);
        } catch (Exception e) {
            throw Throwables.propagate(e);
        }
        try {
            this.mPubnub.subscribe(Constants.PRESENCE_CHANNEL_NAME, this.mPresenceCallback);
        } catch (Exception e) {
            throw Throwables.propagate(e);
        }
        this.mPubnub.hereNow(Constants.CHANNEL_NAME, this.mPresenceCallback);
        this.mPubnub.history(Constants.CHANNEL_NAME, 200, this.mChatCallback);
    }
    private void disconnectAndCleanup() {
        getSharedPreferences(Constants.DATASTREAM_PREFS, MODE_PRIVATE).edit().clear().commit();
        if (this.mPubnub != null) {
            this.mPubnub.unsubscribe(Constants.CHANNEL_NAME);
            this.mPubnub.unsubscribe(Constants.CHANNEL_NAME);
            this.mPubnub.shutdown();
            this.mPubnub = null;
        }
        ...
        CookieSyncManager.createInstance(this);
        CookieManager cookieManager = CookieManager.getInstance();
        cookieManager.removeSessionCookie();
        Twitter.getSessionManager().clearActiveSession();
        Twitter.logOut();
    }
}
The 2 main UI event handlers are:
logout(): which processes a logout menu item click.publish(): which handles a message send button click.
The onCreateOptionsMenu() and onOptionsItemSelected() should look familiar toAndroid developers, it’s just initializing and handling menu clicks.
Similarly, onStop() and onDestroy() are handling the Android lifecycle events.
Ok, now that that’s out of the way, we can dive into the onCreate() method. Ittakes care of:
- Initializing the Twitter auth config.
- Initializing Fabric with the Twitter plugin.
- Ensuring that we are coming from the LoginActivity (or other activity) with the username preference set.
- Instantiating
Adapterinstances andCallbackinstances for Chat and Presence features. - Creating the Tab layout with Chat and Presence tabs.
- Initializing PubNub.
- Connecting our app to the PubNub Chat channel.
- Handling message publish events coming from the chat UI.
- Cleanly destroying resources during the important lifecycle events (or logout).
There are a couple of things worth mentioning in this code.
We call hereNow() and history() to bootstrap the presence and chatfeatures respectively. Make sure your PubNub application keys are configuredwith the Presence and Chat add-ons, or these features won’t work!
The last note is that Twitter auth uses a web view which doesn’t reset easily -we include some code to reset the web view CookieManager in the disconnectAndCleanup()code above.
ChatPojo
The Pojo classes are the most straightforward of the entire app – theyare just immutable objects that hold data values as they come in. We makesure to give them toString() , hashCode() , and equals() methods sothey play nicely with Java collections.
The ChatPojo contains three fields: sender, message and timestamp.
public class ChatPojo {
    private final String sender;
    private final String message;
    private final String timestamp;
    public ChatPojo(@JsonProperty("sender") String sender, @JsonProperty("message") String message, @JsonProperty("timestamp") String timestamp) {
        this.sender = sender;
        this.message = message;
        this.timestamp = timestamp;
    }
    public String getSender() {
        return sender;
    }
    public String getMessage() {
        return message;
    }
    public String getTimestamp() {
        return timestamp;
    }
    @Override public boolean equals(Object obj) { ... }
    @Override public int hashCode() { ... }
    @Override public String toString() { ... }
}
PresencePojo
The PresencePojo contains three fields: sender, presence value and timestamp.
In our case, we use the value of the three main PubNub presence event types for the presence value: “join”, “leave”, and “timeout.” We’ll translate these events to corresponding status (online/offline/etc) strings in the PresenceListAdapter .
( +PresencePojo+ code omitted for brevity’s sake )
ChatListRowUi
The ChatListRowUi object just aggregates the UI elements in achat list row. Right now, these just happen to be TextView instances.
public class ChatListRowUi {
    public TextView sender;
    public TextView message;
    public TextView timestamp;
}
PresenceListRowUi
The PresenceListRowUi object just aggregates the UI elements in achat list row. Right now, these just happen to be TextView instances.
( +PresenceListRowUi+ code omitted for brevity’s sake )
ChatTabFragment
The ChatTabFragment object takes care of instantiating the Chat taband hooking up the ChatListAdapter.
public class ChatTabFragment extends Fragment {
    private ChatListAdapter chatAdapter;
    @Override
    public View onCreateView(LayoutInflater inflater, ViewGroup container,
                             Bundle savedInstanceState) {
        View view = inflater.inflate(R.layout.fragment_chat, container, false);
        ListView listView = (ListView) view.findViewById(R.id.chat_list);
        listView.setAdapter(chatAdapter);
        return view;
    }
    public void setAdapter(ChatListAdapter chatAdapter) {
        this.chatAdapter = chatAdapter;
    }
}
PresenceTabFragment
Similarly, the PresenceTabFragment object takes care of instantiating the Presencetab and hooking up the PresenceListAdapter.
( +PresenceTabFragment+ code omitted for brevity’s sake )
ChatListAdapter
The ChatListAdapter follows the Android Adapter pattern, which is used to bridgedata between Java data collections and ListView user interfaces. In the case of PubNub,messages are coming in all the time, unexpected from the point of view of the UI. Theadapter is invoked from the ChatPnCallback class: when a chat message comes in, thecallback invokes ChatListAdapter.add() with a ChatPojo object containing the relevantdata.
In the case of the ChatListAdapter , the backing collection is a simple ArrayList ,so all the add() method has to do is:
- Add the item to the collection (actually prepend by doing
insert(0, value)). - Notify the UI thread that the data set changed (this must happen on the UI thread only!).
The getView() method is also straightforward – it uses View Tags to memorize the objects already instantiated. So within the body of the getView() method, we just need to:
- Find the Pojo for the specified list position.
- Create a new RowUi object if necessary, or find the one already associated with the object.
- Populate the RowUi object with the new data.
Not too bad!
public class ChatListAdapter extends ArrayAdapter<ChatPojo> {
    private final Context context;
    private final LayoutInflater inflater;
    private final List<ChatPojo> values = new ArrayList<>();
    public ChatListAdapter(Context context) {
        super(context, R.layout.list_row_chat);
        this.context = context;
        this.inflater = LayoutInflater.from(context);
    }
    @Override
    public void add(ChatPojo message) {
        this.values.add(0, message);
        ((Activity) this.context).runOnUiThread(new Runnable() {
            @Override
            public void run() {
                notifyDataSetChanged();
            }
        });
    }
    @Override
    public View getView(final int position, View convertView, ViewGroup parent) {
        ChatPojo dsMsg = this.values.get(position);
        ChatListRowUi msgView;
        if (convertView == null) {
            msgView = new ChatListRowUi();
            convertView = inflater.inflate(R.layout.list_row_chat, parent, false);
            msgView.sender = (TextView) convertView.findViewById(R.id.sender);
            msgView.message = (TextView) convertView.findViewById(R.id.message);
            msgView.timestamp = (TextView) convertView.findViewById(R.id.timestamp);
            convertView.setTag(msgView);
        } else {
            msgView = (ChatListRowUi) convertView.getTag();
        }
        msgView.sender.setText(dsMsg.getSender());
        msgView.message.setText(dsMsg.getMessage());
        msgView.timestamp.setText(dsMsg.getTimestamp());
        return convertView;
    }
    ...
}
PresenceListAdapter
The PresenceListAdapter also follows the Android Adapter pattern. This adapter is invoked from the PresencePnCallback class: when a presence event comes in, the callback invokes PresenceListAdapter.add() with a Presence Pojo object containing the relevant data.
In the case of the PresenceListAdapter , the backing collections are a little different. We use a simple ArrayList to hold the list of user names, and a Map<String, PresencePojo>to store a map of user names to PresencePojo values. We do this because there may be cases (such as tapping on a username) where we want to lookup the presence of a given username quickly, sothe Map instance will save us a lot of work.
One other aspect of presence is that we only store one line per user; in this application, it just makes sense to display the latest presence status in the presence tab. (You might imagine creating a more complex UI that has historical presence information.)
So given all the above, the add() method has to:
- Remove the existing items from the collections as appropriate (since we’re only keeping the latest value).
- Add the item to the collections (actually prepend by doing
insert(0, value)). - Notify the UI thread that the data set changed (this must happen on the UI thread only!).
The getView() method is similarly straightforward – it uses View Tags to memorize the objects already instantiated. So within the body of the getView() method, we just need to:
- Find the Pojo for the specified list position.
- Create a new RowUi object if necessary, or find the one already associated with the object.
- Populate the RowUi object with the new data.
For an extra level of usefulness, we include 2 methods for getting a human-friendly presence status (online/offline/idle) and color. In a real-world Android app, the actual values would probably be better stored in the appropriate externalized XML resource file.
public class PresenceListAdapter extends ArrayAdapter<PresencePojo> {
    private final Context context;
    private final LayoutInflater inflater;
    private final List<String> presenceList = new ArrayList<>();
    private final Map<String, PresencePojo> latestPresence = new LinkedHashMap<>();
    public PresenceListAdapter(Context context) {
        super(context, R.layout.list_row_presence);
        this.context = context;
        this.inflater = LayoutInflater.from(context);
    }
    @Override
    public void add(PresencePojo message) {
        if (latestPresence.containsKey(message.getSender())) {
            this.presenceList.remove(message.getSender());
        }
        this.presenceList.add(0, message.getSender());
        latestPresence.put(message.getSender(), message);
        ((Activity) this.context).runOnUiThread(new Runnable() {
            @Override
            public void run() {
                notifyDataSetChanged();
            }
        });
    }
    @Override
    public View getView(final int position, View convertView, ViewGroup parent) {
        String sender = this.presenceList.get(position);
        PresencePojo presenceMsg = this.latestPresence.get(sender);
        PresenceListRowUi msgView;
        if (convertView == null) {
            msgView = new PresenceListRowUi();
            convertView = inflater.inflate(R.layout.list_row_presence, parent, false);
            msgView.sender = (TextView) convertView.findViewById(R.id.sender);
            msgView.presence = (TextView) convertView.findViewById(R.id.value);
            msgView.timestamp = (TextView) convertView.findViewById(R.id.timestamp);
            convertView.setTag(msgView);
        } else {
            msgView = (PresenceListRowUi) convertView.getTag();
        }
        msgView.sender.setText(presenceMsg.getSender());
        msgView.presence.setText(getPresenceText(presenceMsg.getPresence()));
        msgView.presence.setTextColor(getPresenceColor(presenceMsg.getPresence()));
        msgView.timestamp.setText(presenceMsg.getTimestamp());
        return convertView;
    }
    private String getPresenceText(String presenceEvent) {
        switch (presenceEvent) {
            case "join":
                return "online";
            case "leave":
                return "away";
            case "timeout":
                return "idle/disconnected";
            default:
                return "";
        }
    }
    private int getPresenceColor(String presenceEvent) {
        switch (presenceEvent) {
            case "join":
                return Color.rgb(0x00, 0x90, 0x00);
            case "leave":
                return Color.rgb(0x90, 0x90, 0x00);
            case "timeout":
                return Color.DKGRAY;
            default:
                return Color.BLACK;
        }
    }
    ...
}
ChatPnCallback
The ChatPnCallback is the bridge between the PubNub client and our application logic. In this application, we omit the handlers for error, connect, disconnect and reconnect events that a real-world application would want to pay attention to. In the callback below, the most interesting code is in the successCallback() code.It takes an inbound messageObject object and turns it into a Pojo value that is forwarded on to the ChatListAdapter instance.
In the case of PubNub publish/subscribe messaging (our example chat), that message may take one of two forms: a single JSONObject message (in the event of channel subscription),or a JSONArray of message objects (in the event of a PubNub history() call).
In either case, we extract the relevant fields from the structured data object and pass along one or more ChatPojo objects to our trusty ChatListAdapter .
public class ChatPnCallback extends Callback {
    private static final String TAG = ChatPnCallback.class.getName();
    private final ChatListAdapter chatListAdapter;
    public ChatPnCallback(ChatListAdapter presenceListAdapter) {
        this.chatListAdapter = presenceListAdapter;
    }
    @Override
    public void successCallback(String channel, Object messageObject) {
        try {
            Log.v(TAG, "message(" + JsonUtil.asJson(messageObject) + ")");
        } catch (Exception e) {
            throw Throwables.propagate(e);
        }
        try {
            if (messageObject instanceof JSONObject) {
                chatListAdapter.add(messageToPojo((JSONObject) messageObject));
            } else if (messageObject instanceof JSONArray) {
                JSONArray values = (JSONArray) ((JSONArray) messageObject).get(0);
                for (int i = 0; i < values.length(); i++) {
                    chatListAdapter.add(messageToPojo((JSONObject) values.get(i)));
                }
            }
        } catch (Exception e) {
            throw Throwables.propagate(e);
        }
    }
    private ChatPojo messageToPojo(JSONObject messageObject) throws Exception {
        Map<String, Object> chatMessage = JsonUtil.fromJSONObject(messageObject, LinkedHashMap.class);
        String sender = (String) chatMessage.get("sender");
        String message = (String) chatMessage.get("message");
        String timestamp = (String) chatMessage.get("timestamp");
        ChatPojo chat = new ChatPojo(sender, message, timestamp);
        return chat;
    }
    ...
    // error, connect, disconnect and reconnect callbacks omitted for conciseness
    ...
}
PresencePnCallback
The PresencePnCallback is the other bridge between the PubNub client and our application logic. In this application, we omit the handlers for error, connect, disconnect and reconnect events that a real-world application would want to pay attention to. In the callback below, the most interesting code is in the successCallback() code.It takes an inbound message object and turns it into a Pojo value that is forwarded on to the PresenceListAdapter instance.
In the case of PubNub presence events (our example buddy list), that message may take one of two forms: a JSONObject message that contains a single “uuid” field(in the case of presence events), or a “uuids” field with a JSONArray of String uuids(in the case of a PubNub hereNow() call).
In either case, we extract the relevant fields from the structured data object and pass along one or more PresencePojo objects to our trusty PresenceListAdapter .
public class PresencePnCallback extends Callback {
    private static final String TAG = PresencePnCallback.class.getName();
    private final PresenceListAdapter presenceListAdapter;
    public PresencePnCallback(PresenceListAdapter presenceListAdapter) {
        this.presenceListAdapter = presenceListAdapter;
    }
    @Override
    public void successCallback(String channel, Object message) {
        try {
            Log.v(TAG, "presenceP(" + JsonUtil.asJson(message) + ")");
        } catch (Exception e) {
            throw Throwables.propagate(e);
        }
        try {
            Map<String, Object> presence = JsonUtil.fromJSONObject((JSONObject) message, LinkedHashMap.class);
            List<String> uuids;
            if (presence.containsKey("uuids")) {
                uuids = (List<String>) presence.get("uuids");
            } else {
                uuids = Arrays.asList((String) presence.get("uuid"));
            }
            for (String sender : uuids) {
                String presenceString = presence.containsKey("action") ? (String) presence.get("action") : "join";
                String timestamp = DateTimeUtil.getTimeStampUtc();
                PresencePojo pm = new PresencePojo(sender, presenceString, timestamp);
                presenceListAdapter.add(pm);
            }
        } catch (Exception e) {
            throw Throwables.propagate(e);
        }
    }
    ...
    // error, connect, disconnect and reconnect callbacks omitted for conciseness
    ...
}
And… that’s about it! Hopefully this gives a good idea of what all the code in the sample application is for. There’s just a few more code snippets we’ll pass along for advanced users who want to dive deeper intoTwitter Authentication using Fabric.
Using Fabric for Twitter Auth
With Fabric, integrating the Twitter API was super simple. Just in case you want to learn more, we’ll outline some of the additional code snippets you can use with Twitter Auth in your Android application.
Login
We’ve already seen the code for setting up the login button in the LoginActivity .
loginButton = (TwitterLoginButton) findViewById(R.id.twitter_login_button);
loginButton.setCallback(new Callback<TwitterSession>() {
    @Override
    public void success(Result<TwitterSession> result) {
        ...
    }
    @Override
    public void failure(TwitterException exception) {
        ...
    }
});
If you’d prefer to trigger the login from a different event (not the Twitter button),you can do so as follows:
Twitter.logIn(activity, callback);
In the code above:
- activity is the
Activitycontext (the parent Android activity). - callback is a
Callbackinstance (to receive the result of the auth flow).
This code will instantiate a new web view that goes through the auth flow and gives control to the callback method as appropriate.
Getting the TwitterSession
If your app ever needs to examine the active session, it can do so as follows:
TwitterSession session = Twitter.getSessionManager().getActiveSession();
TwitterAuthToken authToken = session.getAuthToken();
This information can be used to make Twitter API requests from the application. In addition, Twitter supports OAuth Echoto send user credentials to your backend services in a trustworthy way.
Logout
Logout is easy, we just clear the Twitter auth session via the session manager. Clearing out the attributes is a little trickier though (since the Twitter auth feature uses a web view that can save cookies, preventing login as a different user).
CookieSyncManager.createInstance(this);
CookieManager cookieManager = CookieManager.getInstance();
cookieManager.removeSessionCookie();
Twitter.getSessionManager().clearActiveSession();
Twitter.logOut();
Hopefully that code will get easier in a future SDK release!
Validate
One thing worth mentioning – the Twitter code will return a user session,but how can we trust the results? In a malicious case, the app may be running in a debugger where the user is tinkering with values. We wouldn’t want our backend to get “tricked” by bad information coming from malicious spoofed user requests! To cover this case, the Twitter API provides authHeaders that can be used to validate the OAuth token on the user side and retrieve the user’s profile details directly from Twitter for cross-checking. For any app with an important backend, you’ll want to do something as follows:
URL url = new URL("https://your_backend/check_credentials.json");
HttpsURLConnection connection = (HttpsURLConnection)url.openConnection();
connection.setRequestMethod("GET");
// Add OAuth Echo headers to request
for (Map.Entry<String, String> entry : authHeaders.entrySet()) {
  connection.setRequestProperty(entry.getKey(), entry.getValue());
}
// Perform HTTP request to backend, which in turn calls Twitter verify_credentials endpoint
connection.openConnection();
Phew! That’s a lot better. And safer!
Conclusion
Thank you so much for staying with us this far! Hopefully it’s been a useful experience. The goal was to hopefully convey our experience in how to build an app that:
- Log in with Twitter auth.
- Send chat messages to a PubNub channel.
- Display current and historical chat messages.
- Display a list of what users are online.
If you’ve been successful thus far, you shouldn’t have any trouble extending the app to any of your realtime data processing needs.
Stay tuned, and please reach out anytime if you feel especially inspired or need any help!
If you are interested in more information about using Twitter Fabric with PubNub please see the recording of our Twitter Fabric webinar with a member of the Fabric team at Twitter.
This post is part of a series. Here is the previous tutorial: Building Realtime Android Apps with PubNub’s Presence.


