IN THIS ARTICLE
In a highly competitive app market, the main thing that keeps your app on top is how it handles user experience. Delivering a better user experience, you can increase user engagement and improve the feeling a user has when using your application. Push notifications are one way to do this.
Let’s see how we can integrate push notifications into our iOS app. Specifically, we’ll be covering how to integrate push notifications with Apple Push Notifications Service (APNs).
Setting Up PubNub
With the new APNS 2 update, it makes it easier for us to send push notifications and maintain our application since we wouldn’t have to update device ID’s each time our app version is updated. The best way to get the token is by following the steps laid out here.
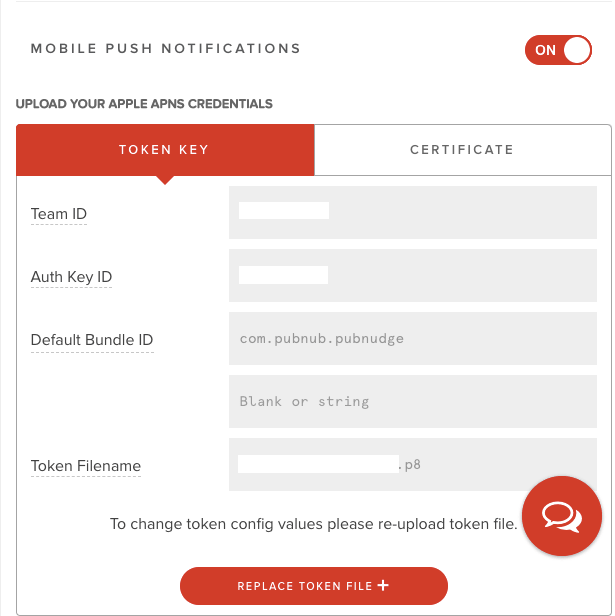
Once we have the token, we can go ahead and upload that into where we have the application add-ons once we click into our key set.
Once we upload our .p8 token file, we can fill in our unique team, auth, and bundle IDs. That’s it, we’re set up on the PubNub side!
Make sure that your environment for your apple credentials are set to the same as the token you provided right above!
Swiftly Code Some Swift
Alright, let’s head over to Xcode and create a new project. In the directory of the project, let’s open a terminal and run the following command.
- touch podfile
Then add the following code to the podfile, so that we can have the PubNub iOS SDK available for import in our application.
- source 'https://github.com/CocoaPods/Specs.git'
- # optionally complete and uncomment if compilation issues arise
- # project '<path to project relative to this Podfile>/<name of project without extension>'
- # workspace 'MyPubNubProject'
- use_frameworks!
- target 'application-target-name' do
- # Should only use this with projects
- # that must have a minimum deployment
- # target of iOS 8
- platform :ios, '8.0' # (or '9.0' or '10.0')
- pod "PubNub", "~> 4"
- end
Note: this only works for iOS 8 and above. for previous versions, look at this documentation for reference.
Now we can go ahead and install the pods by running the command pod install. After adding PubNub to our project, we’ll see in the terminal that they recommend that we use the new Xcode project file and reopen our project. So let’s go ahead and do that.
Once that’s done we can configure our AppDelegate.swift so that it’s ready to receive push notifications. At the top of the file, let’s make sure we have the following imports.
- import PubNub
- import UserNotifications
Then we can add the PNObjectEventListener to the class declaration and also initialize the PubNub Object. Make sure you get your forever free PubNub API Keys and paste them in the code.
- class AppDelegate: UIResponder, UIApplicationDelegate, PNObjectEventListener {
- var window: UIWindow?
- lazy var client: PubNub = {
- let config = PNConfiguration(publishKey: "YOUR_PUBLISH_KEY_HERE", subscribeKey: "YOUR_SUBSCRIBE_KEY_HERE")
- config.stripMobilePayload = false
- let pub = PubNub.clientWithConfiguration(config)
- return pub
- }()
- }
We can also add registerForPushNotifications() to our main application function.
- func application(_ application: UIApplication, didFinishLaunchingWithOptions launchOptions: [UIApplication.LaunchOptionsKey: Any]?) -> Bool {
- // Override point for customization after application launch.
- registerForPushNotifications()
- return true
- }
Lastly, we’ll need to have some functions to the end of our AppDelegate that will allow our app to receive Push Notifications from APNS, and also get the device token so that we could send it to PubNub.
- func registerForPushNotifications() {
- UNUserNotificationCenter.current().delegate = self
- UNUserNotificationCenter.current().requestAuthorization(options: [.alert, .sound, .badge]) {
- (granted, error) in
- print("Permission granted: \(granted)")
- guard granted else { return }
- self.getNotificationSettings()
- }
- }
- func getNotificationSettings() {
- UNUserNotificationCenter.current().getNotificationSettings { (settings) in
- print("Notification settings: \(settings)")
- guard settings.authorizationStatus == .authorized else { return }
- DispatchQueue.main.async(execute: {
- UIApplication.shared.registerForRemoteNotifications()
- })
- }
- }
- func application(_ application: UIApplication,
- didRegisterForRemoteNotificationsWithDeviceToken deviceToken: Data) {
- UserDefaults.standard.set(deviceToken, forKey: "deviceToken")
- self.client.addPushNotificationsOnChannels(["cash"],
- withDevicePushToken: deviceToken,
- andCompletion: { (status) in
- if !status.isError {
- // Handle successful push notification enabling on passed channels.
- }
- else {
- /**
- Handle modification error. Check 'category' property
- to find out possible reason because of which request did fail.
- Review 'errorData' property (which has PNErrorData data type) of status
- object to get additional information about issue.
- Request can be resent using: status.retry()
- */
- }
- })
- }
- func application(_ application: UIApplication,
- didFailToRegisterForRemoteNotificationsWithError error: Error) {
- print("Failed to register: \(error)")
- }
You’re probably wondering what’s really going on here? Well, to simplify, we’re first asking the user if we could send push notifications in the registerForPushNotifications function. The getNotificationSettings function is then making sure the setting is enabled, and if it is, it will get the notifications.
The application function then gets our device token and sends it to PubNub. this allows PubNub to be able to know which devices should get the notification.
Now the last thing we’ll need to add to the AppDelegate.swift file will be the ability to show the notification on the device itself.
- extension AppDelegate: UNUserNotificationCenterDelegate {
- func userNotificationCenter(_ center: UNUserNotificationCenter, willPresent notification: UNNotification, withCompletionHandler completionHandler: @escaping (UNNotificationPresentationOptions) -> Void) {
- completionHandler(.alert)
- }
- }
Now let’s look at the front end. Here we’re going to make it really simple and just add a button that will publish a push notification every time we press it. Once the button is created, we can make a function for when it’s pressed. At the end, our ViewController.swift should look like this.
- import UIKit
- import PubNub
- class ViewController: UIViewController, PNObjectEventListener {
- override func viewDidLoad() {
- super.viewDidLoad()
- // Do any additional setup after loading the view, typically from a nib.
- }
- @IBAction func btnPushNotif(_ sender: Any) {
- guard let appDelegate = UIApplication.shared.delegate as? AppDelegate else {
- fatalError("Where is our app delegate")
- }
- let payloads = ["aps" : ["alert" : "Push Notification sent through PubNub!"]]
- appDelegate.client.publish("Test", toChannel: "cash", mobilePushPayload: payloads,
- withCompletion: { (status) in
- print("\(status.debugDescription)")
- })
- }
- }
If you’ve worked with PubNub before, the code above should look fairly straightforward.
We define a payload that will be in our mobilePushPayload that we publish to PubNub. In that payload, we give the identifier of which platform it will go to, in this case, APNS, and inside of that, we’ll define the object which has our alert message. This object could contain other info as well. You can find the info here.
That’s it! We should not have push notifications working on iOS. Feel free to download from the GitHub repository that’s located over here.


