
IN THIS ARTICLE
Welcome back to part two of three of our series on building Android beacon technology! In this part, we’ll build the Android iBeacon detector (aka the ‘listener’ or ‘observer’). We’ll then show you how to build the Android beacon emitter (aka the ‘publisher’) in part three.
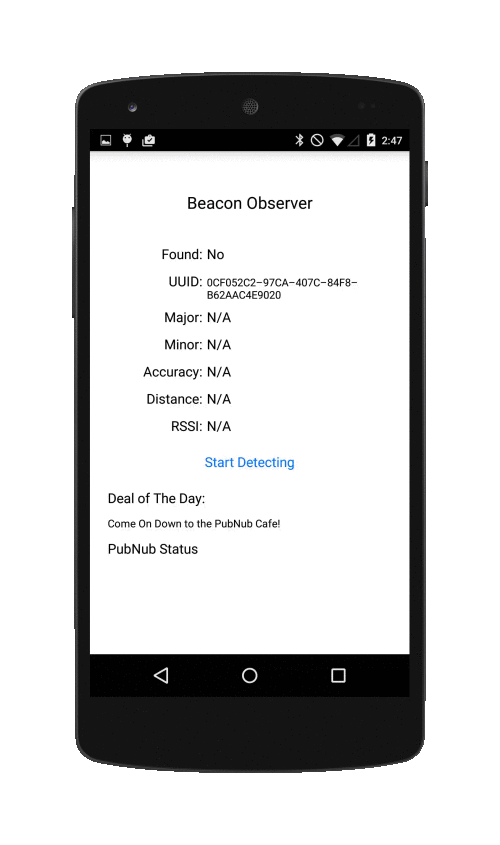
In this article, we’ll create a working example that detects Beacons with an Android Phone. Note that the device must be running Android 5.0 Lollipop and have a compatible Bluetooth chip.
But we won’t stop at beacon detection, we want to make our beacon smarter! Our sample app will be using PubNub to establish a two-way communication between the beacon and our smart phone! Check out our series overview on building smarter beacons for Android, iOS, and Tessel here to learn more.
In our overview, we showed you how the beacon’s advertised data is organized in order to comprehend some key lines of code from this tutorial.
Setting up the ScanFilter and the ScanSettings
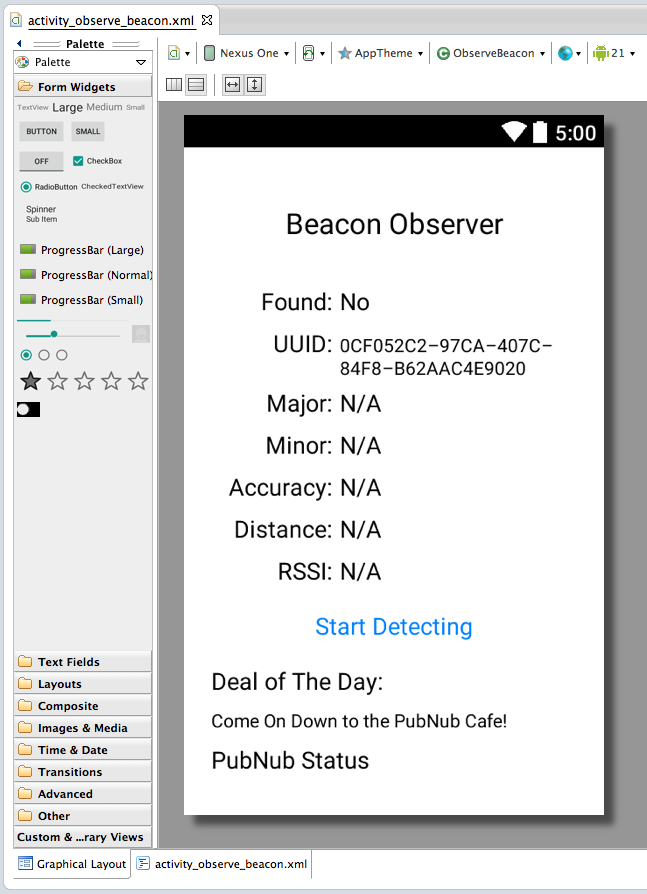
In the scope of this article, we’re not going to focus on building the UI, and trust that you will be able to make a beautiful one of your own. So for the sake of simplification, we will run most of our code from the onCreate method of our main activity.
The first thing you’ll want to do is add BLUETOOTH and BLUETOOTH ADMIN permissions to your android manifest. Then in your onCreate method, you will instantiate a Bluetooth LE Adapter and a Bluetooth LE Scanner as described in an overview of the package.
From our onCreate method we will set the Scan Setting and the Scan Filter:
We create the manufacturer data array which contains a template of what scan records should be detected by the scanner. The Mask allows us to define precisely which bytes from the template should match with detected scan records. Ones represent mandatory bytes, zeros for the rest.
We set some settings, this is fairly self explanatory.
That’s the only preliminary work you need to achieve! Now we are good to go, we can start the scanner:
At this point you noticed that we put a Scan Callback in our parameters. We will need to implement it!
Building the ScanCallback for the Android BluetoothLE Package
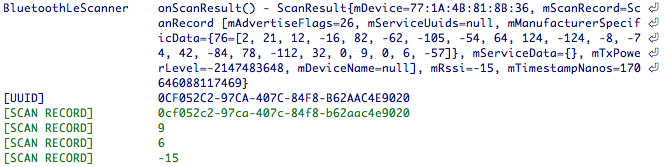
There are two other methods in the callback you can override, for the sake of simplicity we will only look into the most important one. This method is called every time your device detects a beacon containing the manufacturer data you set, i.e. the UUID of your organization. We need to extract the information from the callback. Here we extracted the scan record and the intensity of the received signal, the RSSI.
The manufacturer specific data is extracted for a given company identifier, in this example 224 is the official bluetooth google company identifier. It is represented as an array of integers. All you need to do now is extract the first 2 bytes to make sure they match your protocol. The 16 following ones will be your UUID, the 2 next your major, 2 more for your minor, and finally your tx power / reference RSSI.
And there you go, you already have access to most of the data you want.
As mentioned in the series overview explaining how the beacon protocol works, we will have to build a method which computes the distance to the beacon based on the intensity of the signal received and the reference RSSI sent inside the advertised data. We will use AltBeacon’s algorithm.
There isn’t much explaining to do. This algorithm was determined experimentally, you’ll need to use it as is to compute the distance to the beacon.
The next step is to classify the distance into “Immediate”, “Near” and “Far” zones:
And that’s it! You have everything you need to detect your Beacon!
Now let’s get to the most interesting part: creating a two way communication between the beacon and your phone!
Use PubNub to Make Smarter Beacons
The first thing you’ll want to do is import pubnub in your build path! Grab the PubNub Android Java SDK here, and see how to get started.
Also, add the INTERNET permission:
Our Activity will have a PubNub variable which we will initialize on create, like so:
When the connection to PubNub is initialized, you need a publish and a subscribe key.
To get your unique pub/sub keys, you’ll first need to sign up for a PubNub account. Once you sign up, you can get your unique PubNub keys in the PubNub Developer Dashboard. Our free Sandbox tier should give you all the bandwidth you need to build and test your app with the PubNub API.
All we have to do is subscribe to the channel that is advertised by the detected beacon when we are at “Immediate” distance from the beacon.
We trigger the subscription only once and only when we are close enough. We can define a pubnub callback which will be called when a message is sent to the channel:
And that’s it! We’ll finish off our project with the Android beacon emitter (publisher) tutorial, and we’ll be good to go!
Try PubNub today!


