

IN THIS ARTICLE
On-demand services rely on communicating data in realtime and matching supply and demand optimally. This business model lives across a massive number of applications today: rideshare apps (Uber, Lyft and Grab), food and general delivery (Postmates and Instacart), gig economy services (TaskRabbit and Gigwalk), freelancing (Freelancer and Upwork), courier services, education (Udemy), emerging self-driving car networks, and online rental systems (Airbnb).
To learn more about the on-demand economy, read this great overview of the on-demand economy, sharing economy, and gig economy.
A common technological theme across all these on-demand applications is realtime communication. From live mapping, to chat, to alerts and notifications, to payments, seamless realtime connectivity is key to delivering the interactive and efficient on-demand experience users expect.
In this tutorial, we’ll focus on the ridesharing use case. We’ll build an Uber/Lyft clone, including UI/UX, ride-hailing and dispatch, realtime mapping, chat, and push notifications for instant alerts.
The full GitHub repo for this project is available here.
User Experience (UX) for a Rideshare App
Let’s begin by planning what the customer journey will look like for users of our app. In this case, we’ve got two personas: the customer who is requesting the service (passenger), and the service provider who is fulfilling it (driver).
We will look into the passenger’s user experience first. This skeleton will allow us to build out the features of the app and ultimately tie it together to build our own on-demand ridesharing app.
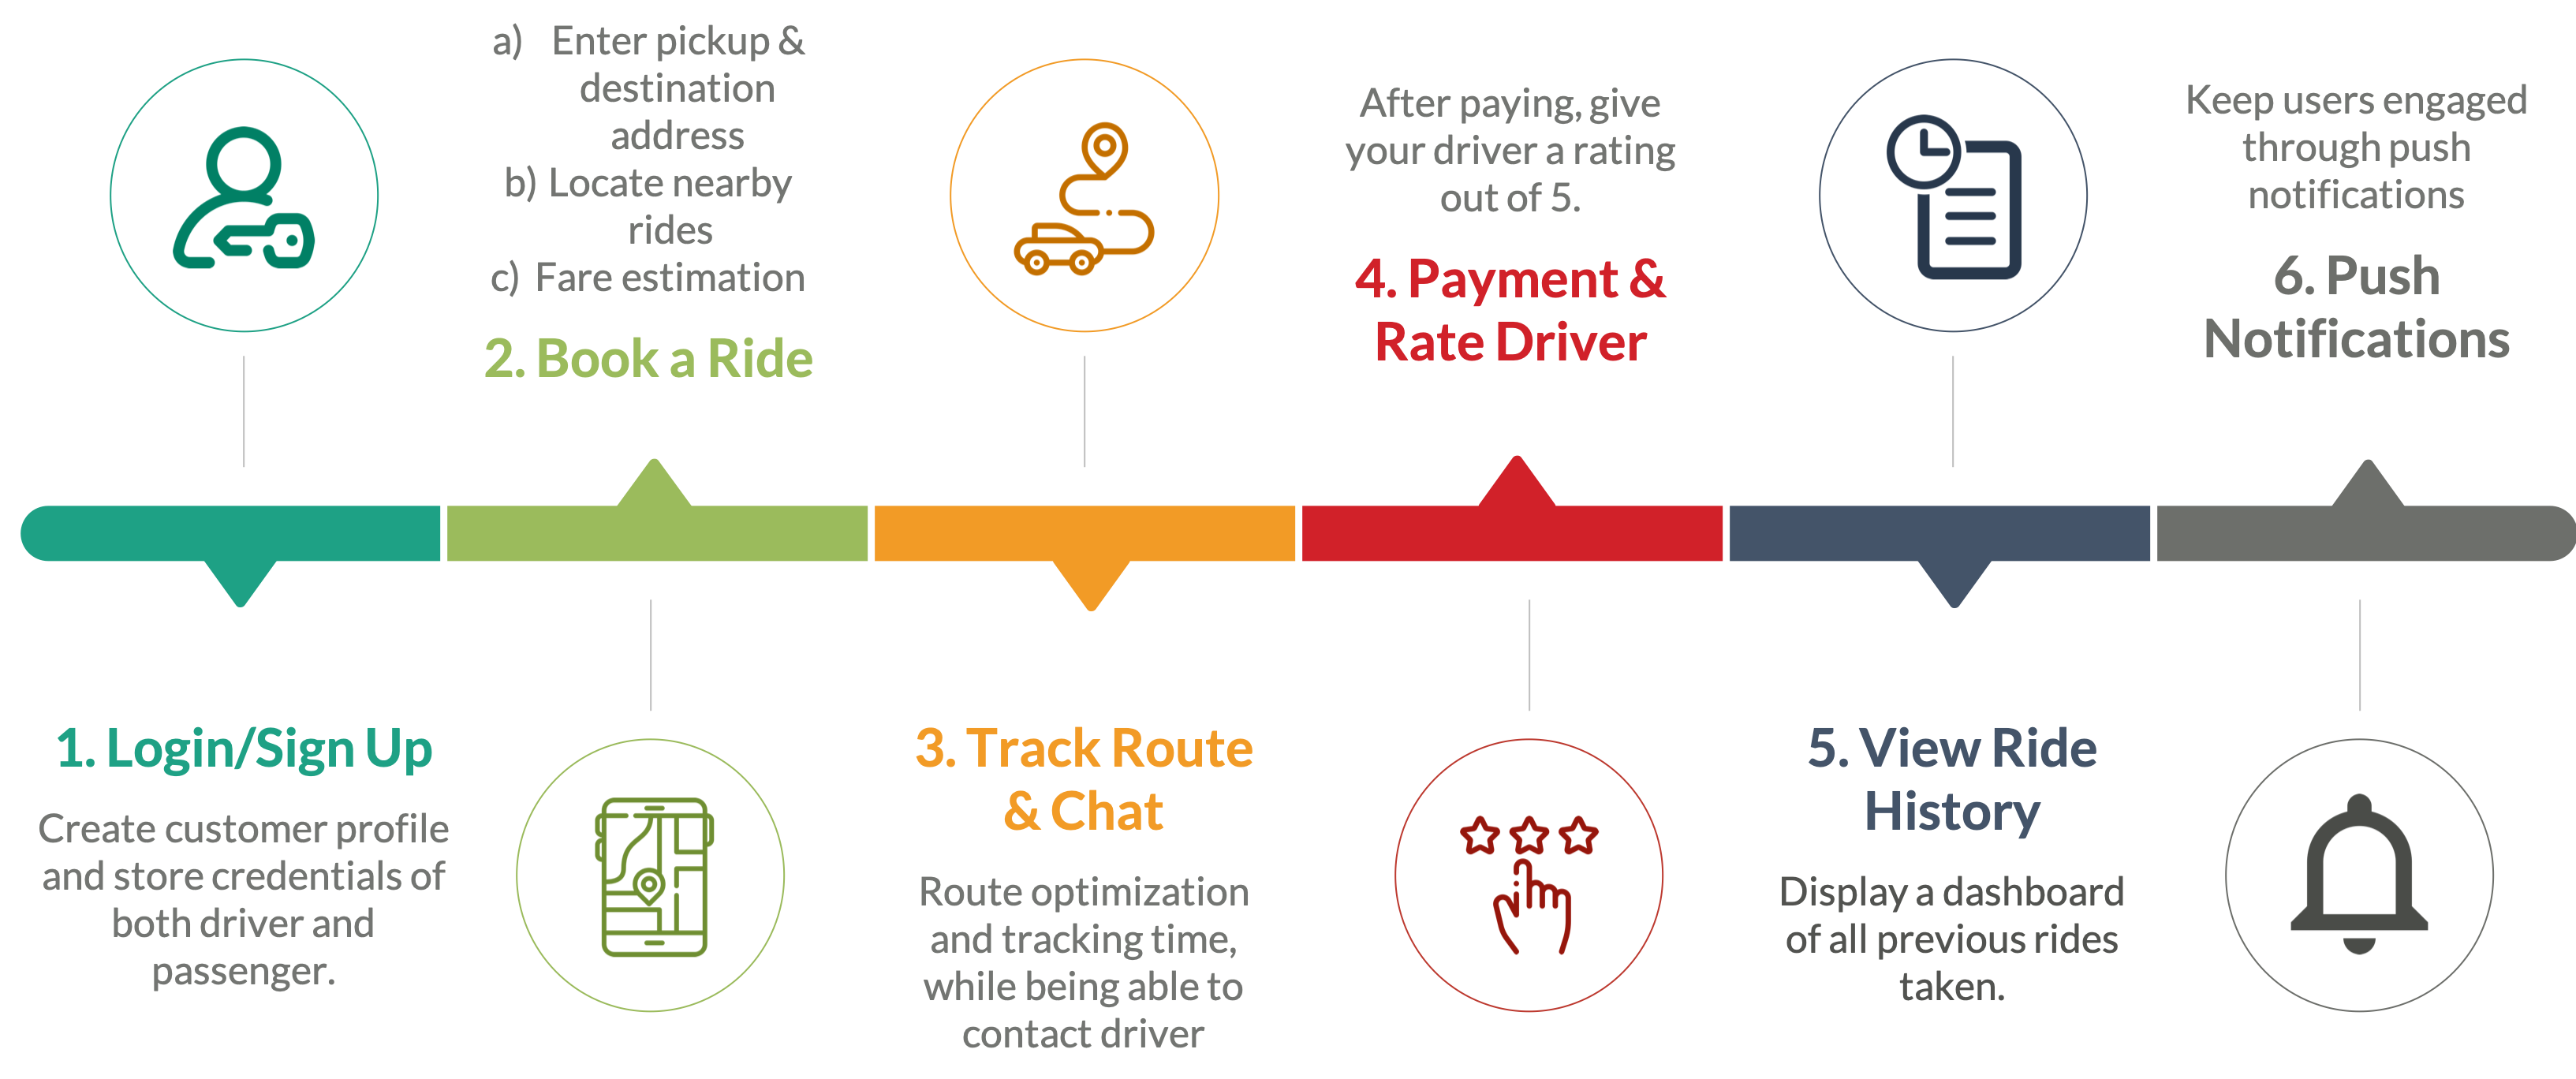
Our UX is designed around a basic Android app that puts drivers and passengers onto a shared network, or channel, allows them to book a driver, and draws an optimal route between the location of the nearest pair in realtime.
Setup
To get set up, create a PubNub account and start with a new app. You’ll need to obtain your API keys to enable Pub/Sub Messaging.
You will also need to create a Google Cloud Platform account to use the Google Maps APIs, which will power a large portion of the app. After creating a new project, enable the Google Maps Android SDK API and the Directions API from the API manager (Menu->APIs & Services->Enable APIs and Services).
Note: you will need to enable billing on your account in order for the Directions API to work (which will power the routes between driver and passenger). You can obtain your keys from the Credentials tab (Create credentials -> API key), and along with your PubNub keys, store them in the Constants.java file. Include your Google Maps API key in AndroidManifest.xml.
In terms of development, we will be using Android Studio with Google Play Services enabled. Add the following gradle dependencies, if not already present, in your app build.gradle:
implementation 'com.android.support:appcompat-v7:27.1.1'
implementation 'com.android.support.constraint:constraint-layout:1.1.3'
testImplementation 'junit:junit:4.12'
androidTestImplementation 'com.android.support.test:runner:1.0.2'
androidTestImplementation 'com.android.support.test.espresso:espresso-core:3.0.2'
implementation 'com.google.android.gms:play-services-maps:12.0.1'
implementation 'com.google.android.gms:play-services:12.0.1'
implementation 'com.android.support:multidex:1.0.3'
implementation 'com.github.ar-android:DrawRouteMaps:1.0.0'
implementation 'com.android.support:design:27.1.1'
implementation 'com.android.support:cardview-v7:27.1.1'
implementation 'de.hdodenhof:circleimageview:2.2.0'
implementation 'com.android.support:recyclerview-v7:27.1.1'
implementation 'nl.psdcompany:duo-navigation-drawer:2.0.8'
implementation group: 'com.pubnub', name: 'pubnub-gson', version: '4.12.0'
implementation group: 'com.fasterxml.jackson.core', name: 'jackson-core', version: '2.9.2'
implementation group: 'com.fasterxml.jackson.core', name: 'jackson-annotations', version: '2.9.2'
implementation group: 'com.fasterxml.jackson.core', name: 'jackson-databind', version: '2.9.2'
implementation 'com.github.jd-alexander:library:1.1.0'
Rideshare App Software Architecture
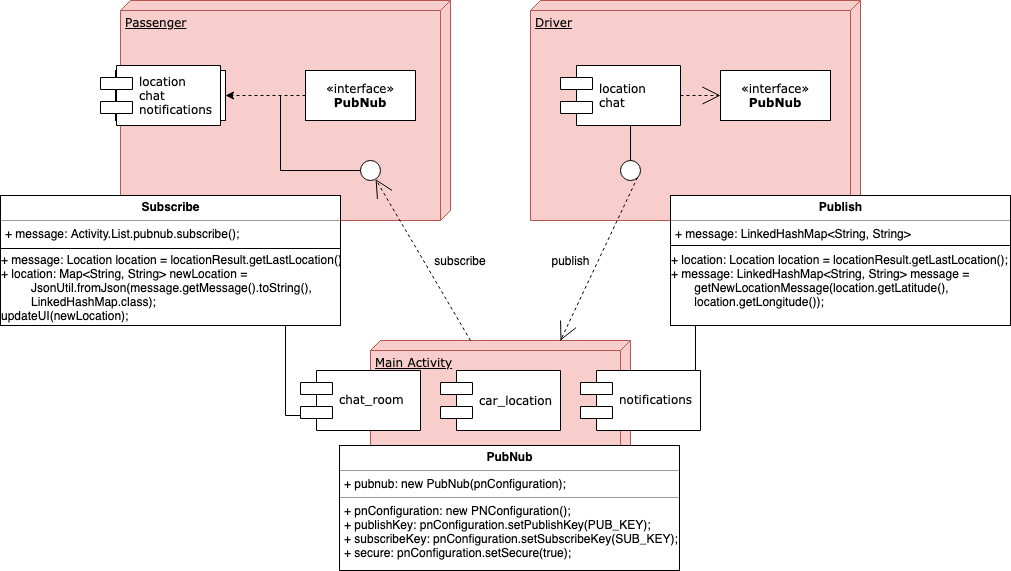
Before we jump into the code, let’s take a look at the overall software architecture of the app.
The Main Activity (or Activity_List.java in the repo) will hold the PubNub instance and instantiate it. This will be the home of the three PubNub channels we create. The driver side will then publish the location messages through PubNub in a LinkedHashMap. The Passenger will be subscribed to the channels with listeners for messages in the various channels, allowing it to have access to real-time messages over those respective channels.
Requesting GPS Location Permissions using Google Maps
An important piece to have geo-tracking work and location messages to be actively communicated is to ensure both devices have provided permissions to share location and that the Android app has access to it. The following Google Maps packages are required to request location:
import android.content.pm.PackageManager;
import android.location.Location;
import android.os.Bundle;
import android.support.v4.app.ActivityCompat
import android.support.v4.content.ContextCompat;
We also need to include the access permissions in our AndroidManifest.xml.
    <uses-permission android:name="android.permission.ACCESS_FINE_LOCATION" />
    <uses-permission android:name="android.permission.ACCESS_COARSE_LOCATION" />
    <uses-permission android:name="android.permission.ACCESS_NETWORK_STATE" />
    <uses-permission android:name="android.permission.INTERNET" />
This is where we include our Google Maps API key. Replace YOUR_GOOGLE_API_KEY with the API keys you obtained earlier.
        <meta-data
            android:name="com.google.android.geo.API_KEY"
            android:value="YOUR_GOOGLE_API_KEY" />
When the app is instantiated, we can check whether permission is granted. If it isn’t, we can prompt the user to share location with the following lines in your main activity:
if (ContextCompat.checkSelfPermission(this, Manifest.permission.ACCESS_FINE_LOCATION)
        == PackageManager.PERMISSION_GRANTED)
    mMap.setMyLocationEnabled(true);
else
    ActivityCompat.requestPermissions(
        this, new String[]{Manifest.permission.ACCESS_FINE_LOCATION},
    PERMISSIONS_REQUEST_ACCESS_FINE_LOCATION);
This should prompt the following window on app launch:

In-App Realtime Geolocation Tracking
Note: you can find the full source code for this section in Activity_List.java in the GitHub repo.
PubNub will allow both drivers and passengers to communicate their location with each other in realtime.
The following packages are required:
import com.pubnub.api.PNConfiguration;
import com.pubnub.api.PubNub;
import com.pubnub.selfdrivingdemo.util.Constants;
Instantiate PubNub in the main activity:
private void initPubnub() {
    PNConfiguration pnConfiguration = new PNConfiguration();
    pnConfiguration.setSubscribeKey(Constants.PUBNUB_SUBSCRIBE_KEY);
    pnConfiguration.setPublishKey(Constants.PUBNUB_PUBLISH_KEY);
    pnConfiguration.setSecure(true);
    pubnub = new PubNub(pnConfiguration);
}
That’s it! With a few lines of code, PubNub is ready to power your app. We will use it to seamlessly subscribe to a channel and publish our location data to it.
Creating the Driver App
Note: you can find the full source code for this section in DriverActivity.java in the repo.
Let’s focus on the driver side first, as it is more straightforward. We will use an Android device to proxy as a beacon for the car, but as seen in this Raspberry Pi GPS tracking tutorial, any device can be used, including the car itself. The important functionality from the driver is to continuously publish location data so that the rideshare network is aware of all cars at all times.
A LinkedHashMap data structure will be used to store the location GPS coordinates in terms of latitude and longitude.
LinkedHashMap<String, String>
To get an updated state of the device’s current location, we can use the mFusedLocationClient class provided by Google Maps API.
mFusedLocationClient = LocationServices.getFusedLocationProviderClient(this);
locationRequest = LocationRequest.create();
Every few seconds, we can make this location request and publish the data to a shared channel, car_location. This can be done by creating a request every second through LocationRequest with PRIORITY_HIGH_ACCURACY. It is important to note that while this method returns the most accurate location, it may consume more battery.
To publish a message over PubNub, the following simple structure is used:
Activity_list.pubnub.publish()
        .message(message)
        .channel(Constants.PUBNUB_CHANNEL_NAME)
        .async(new PNCallback<PNPublishResult>() {
            @Override
            public void onResponse(PNPublishResult result, PNStatus status) {
                // handle publish result, status always present, result if successful
                // status.isError() to see if error happened
                if (!status.isError()) {
                    System.out.println("pub timetoken: " + result.getTimetoken());
                }
                System.out.println("pub status code: " + status.getStatusCode());
            }
        });
By running this logic through a loop, we are able to get access to the location of the car in realtime on the car_locationchannel.
Creating the Passenger (Customer) App
Note: you can find the full source code for this section in Home.java in the repo.
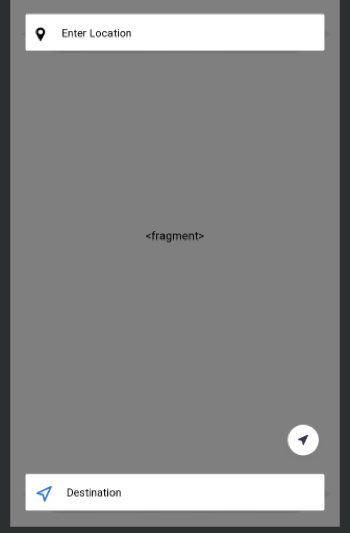
Now that the infrastructure and driver side is set up, let’s lay out the interface for the passenger app.
This map will serve as the activity in which the customers are able to call for a ride and see the location of nearby drivers. They will also be able to input the pickup location.
To do this, add a new Google Maps Activity from New->Activity. After inputting your Google Maps API key, the next step is to generate a Google map instance within the onCreate() event. To generate the UI for the map view, the Activity will call SupportMapFragment and initialize a map.
You should see these lines:
MapFragment mapFragment = (MapFragment) getFragmentManager()
        .findFragmentById(R.id.googleMap);
mapFragment.getMapAsync(this);
private GoogleMap mGoogleMap; // object that represents googleMap and allows us to use Google Maps API features
At this point, you will see an interface with a map built for you when you run your app. After the map is ready, we can begin adding functionality. This can be done from the onMapReady()function. Here, you can adjust the default values of the marker.
We will now subscribe to the PubNub channel we created and call a function whenever we receive a message. To subscribe to the channel, simply add the following lines:
Activity_list.pubnub.subscribe()
        .channels(Arrays.asList(Constants.PUBNUB_CHANNEL_NAME)) // subscribe to channels
        .execute();
Whenever we receive a message updating the location of the driver, we can update the UI of the new car location.
public void message(PubNub pub, final PNMessageResult message) {
    runOnUiThread(new Runnable() {
        @Override
        public void run() {
            try {
                Map<String, String> newLocation = JsonUtil.fromJson(message.getMessage().toString(), LinkedHashMap.class);
                updateUI(newLocation);
            } catch (Exception e) {
                e.printStackTrace();
            }
        }
    });
}
Just like that, we have set up realtime communication between drivers (publishers) and passengers (subscribers) in a geolocation-based app. After spinning up the app on two separate devices (one for the passenger, one for the driver), you will be able to see the location of the car on the passenger map.
With this data, you are able to fill several other use cases, such as drawing routes between the chosen driver, push notifications when a driver is nearby, or creating a self-driving network that functions on its own (for the very ambitious).
Draw a Route Between Two GPS Locations on a Map
Note: you can find the full source code for this section in Home.java in the repo.
To link together the two members in the channel, we will draw routes between the driver and the passenger and a route to the final destination. As we are using PubNub, this will be updated in realtime, allowing for the most optimal route to be displayed at all times.
In order to draw routes, we will use the Google Maps Directions API and the Google-Directions-Android-Library. After including the library in your build.gradle, implement RoutingListener in the passenger activity class.
Note: you will also need to implement the methods of the RoutingListener class.
This API works by making a call for a walking or driving route and implementing a listener that waits for the route to be returned by Google Maps. After the route is provided, we are able to use Polylines to draw varied lines on the streets as the final route.
You will want to make the routing call each time the UI is updated (i.e whenever the driver updates its location). The function that will be called will look like this:
private void getRouteToMarker(LatLng newLocation) {
    Location myLocation = mMap.getMyLocation();
    LatLng myLatLng = new LatLng(myLocation.getLatitude(),
            myLocation.getLongitude());
    Routing routing = new Routing.Builder()
            .key(Constants.GOOGLE_API_KEY)
            .travelMode(AbstractRouting.TravelMode.DRIVING)
            .withListener(this)
            .alternativeRoutes(true)
            .waypoints(newLocation, myLatLng)
            .build();
    routing.execute();
}
In the onRoutingSuccess() method, include the following logic to draw the final route.
public void onRoutingSuccess(ArrayList<Route> route, int shortestRouteIndex) {
if(polylines.size()>0) {
for (Polyline poly : polylines) {
poly.remove();
}
}
polylines = new ArrayList<>();
//add route(s) to the map.
for (int i = 0; i <route.size(); i++) {
//In case of more than 5 alternative routes
int colorIndex = i % COLORS.length;
PolylineOptions polyOptions = new PolylineOptions();
polyOptions.color(getResources().getColor(COLORS[colorIndex]));
polyOptions.width(10 + i * 3);
polyOptions.addAll(route.get(i).getPoints());
Polyline polyline = mMap.addPolyline(polyOptions);
polylines.add(polyline);
Toast.makeText(getApplicationContext(),"Route "+ (i+1) +": distance - "+ route.get(i).getDistanceValue()+": duration - "+ route.get(i).getDurationValue(),Toast.LENGTH_SHORT).show();
}
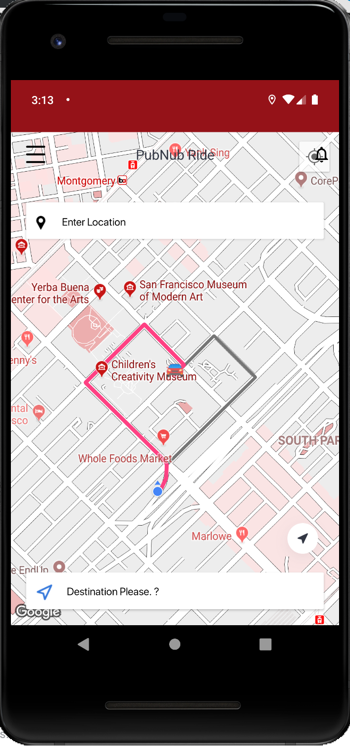
} Ensure the following variables are declared globally:
private List<Polyline> polylines;
private static final int[] COLORS = new int[]{R.color.primary_dark_material_light, R.color.colorAccent};
After testing the polylines, your app should look like this:
Send an Android Push Notification with PubNub and Firebase
Another use case PubNub fills is sending push notifications to the passenger when the driver is nearby. In order to get set up, follow this tutorial on Android push notifications to get Firebase and PubNub set up in your Android application. After you are set up, we can utilize the location data we collected to compute the distance between the passenger and the closest driver.
Location loc1 = new Location(“”);
loc1.setLatitude(passengerLocation.latitude);
loc1.setLongitude(passengerLocation.longitude);

Location loc2 = new Location(“”);
loc2.setLatitude(driverLocation.latitude);
loc2.setLongitude(driverLocation.longitude);
float distance = loc1.distanceTo(loc2);
When the driver is close enough (say, within 200 meters), we can send a push notification to the passenger that the driver is nearby.
if (distance < 200) {
    notificationMessage = {"pn_gcm":{"notification":{"body":"Your driver is nearby."}}}
} else {
    notificationMessage = {"pn_gcm":{"notification":{"body":"Driver found: ” + String.valueOf(distance)}}};
}
With the new Notifications channel built in the tutorial, we can publish the message to the channel and send a push notification to the passenger.
Activity_List.pubnub.publish()
    .message(message)
    .channel(Notifications)
    .async(new PNCallback<PNPublishResult>() {
        @Override
        public void onResponse(PNPublishResult result, PNStatus status) {
        // handle publish result, status always present, result if successful
        // status.isError() to see if error happened
        if (!status.isError()) {
            System.out.println("pub timetoken: " + result.getTimetoken());
        }
        System.out.println("pub status code: " + status.getStatusCode());
    }
});
Create a Connected Experience with Chat for On-demand Apps
Chat between the matched users (in this case, drivers and passengers) is a core feature of on-demand service apps. To build an Android chat inside this app, you may start by following this tutorial on getting started with Android chat.
After the chat is set up, create a button that opens the chat in the xml files pertaining to the driver and passenger activities. Ensure the chat channel is different from the location and notifications channels.
A new channel will need to be created for each different passenger and driver match. If you would like to persist the user information and credentials, it is recommended to use PubNub Access Manager for token-based authorization of each user connected to the app.
Design
Note: you can find the full source code for this section in activity_home.xml in the repo.

This is where you can get creative and tailor your app towards your use case. To modify the UI, we will be dealing with the xml files in app/res/layout/. While the repository contains every page in the flow designed, we will focus on the UI for the passenger home view to get started.
We will use EditText fonts to cleanly display titles and content to the user. For the title, use Roboto Regular, and for any content text, use SF Pro Display Regular (these fonts are included in the GitHub repo). Here are the respective styles for the toolbar, the location card, and the destination card found in activity_home.xml.
<customfonts.MyTextView_Roboto_Regular
    android:layout_width="wrap_content"
    android:layout_height="wrap_content"
    android:text="PubNub Ride"
    android:layout_gravity="center"
    android:textSize="17.3sp"
    android:textColor="#323643"/>


<customfonts.EditText__SF_Pro_Display_Regular
    android:layout_marginTop="15dp"
    android:layout_marginLeft="18dp"
    android:background="#00000000"
    android:textColorHint="#000000"
    android:inputType="text"
    android:textSize="13.4sp"
    android:layout_width="wrap_content"
    android:layout_height="wrap_content"
    android:hint="Enter Location"/>
Next, we will be using the Toolbar widget to display the title, the menu, and notification icons.

To get this Toolbar, use the following xml layout:
<android.support.v7.widget.Toolbar
    android:layout_width="match_parent"
    android:layout_height="wrap_content"
    android:id="@+id/toolbar"
    app:contentInsetStart="0dp">
  <ImageView
      android:id="@+id/navigation_menu"
      android:layout_marginLeft="19.2dp"
      android:layout_width="wrap_content"
      android:layout_height="wrap_content"
      android:src="@drawable/ic_menu_"/>
  <customfonts.MyTextView_Roboto_Regular
      android:layout_width="wrap_content"
      android:layout_height="wrap_content"
      android:text="PubNub Ride"
      android:layout_gravity="center"
      android:textSize="17.3sp"
      android:textColor="#323643"/>
  <ImageView
      android:layout_width="wrap_content"
      android:layout_height="wrap_content"
      android:layout_gravity="right"
      android:src="@drawable/ic_notifications_none_black_24dp"
      android:layout_marginRight="10dp"/>
</android.support.v7.widget.Toolbar>
Next, let’s add in the location and destination cards.
This is accomplished using the CardView widget and ImageView for respective icons.
<android.support.v7.widget.CardView
    android:layout_marginTop="87.9dp"
    android:layout_marginLeft="19.2dp"
    android:layout_marginRight="19.2dp"
    android:layout_width="match_parent"
    android:layout_height="46.1dp">
  <LinearLayout
      android:layout_width="match_parent"
      android:layout_height="wrap_content"
      android:orientation="horizontal">
    	<ImageView
            android:layout_marginTop="17dp"
            android:layout_marginLeft="10dp"
            android:layout_width="17dp"
            android:layout_height="17dp"
            android:src="@drawable/pin_black"/>
    	<customfonts.EditText__SF_Pro_Display_Regular
            android:layout_marginTop="15dp"
            android:layout_marginLeft="18dp"
            android:background="#00000000"
            android:textColorHint="#000000"
 	    android:inputType="text"
            android:textSize="13.4sp"
            android:layout_width="wrap_content"
            android:layout_height="wrap_content"
            android:hint="Enter Location"/>
  </LinearLayout>
</android.support.v7.widget.CardView>
Building and Fixing Common Issues with Rideshare Android App
To run the app, simply build the project and hit the run button in the Android Studio Toolbar. You may use a physically connected device with USB debugging, or an AVD in the built-in emulator. Using the AVD may result in issues in sharing location and so utilizing physical devices is recommended. The current state supports passenger and driver geo-location tracking. To run the cloned repo, select Home from the passenger device first and Driver from the driver device.
There are a few useful tools when testing and debugging your app.
On the Android end, use the Logcat command line tool to identify any errors or messages that you have included by adding Log class commands. Some common issues during the build are not having the correct versions of packages implemented in gradle.build. To increase build time, consider turning on Offline Mode in Android Studio preferences.
If you are unsure that your messages are being published to the PubNub channel, you can use the Debug Console in your admin panel, as seen below:

Alternatively, you can use the PubNub Developer Console, through which you can also track presence and history events. Make sure to use the correct publish and subscribe keys for this app, as well as the correct channel name.

Another source of error occurs if the app is not retrieving the location from Google Maps. Use the APIs Overview in the GCP console to view the number of requests, errors, and latency of the respective APIs to check for any issues.
Expanding the App
After creating this base app, you will be able to expand on this skeleton for your own use cases. You can adapt it to be a food delivery app or a home rental service. If you’d like to continue building the Uber clone, you can build out the other portions of the customer journey, as outlined above.
After cloning the repository, you can add in the functionality behind login/sign-up, additional drivers by adding members to the channel and selecting the closest driver, a payment system, as well as ride history, all powered by PubNub.
In a different tutorial, we will use the Presence function we built to manage and optimize a larger network of several drivers and passengers. Look out for future tutorials that will walk you through expanding this app to other use cases and features.
Have suggestions or questions about the content of this post? Reach out at devrel@pubnub.com.
Try PubNub today!


