

IN THIS ARTICLE
As I showcased the PubNub Arduino-controlled smart home model at CES and other conferences this year, a frequently asked question was if PubNub worked over GSM/GPRS networks. Could I connect my Arduino GSM/GPRS shield to the Internet to stream data bidirectionally? We knew it would work, but had never actually implemented it ourselves.
Until now…
In this blog post, we’ll walk through a simple demonstration of PubNub with GSM/GPRS. In other words, we’re going to easily connect our Arduino to a mobile cell network. This is incredibly exciting and opens the doors for mobile IoT apps, like connected car or drones, or apps without access to a WiFi signal, like weather stations or sprinkler systems.
So let’s get started!
Arduino GSM/GPRS Parts List
Here’s what I used:
- Arduino UNO Rev3
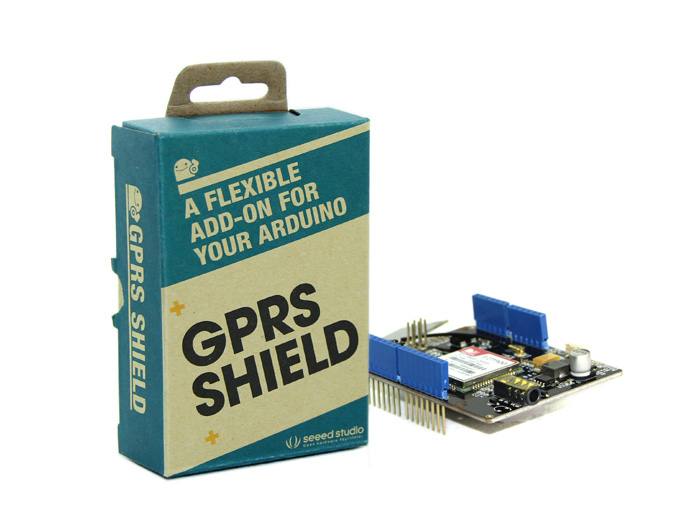
- Seeed Studio GPRS Shield V2.0
- AT&T SIM Card (standalone)
- C size batteries (x5)
- C size battery holder (x5)
- Smartphone
- Laptop
I bought the GPRS Shield from Radioshack. I got the AT&T SIM card from Fry’s Electronics; they have a section for universal SIMS. It may be hard to find the standalone SIM card in other retail stores.
Setting Up the SIM Card
First, you’ll need to unlock your SIM card and attach a data plan to it. This is why a smartphone is in the parts list.
Put the SIM card in your phone and read the instructions included within the package. In the case of the AT&T SIM I purchased, I dialed a series of numbers on my phone to activate the card, and then configured a plan online. Make sure your mobile plan supports data transfer, not just calls and texts.
Once you’ve activated the SIM card, try connecting to a website on your mobile phone. If it succeeds, you have data and it’ll work within your Arduino.
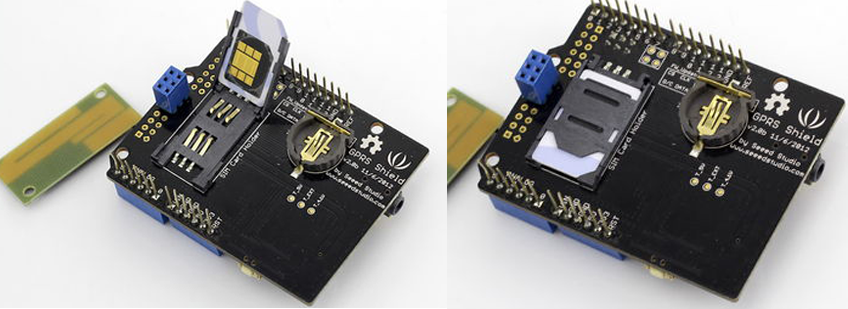
Arduino GPRS Setup
Take your Arduino GPRS Shield, and plug the SIM card in. Seeed Studio has a great tutorial about how to do this. Follow that tutorial but stop and return here before uploading code in “Test Setup”.
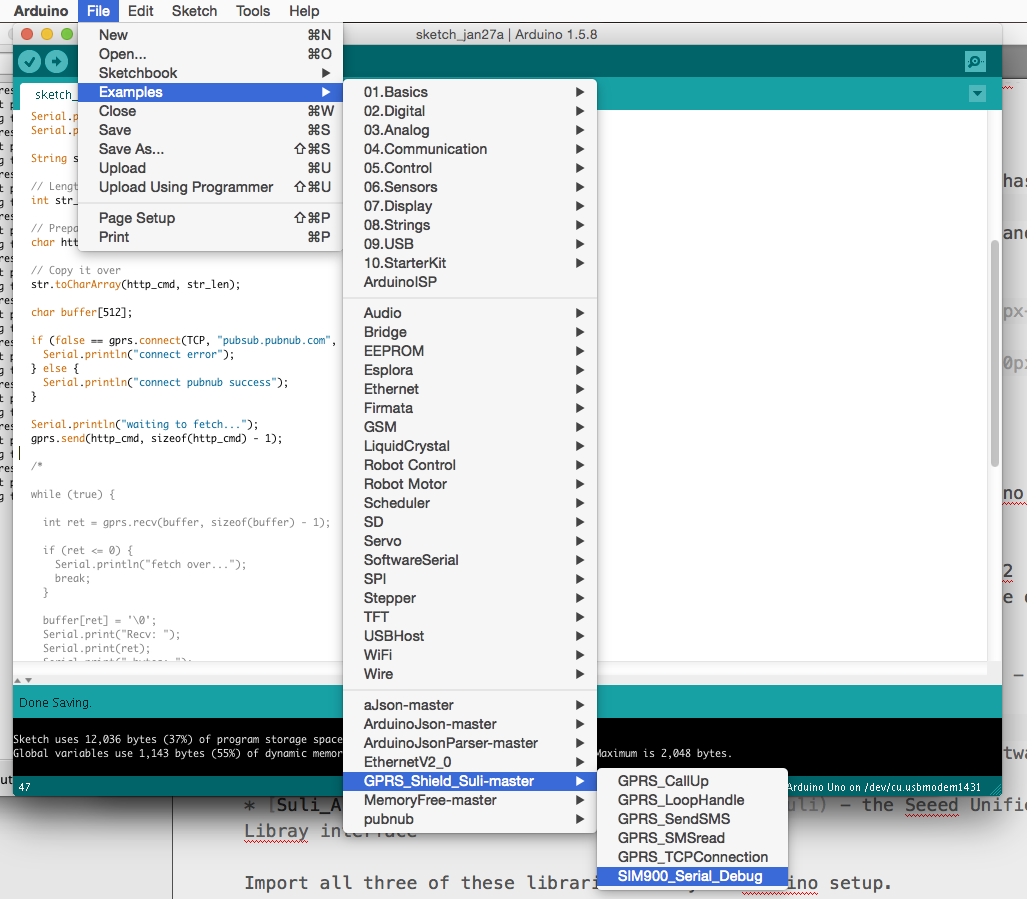
Arduino Libraries
You’ll need a whole heap of libraries to get this thing setup on Arduino, but trust me, it makes it a whole lot easier. I tried writing them myself!
You can find the specific libraries for the Seeed Studio GPRS Shield V2 here. Pay attention to the docs, you need 3 libraries to get this baby rolling:
- GPRS_Shield_Suli – GPRS Module Library,
- SoftwareSerial – we use software serial to communicate with GPRS module
- Suli_Arduino – the Seeed Unified Library interface
Import all three of these libraries into your Arduino setup.
Software Serial
Now for the fun part. Your shield and Arduino environment are all setup. So let’s play with cell networks.
First, we need a way to talk to the SIM900 chip on the Arduino. We could use a Hardware serial and talk directly to it, but that’s hard, so let’s just use Arduino’s software serial.
Open up the SIM_900_Serial_Debug example from your Arduino examples folder.
This example is simple, it just proxies the serial data from Arduino’s serial port into SIM900’s. This let’s us use the built in Arduino Serial debug tool to interact with our SIM900.
Call Yourself
Let’s try calling ourselves with the Arduino GSM shield to test everything out. Load the Software Serial example onto the Arduino, and open up the Serial Debugger. Make sure you power on the SIM card on the Arduino GPRS shield using the button on the side.
Power up the SIM900 by pressing the power button in for about 2 seconds. The red LED will be on. The green one beside it will blink. If the shield joins the network successfully, the green LED will blink every 3 seconds.
Make sure you put your old SMS card back into your phone after testing the Arduino SIM!
Now, type the following into your Arduino Serial Window:
Serial output should show something like:
If you can’t see the messages in the serial monitor, you should click the “send new” option that will add carriage return at the end of AT command and then send AT command “AT+IPR=19200” to set the baud rate of the SIM900.
Now try calling yourself. Enter the following command, replacing 1***8675309 with your own number.
If it succeeds, a message ATH OK will show up as the picture below. Otherwise, No CARRIER will show up instead. The reason might be nonexistent phone number or incorrect command format.
Connect to the Internet
We’ve successfully configured our Arduino project to work over GSM. Now let’s get it connected to the Internet.
Make sure that the baud rate of SIM900 is 9600! You can use the AT Command(AT+IPR=9600) to set it through SerialDebug
Load up the the GPRS_TCPConnection example from GPRS_Shield_Suli. This example makes a simple request tombed.org/media/uploads/mbed_official/hello.txt HTTP/1.0
However, it probably won’t run when you load it on your Arduino. This is because it’s not configured to work with your specific cellular network.
In my case I’m using AT&T, so I needed to change the following lines to configure my gprs connection:
This line isn’t sufficient in most cases. We’ll also need to supply an APN, username, and password. These parameters are omitted from the example but you can simply supply them on your own. You can find the relevant code here.
To connect to AT&T, use the following config:
Now run the code. You should be able to obtain an IP and issue the request. However, the app will probably crash (SIM turns off) when the request has been issued. This might be confusing, but there’s an easy fix.
Batteries
The Seeed Studio and a variety of other shields advertise to be “plug and play” with Arduino but this is not always the case. This shield in particular doesn’t have enough power from the single 5v USB supply to successfully complete TCP requests.
This is easy enough to fix though, all we need to do is give it more power! Online forums suggest adding 5 C cell batteries to power the GSM chip, which is what I have done.

The batteries should be wired in series, with the positive end wired into the VIN input and negative wired into the GND.
After you’ve added batteries, try the example again. It should connect successfully.
Great! Now we’re ready to signal with PubNub.
Implementing PubNub to Signal
Now that we’re fully-powered, let’s get to the fun part. Load the following example onto your board, changing the GPRS gprs() configuration as mentioned previously.
This example connects to PubNub and publishes a message every second. It works just like the previous example, but instead of retrieving data this example streams information to the PubNub network where it’s accessible from anywhere.
Rest Client
You can see how the message is assembled by looking at the publishData() function.
See how the url is created here:
It may be confusing at first, but let’s break it down. The url is formatted according to the PubNub REST Push API.
The domain pubsub.pubnub.com is defined later in the function. The publish key refers to is the pubnub command (you can also subscribe). The pub-key and sub-key come from your own PubNub account, but you can use thedemo keys for now. Don’t worry about signature.
The channel is really important. This is like an IRC channel for your PubNub devices to talk to each other.
Show me the data
Since we don’t have any other device listening for messages from the Arduino, let’s use the PubNub console to observe our channel activity.
If you’re using the default code above, you can use this link to view channel activity for your GPRS chip.
If your demo is running you should see a count like 1, 2, 3, 4 appear in the “message” pane.
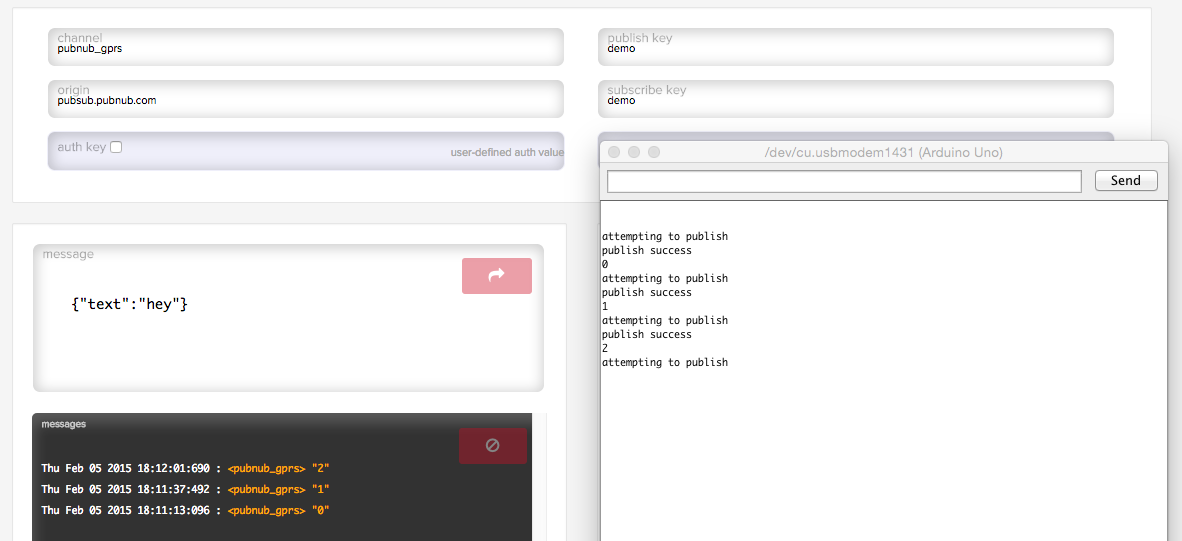
We’re able to view the data coming out of the Arduino because we plugged the same publish and subscribe key into the PubNub console as we did into the Arduino. Since we’re using the demo keys the channel is shared publicly, but if you create your own account your data will be privatized.
Additional Resources and More Information
This is just one of our many Arduino-PubNub implementations. We’ve also connected Arduino Yún to the Internet, as well as showing you how to connect Arduino Uno and Seeed Studio Ethernet Shield v2. For all our Arduino related posts, here’s the full feed.
Try PubNub today!


