IN THIS ARTICLE
Nowadays an insight is more or less useless if it is out of time. There are so many time-sensitive industries such as financial trading and risk-management systems which require immediate access to data. Changes in market conditions for example, happen far too quickly to rely on old information. One must have access to realtime information to make well-informed decisions.
The same logic holds true for home security. Time is the biggest factor in any emergency, but in the case of fire or break-ins for example, time is of the essence. A realtime emergency alert could mean the difference between safety and severe danger.
In this blog post, we’ll going to show you how you can use a Raspberry Pi (with just a few additional parts) to build your very own Raspberry Pi Security Camera which can detect motion, detect human faces, and alert you if people are detected. If detected, a notification is sent in realtime. We’ll be using both the JavaScript SDK and Python SDK.
Project Overview: Raspberry Pi Security Camera
We’ll harness the power of some hardware, as well as a couple of APIs:
- Raspberry Pi B+ as our computer board of choice
- Raspberry Pi Camera Module
- PIR Sensor to detect motion
- Parse to store our photos
- OpenCV to enable accurate facial detection of photos
- PubNub to facilitate realtime communication between our RPi and Web Console
The high-level process of the security camera is that the PIR sensor will detect motion and tells the camera module snap a photo. We use OpenCV to decide if that photo did in fact contain a person; if the algorithm does detect a person in the photo then we store the photo in our Parse database; else, delete the photo. Last, we use PubNub to publish an alert in realtime to our web console.
(For fun we decided to overlay any facial detections with face cutouts of super heroes and celebrities, this part of the tutorial is definitely not useful as a security feature, however I would recommended it for a good laugh.)
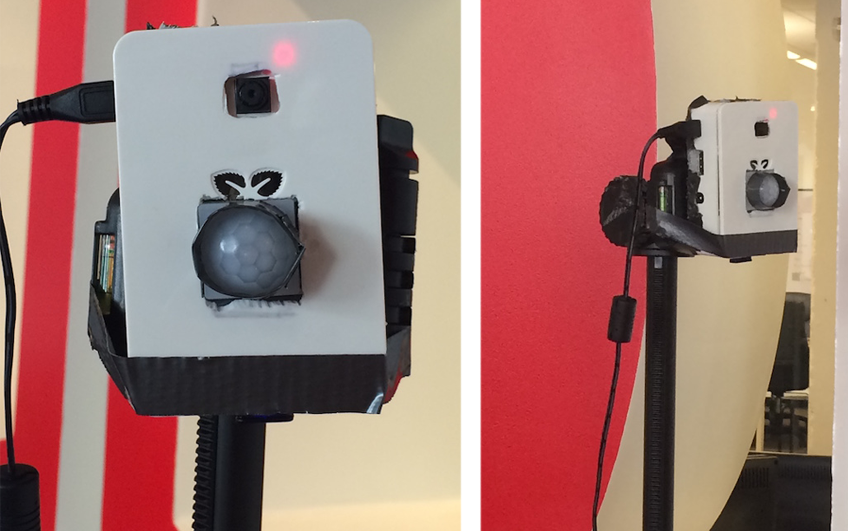
My final product was mounted on a Tri-pod, and placed into a home-made box and looked like this:
Our own PiCam is live, to view the photos being taken at PubNub HQ in realtime check out http://justinplatz.github.io/SecurityCam/
If you want to skip ahead and just look at the code repo, my whole project is available for you over at https://github.com/pubnub/SecurityCam, however if you keep reading I will show you the entire process of building your own security camera step by step.
Let’s get started!
Setting Up Your Raspberry Pi
Hardware Requirements
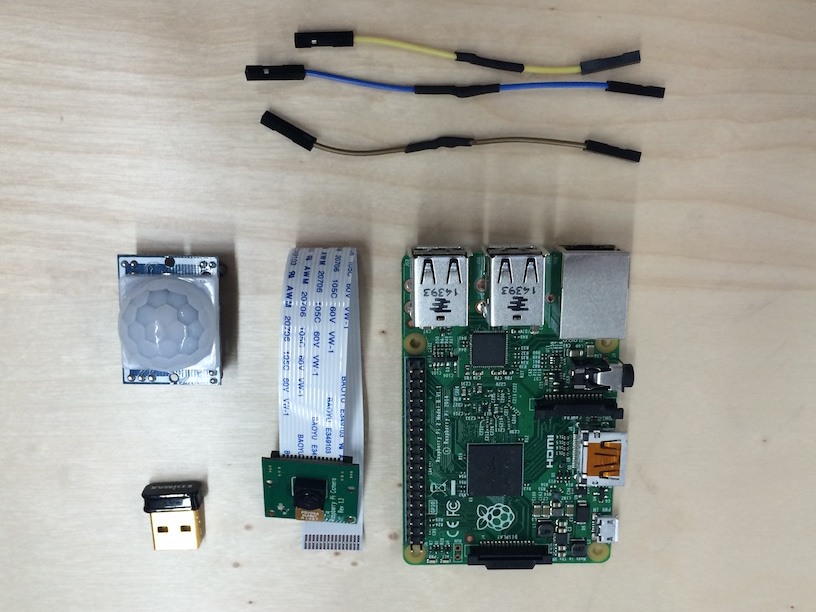
You will need a few components for this project:
- Raspberry Pi B+ With Raspbian
- You will need Raspbian installed. For instructions on how to install Raspbian, click here.
- Raspberry Pi Camera Module
- PIR Sensor
- 3 Female-Female Wires
- WiFi Module
Software Requirements
Our tutorial uses the following SDKs and imports:
- import RPi.GPIO as GPIO
- import time
- import picamera
- import sys, os
- import json,httplib
- import base64
- PubNub Python SDK
- PubNub Javascript SDK
You’ll need to complete a couple a steps to get all set up:
- Set up your Raspberry Pi camera module with Python.
- Set up PubNub with your Raspberry Pi.
- Lastly, if you do not have an account with Parse, go ahead and sign up then check out this tutorial to set up your Pi with the Parse library.
For this project we will create a custom Parse class and give it two columns of type string named fileData and fileName.
Connecting PiCamera and PIR Sensor
The PiCamera link above should have already explained how to place the camera module onto the board properly. So by now your PiCamera should be already set up. Now we want to connect our PIR sensor.
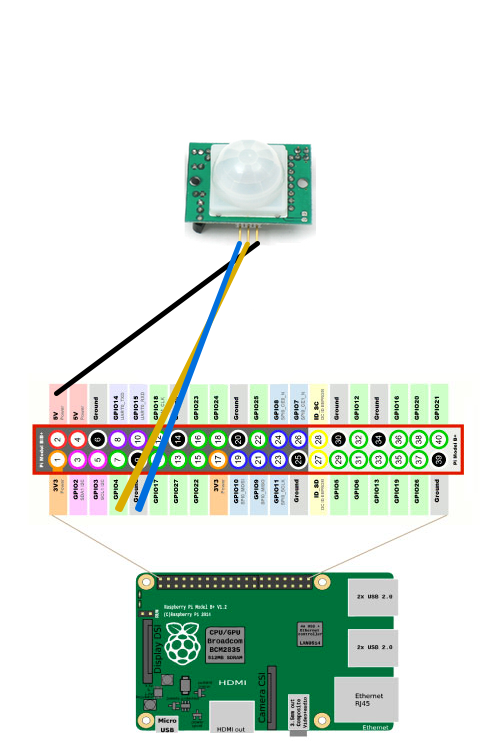
Using three female-to-female jumper cables, you’ll need to connect each of the PIR sensor’s connectors to the appropriate pins on the Raspberry Pi.
Connect the top one (labelled VCC on the PIR sensor) to the 5V pin on the Raspberry Pi, connect the middle one (labelled OUT) to GPIO pin 4, and connect the bottom one (labelled GND) to a ground pin marked GND like so:
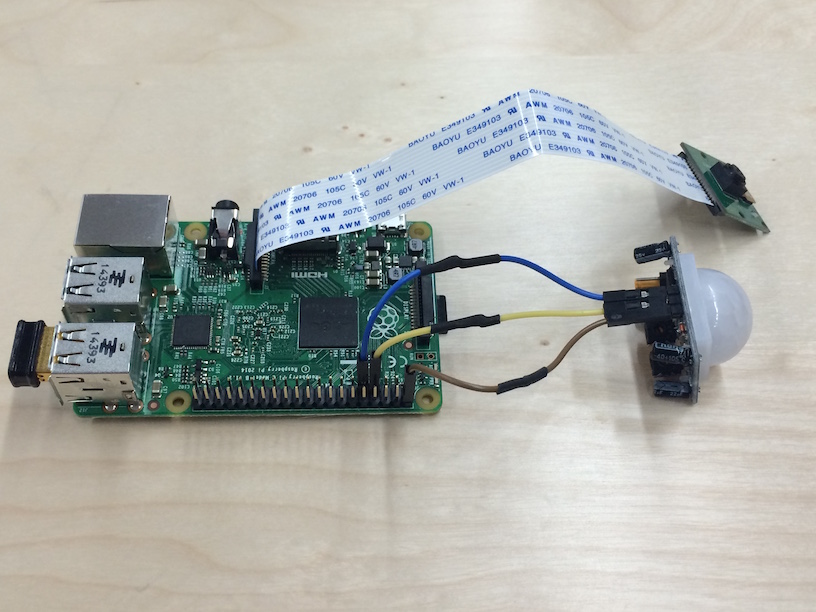
After the camera and PIR are hooked up your Pi Should now look something like this:
Programming Your Pi
Boot up the Pi, open the Python 2 IDE and create a new Python file. Name it PirCam.py .
Add the following to your file:
We have just imported all the libraries we will be using to take and store the photo, initialized our connection to Parse, initialized a instance of PubNub, defined our PubNub channels, declared our sensor as input and set some basic camera settings.
Next we need to define a few functions we will call in our main loop. Our code looks like this:
Take note of the import statement from detector import Detector. This Detector class will handle our OpenCV image analysis. If you do not have OpenCV installed on your Pi, follow this tutorial.
OpenCV is a very powerful open-source library used for image and video analysis. The only function that deals with image analysis in our main file is is_person. So, to create your detector, create a new file called detector.py that is located in the same folder as pirCam.py.
The implementation of our detector is as follows:
NOTE: You will have to find where your cascade xml files are. If you installed OpenCV from the link above, the files will be located in the OpenCV version you downloaded. Mine were in opencv-2.4.10/data/haarcascades/.
After we have all our imports, constants and functions set we can now set up our main program loop. At a high level our loop is just waiting for the motion-detector to signal, and once it detects motion we snap a photo and then process that image looking for people.
My main try loop looks like this:
You can go ahead and save your file, your Pi is now completely set up. Try running the following line in the correct directory:
sudo python PirCam.py
If you trip the PIR sensor then you should see on your screen an image being taken, and if you look in your Parse database you will see a new item has appeared, that is your image.
However it is not enough to just store your image onto Parse, if there is really a break-in you want to be alerted in realtime- so we will next setup a web console to receive alerts as soon as they happen.
Setting Up Our Realtime Web Console
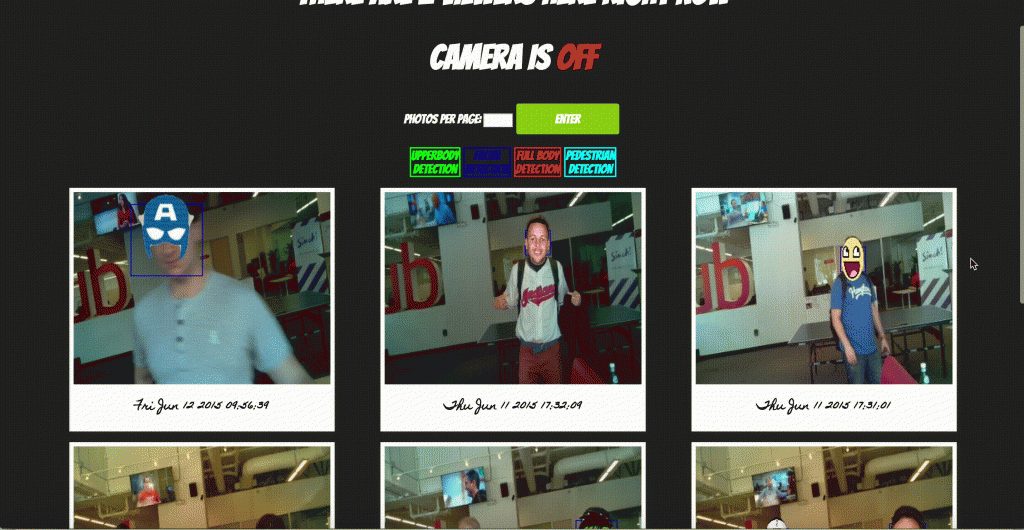
Using HTML,CSS, and some JavaScript magic well be able to pull our photos from Parse in realtime thanks to PubNub. My web console looked like this:
Notice at the top of the page I show you how many people are currently looking at the page, and the state of the camera (On/Off)- both parts are connected to PubNub to change in realtime. To do this we actually use a feature of PubNub called PubNub Presence, which can tell us about the members on any given channel.
I will show you how to set this up as well. However, there are some parts of the page I will not cover, such as creating the detection key using CSS and changing the number of photos on the page, but feel free to view my entire project at: https://github.com/pubnub/SecurityCam
Now, go into your favorite text editor and create a new .html file, I went with a edgy, unique name and saved mine as index.html. We will need to import both PubNub and Parse, so in the body of our file we paste the following:
<script src="https://cdn.pubnub.com/pubnub-3.7.1.min.js"></script>
<script src="http://www.parsecdn.com/js/parse-1.4.2.min.js"></script>
At the top of my page I have the occupancy of the channel, and the status of the camera. The code for the html part of this looks like this:
<h2 class="occupancy"> </h2>
<h2>Camera is <span id="status" class="cameraOff"> Off</span></h2>
Next I will place the container div which will be used to hold all the photos we have stored and those we will receive in realtime. The code looks like this:
<div id="placehere"> </div>
That is the entire html portion of the code. All thats left is the JavaScript that we use to pull our old photos from Parse, subscribe to PubNub in order to pull new photos in realtime, and check the occupancy of the site and status of the camera.
My entire JavaScript looks like this:
Conclusion
Once all of this is set up you should go ahead and try the site out! Run PirCam.py on your RPi and trip the motion detector. Now when your camera detects a person, you should almost immediately (depending on your Pi’s internet connection) see the photo appear on your Web Console.
What you have now is a basic home security system which detects motion, has facial recognition and alerts you in realtime. If you want to continue build on this project, you could even use PubNub to send Push Notifications to your phone each time a photo is taken.
For more information on how we set up image overlays on the facial detections, or anything you saw follow @justin_m_platz or check my repo at https://github.com/pubnub/SecurityCam.


