IN THIS ARTICLE
So you’re here because you want to turn your JavaScript application into a mobile Android application. Luckily for you, we’ve written this tutorial just for that, using the PhoneGap framework. In addition to our PhoneGap tutorial, we’ll also walk you through a manual way using Cordova CLI with an Android SDK.
If you want to convert an iOS app, we have a tutorial for that as well.
We’ve built numerous chat demos and tutorials with JavaScript, including 10Chat, a simple chat app written with only 10 lines of JavaScript. These demos do work on mobile, but are not exclusively for building native Android applications. On that note, we’ll change that.

Closing the Gap Between Web and Native with PhoneGap
PhoneGap is an open source mobile framework that enables you to create cross-platform apps that run on various mobile devices including iOS and Android. You write your web app in HTML5, JavaScript and CSS, and PhoneGap helps you to turn it into native apps, most likely Android or iOS.
You can create mobile, or responsive web apps with any UI frameworks and libraries of your choice- jQuery Mobile, Sencha Touch, Enyo, Kendo UI, Onsen UI… you name it. Or, of course, VanillaJS sans any frameworks can be your choice. The sample code used for this tutorial is available on Github, and this demo has very clean interface with minimal CSS and no images, and using no extra UI libraries.
There are two ways to make your web app into an Android app using PhoneGap. One is a no-pain ultra easy way, and another way is a manual way using Cordova CLI with an Android SDK.
Option 1: Seamless Android Apps with PhoneGap Build
Using PhoneGap Build is absolutely painless. All you need to do is zip up your web app, upload it to Adobe PhoneGap Build cloud, and the service takes care everything for you. You don’t even need to download and set up SDK or emulators.
- Write a web app
- Zip it up
- Upload the zip file to PhoneGap Build cloud. Click Ready to Build. Edit the name of the app and upload an app icon too.
- When ready, scan the QR code with your Android phone, and follow the link
- Download the apk and install it on your phone
- Woo-hoo!
- (…Profit!)
Option 2: Full Development with PhoneGap Cordova CLI
Right, that was easy. Or, you can install Cordova command-line interface (CLI) tools and Android SDKs for full development with taking advantage of the plugins that enable for you to use hardware APIs, push notifications and more, and debugging.
Step 1: Install Android Eclipse Bundle
First, you need to download and install Eclipse ADT Bundle. The bundle includes the Android SDK tools, Eclipse IDE with built-in Android Developer Tools.
Step 2: Set Up the Android SDK
Once everything you need is installed, open Eclipse and go to Window > Android SDK Manager. In the dialog, select SDK tools. You probably need:
- Android SDK Tools
- Android SDK Platform-tools
- Android SDK Build-tools (API 19 to work with Cordova, as of Oct. 2014)
- SDK Platform
- ARM EABI v7a System Image

For more information on adding SDK packages, please refer, http://developer.android.com/sdk/installing/adding-packages.html site.
Step 3: Set Up Android Emulator
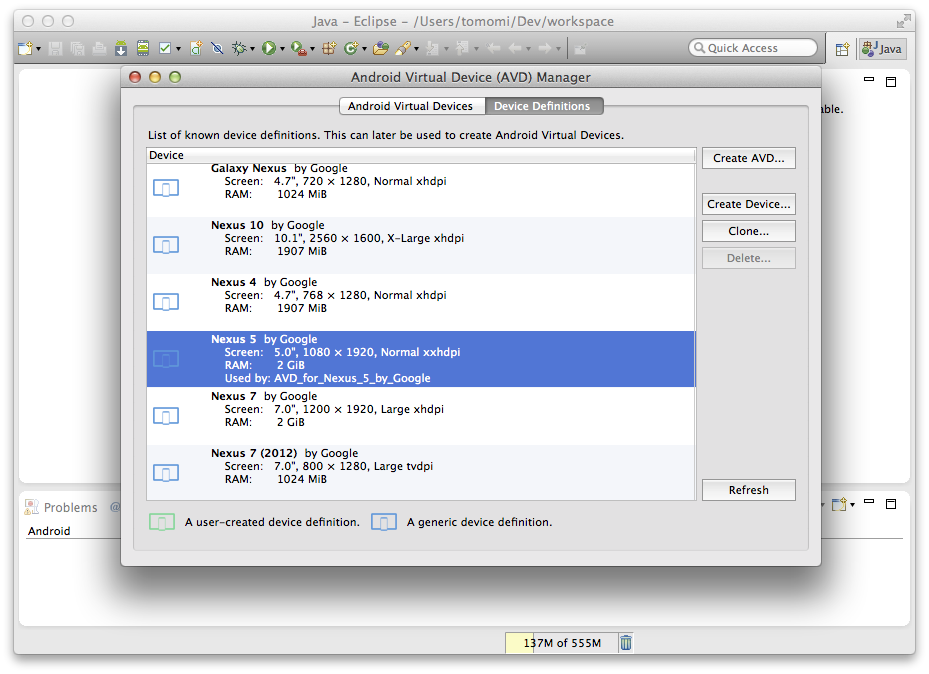
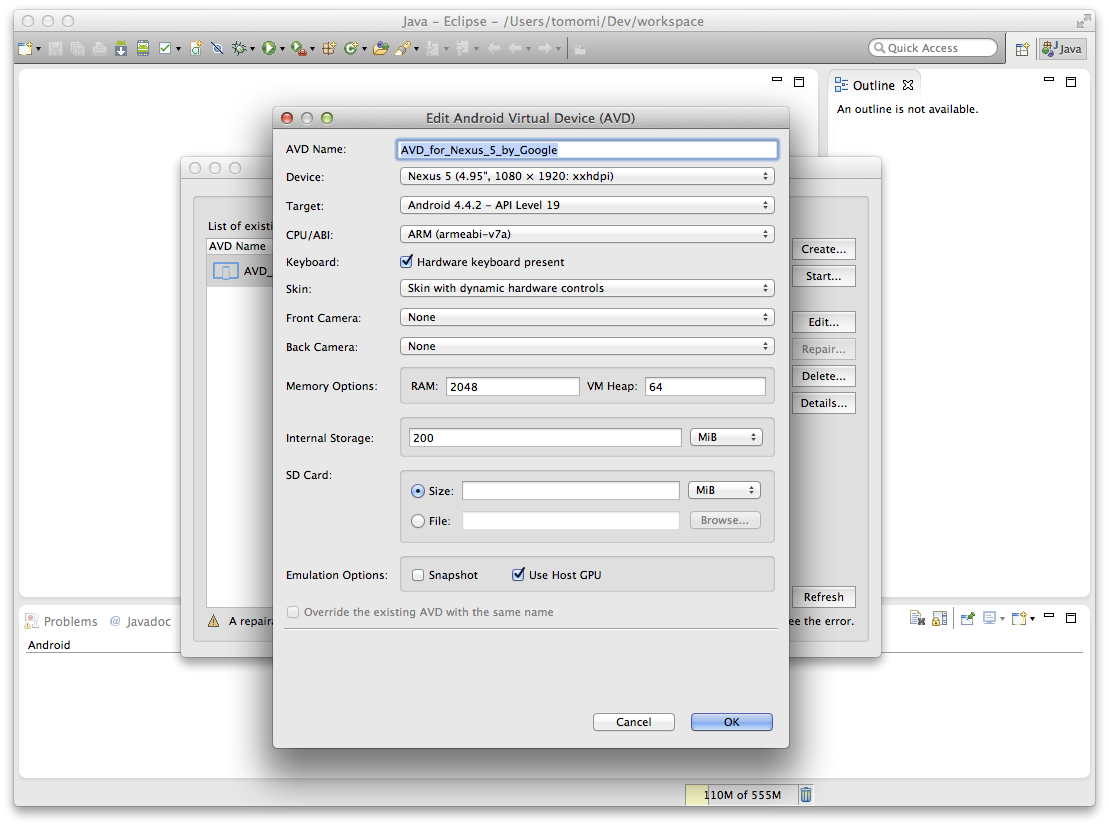
Now, you need to create an Android Virtual Device (AVD). On Eclipse, go to Window > Android Virtual Device Manager. In the AVD Manager window, at Device Definitions tab, pick an emulator and click Create AVD….


Step 4: Install Cordova CLI
Installation of the command line interface requires node.js. If you have not, you must install it first.
Install cordova with npm:
$ sudo npm install -g cordova
Step 5: Create a New Project in the SDK
Create a new project by typing these commands:
$ cordova create simple-chat com.mydomain.chat SimpleChat
$ cd simple-chat
$ cordova platform add android
Try building it and deploying the app to an emulator, or an device:
$ cordova build
$ cordova run android
It may take a while to launch the emulator, but be patient. Once the emulator is up and running, you should see this Cordova splash screen!

Step 6: Port Your Web App
In your project folder, you should find a /www/ directory. This is where your web app goes.

Your index.html body content goes into the body of /www/index.html. Do not delete or replace head section unless you know what you are doing.
And /js/index.js includes functions that are required for PhoneGap. You just need to call your app functions in onDeviceReady().
| var app = { | |
| initialize: function() ... | |
| bindEvents: function() ... | |
| onDeviceReady: function() { | |
| // Your awesome chat app here --- | |
| var channel = 'chat'; | |
| var p = PUBNUB.init({ | |
| subscribe_key: 'sub-c-f762fb78-2724-...', | |
| publish_key: 'pub-c-156a6d5f-22bd-...' | |
| ... | |
| }); | |
| } | |
| }; | |
| app.initialize(); |
Also, you include all your css files and images under /www/.
The application icons can be anywhere, you just need to specify the location in your config.xml file.
| <?xml version='1.0' encoding='utf-8'?> | |
| <widget id="com.pubnub.com" version="0.0.1" xmlns="http://www.w3.org/ns/widgets" xmlns:cdv="http://cordova.apache.org/ns/1.0"> | |
| <name>SimpleChat</name> | |
| ... | |
| <icon src="app-icon.png" /> | |
| </widget> |
![]()
Deploy to an emulator or device.
$ cordova run android
Now you have your own chat app for Android! Super!
Remote Debugging with Chrome
When you are working on Android apps, you can easily remote-debug on Chrome.
- Enable USB debugging mode on your Android device by going to Settings > Developer Options, then turn on USB debugging option.
- On your desktop Chrome browser, go to chrome://inspect.
- Connect the device and your computer with a USB cable
- You should see your device name (in this screenshot below, XT1032 is the name of Moto G that I am testing with), also your app on Chrome screen
- Click “inspect”

Once you click “inspect”, you should see the familiar DevTools window for debugging! If you have a trouble with the tools, go to Google Chrome Developer for more info.
I hope you enjoyed this tutorial. In a week or two, we’ll be releasing the this tutorial for iOS and PhoneGap!


