

IN THIS ARTICLE
As of 2017, the average investment in Blockchain projects is $1 Million USD. As the technology is expected to have a market worth of over $20 Billion USD by 2024, it’s beneficial as a developer to consider entering the world of crypto.
If you’re unfamiliar with this technology, just take a look at the 2017 culture craze that surrounded Bitcoin. Why were so many people pouring millions of dollars into it? Why were banks, one of the most trusted currency handlers, worried of their replacement?

The reason is that Bitcoin, like many other cryptocurrencies (eg. Ethereum, Litecoin), is built on an extremely secure and reliable technological system called the blockchain, or “decentralized network”. The specifics in logistics behind this network structure is too complex to explain in a little blog post; however, in short, you can think of it like this:
Imagine you, Sally, and Walter decided to start a new life on a remote island. Naturally, after many arguments over who does what around the island, you all decided to establish a currency system to handle the exchange of goods and services. Conveniently, there’s a gold deposit just a little way down the island so you all decide to mine, develop, and give 5 gold coins to each person for a total of 15 gold coins in circulation.
But hold on a second. Before you start to trade coins with each other, you realize that you don’t really trust that Walter guy too much. You’ve witnessed his immaculate craftsmanship in the past, which means that he could very easily forge his own fake coins without anyone knowing. You being the smart Blockchain enthusiast, decide to implement what’s called a ledger.
This is the crux of the decentralized network that gets its hype. A ledger can be visualized as a piece of paper with everyone’s name on it and how many coins they should have in their account. Everyone gets a copy of the ledger so if Walter wants to say he has 100 gold coins, all you have to do is check your ledger to see if the transaction was legit.
Of course, there are many more details to explain, and there are certainly no shortage of resources to fill you in if you’re interested, but the key importance to blockchain is its security and reliability in infrastructure.
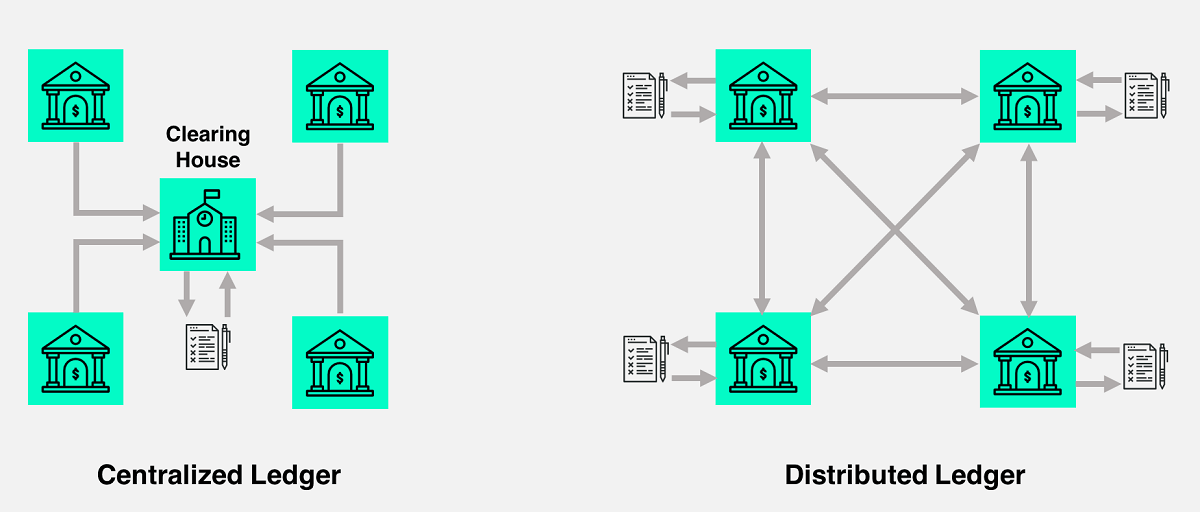
Image source: TradeIX
If people are considering adopting Bitcoin as their new means of currency, then it just goes to show how much faith people are putting into the strength of the blockchain network.Now, to take advantage of the booming Blockchain market, you may want to consider incorporating PubNub into your crypto projects. As Blockchain’s decentralized network thrives on the global interconnectivity we have by our internet devices, companies such as Cryptotronix and IBM have been pushing the field of IoT to the forefront of Blockchain. PubNub, one of the leaders in this IoT frontier, offers a crucial marriage between device and Blockchain that will only become more essential as the crypto world expands and develops.
How PubNub Enhances the Blockchain User Experience

PubNub Functions contains an XHR module which allows the user to make JSON RPC requests to any public Ethereum node on the network. Not only can you make multiple requests at once, but can also execute a 64kb length block of JavaScript code in tandem with your requests all in real-time.
This means that you can have realtime access and processing to your Ethereum smart Contracts. From data sorting algorithms to outputting data to your client UIs, the applications are endless and with PubNub’s scalability, you can expand your Ethereum projects to connect millions of clients and devices to your contracts.
Additionally, since Functions is cloud-based, you can enable limited-storage IoT devices to access all of the data extractions we have to offer by making a simple HTTP request to your function. Supplementing this with any variety of our APIs allows you to get the most bang for your buck when working with millions of devices.
You can check out the tutorial below to see what a scenario using PubNub Functions with Ethereum looks like, OR you can click the link below to skip to the implementation of PubNub Functions with the Blockchain.
Click me if you already know how to create Ethereum contracts!
PubNub Functions + Ethereum Blockchain
Link to the GitHub repo for cross-referencing instructions: https://github.com/Cakhavan/PubNubBlockChain
Let’s illustrate a quick and simple example of how one would use PubNub to interact and pull data from a Blockchain network. This tutorial will be fairly extensive to accommodate those who are yet familiar with this technology. Our goal is to create a simple company timesheet that allows workers to map the number of hours they worked to their employee ID for everyone to see.
We will use PubNub Functions solely allow company members to collect this info in real-time. The demo is structured like so:

Step 1: The Network
For this tutorial, we will be working with the Ethereum Network. Unlike Bitcoin, which is specifically designed to use Blockchain as a currency, Ethereum was designed to allow developers to work with Blockchain freely. More specifically, we will be working in a test version of Ethereum called the Ropsten Network(more on this later). Two key things to note are:
- Money in the real world can buy Ether => Ether can be used for currency when doing transactions in smart contracts (see step 2)
- Computational logic within smart contracts costs “gas” => “gas” costs real-world money. The more computation you’re doing on your smart contract, the more money it’s going to cost you and your users.
Step 2: Truffle
The next step is to download the Truffle Ethereum development framework. Although not necessary, Truffle makes our lives much easier for building and testing Blockchain apps as they provide many skeleton files and testing tools. In order to start installing dependencies, you need to install node.js.
To download truffle first open up your terminal and do:
npm install -g truffle
Now that we have the truffle packages installed, we’ll want to make a directory space to hold our project. I named mine DEMO:
mkdir DEMO
cd DEMO
And then download an empty truffle project
truffle init
You should now have 4 directories installed each of which I’ve linked the proper documentation for those interested:
contracts/: Directory for Solidity contractsmigrations/: Directory for scriptable deployment filestest/: Directory for test files for testing your application and contractstruffle.js: Truffle configuration file
Now we can begin coding up our project.
Step 3: The Smart Contract
This is the heart of your Blockchain application or “DAPP” (Decentralized Application). Like the name implies, a smart contract is an electronic contract of code you deploy out to the network for your users to use and abide by. Referring back to the island analogy used earlier, you can think of a smart contract as writing down the rules of how you guys are going to trade your gold coins (ex. I will charge you 1 coin to clean my house and 2 coins to fish me dinner).
Smart contracts are written in the solidity language so you’re going to need to save your contract files as .sol. To download solidity, open up the terminal again and execute the following command:
npm install solc
For our DEMO, save a file named PubNubTimeSheet.sol in DEMO/contracts.
Next, let’s open up the file and start constructing the contract. Since Solidity is still in its infancy stage, updates are being pushed to it constantly so you’re going to need to be mindful of which version to use as you can run into compatibility issues if you ever work with other people’s contracts that are out of date.
At the top of the file, write in your version like so:
pragma solidity ^0.4.18;
Below you can name and construct your contract:
contract PubNubTimeSheet{<Insert Code Here>} Now we have to consider how an employee or manager is going to interact with our contract to input and access the amount of hours an employee has worked. A useful tool in solidity is the address variable. An address is a unique set of bits that act as a person’s identification/address. This is how a function in a contract knows who’s calling the function and where to return things to.
Another important tool is the mapping function:mapping(_KeyType => _ValueType). A mapping is like a lock that holds a certain value and to open that value type you need a specific key. Since mappings start out empty, you can assign which key unlocks which value. This is useful as we’re going to need to figure out a way to map hours worked to an employee’s address type.
For our project, since addresses are long and difficult to remember, we’re going to abstract the address to an ID integer. Assuming there are going to be 100 employees in our company, we’re going assign a number 1-100 to each employee to map to their address so someone can look them up by their id # instead of the address.
In the contract body declare an address array and 2 mappings:
address[100] Employees;
mapping (uint => uint) punchCard; //map hours worked to employee's id#
mapping (address => uint) cardToEmployee; //map employee's address to id#
Next, let’s add a function so an employee can set their address and id into the system and map their elements to the proper locations:
//initialize each employee address to their id # and set the id # to the "Employees" address array
  function setEmployee(uint id, address addy) public{
    cardToEmployee[addy] = id;
    Employees[id] = addy;
  }
We’ll also need another function to so that an employee can input how many hours they have worked for the day to their crypto punch card. In this function we’re going to use another valuable solidity tool that is msg.sender. This is the address of who ever is calling the function so if we require that the function caller’s address be equal to the address to be modified, we eliminate the potential of a nefarious co-worker tampering with another worker’s hours.
//Employee inputs amount of hours worked
  function input(uint time, uint id) public {
  //authenticate the employee
    require(msg.sender == Employees[id]);
    punchCard[id] = time;

  }
Lastly, let’s create two getter functions that allow people to look up their own or another worker’s information.
//get the employee ID associated with the Employee's address
function getMapping(address addy) public view returns (uint){
  return cardToEmployee[addy];
}
//look up amount hours an employee has worked
function getHours(uint id) public view returns (uint){
  return punchCard[id];
}
Step 4: Migration
Migrating your contract is an essential step in deploying new code or a contract to a certain network. For now, you don’t have to worry too much about where to migrate too or how to do it, but in order to progress on to the next step, we need to add this file into the ./migrations folder in our project
var ts = artifacts.require("./PubNubTimeSheet.sol");
module.exports = function(deployer){
     deployer.deploy(ts);
};
Step 5: Testing
This is where we are going to start seeing the beauty and magic behind the Truffle dev kit. One of the key rules of Blockchain is that once a contract is deployed to the network, it’s set in stone forever, meaning no one can ever change the way it’s written.
This is great because it enables decentralization of a contract, but also means that mistakes are very costly. In order to minimize any errors are contract may have, Truffle offers a testing feature that allows developers to write their own tests to simulate how the contract may be interacted with once on the network. If you’ve ever worked with Mocha tests, the process runs the same.
To start writing tests for our contract, start a new file test1.js in the ./test directory of our project. At the top store an inclusion of our contract into a variable:
var pnpc = artifacts.require("./PubNubTimeSheet.sol"); If you’re new to JavaScript async awaits and our notation, I highly recommend watching a few videos from the Youtube channel The Coding Train (start here: https://www.youtube.com/watch?v=XO77Fib9tSI) as this is a very valuable skill to learn for writing quick and quality code for DApps.
Going into full detail about how to write test functions is out of the scope of this tutorial, but you can learn a lot from playing with the test I wrote here:
contract('PubNubTimeSheet', async (accounts) => {
  //state the objective of your test
  it("should initialize number 4 to first employee address", async () => {
    //store the instance of your contract deployment promise into a variable
    var instance = await pnpc.deployed();
    //call setEmployee() to set the id# 4 to the first address in our Truffle test library
    await instance.setEmployee(4, accounts[0]);
    //call our getter function to retrieve the id# of the account with this address
    var test = await instance.getMapping(accounts[0]);
    //testing condition
    assert.equal(test, 4); //
  });
});
Once saved, compile your code by going to the terminal project directory and hit
truffle compile
To run the test open up your terminal and go to the directory of your project and type “truffle test”. You should see an output like this:

Ideally, you should write many many MANY tests and try to write a test for EVERY possible scenario imaginable on how your contract can be interacted with.
Step 6: Deploying to a Network
While there are many ways to deploy your contract the best way is to use the Infura custom provider. Infura is a service that hosts an Ethereum node for you and your users so you don’t have to (it can take days to weeks to months to host your own node).
Additionally, you’re going to want to use a test network first before you deploy to the main Ethereum network as the main will cost money to function and a test network is a great place to beta test your contracts further.
To begin deployment, you first need to install a chrome extension called MetaMask, which holds your Ethereum Wallet. Sign up to their service and save your received mnemonic somewhere safe.
Next, go to Infura and sign up to get a network API key. This is the URL key to where your node is being hosted. You are allowed to pick which network to choose, but for this demo we are going with Ropsten, which looks something like this in an email: “https://ropsten.infura.io/v425L7501kT4oFF4kUr0”. The last dependency to install is the Infura HD wallet provider, which can be installed through your terminal with:
npm install truffle-hdwallet-provider
Next, open up the truffle.js file in the DEMO project and past this code template, but replace it with your mnemonic and api key:
//include Wallet
var HDWalletProvider = require("truffle-hdwallet-provider");
//mnemonic
var mnemonic = "seminar owner mushroom torch diamond dragon hire box code regret bitter divorce"
module.exports = {
  networks: {
    //change this to whatever network you decide to (ex. ropsten, rinkeby, etc)
    ropsten: {
      provider: function() {
        //replace with your specific api key given by Infura
        return new HDWalletProvider(mnemonic, "https://ropsten.infura.io/v425L7501kT4oFF4kUr0")
      },
      network_id: 1,
      //optional, but if your code fails, remove this part
      gas: 980000
    }
  }
};
In order to actually deploy your contract, you will need to have some test ether in your account to pay the gas price used to put your code out on the network. You can get free test ether from one of the many online free ether faucets. I used this one: http://faucet.ropsten.be:3001/
Lastly, open up your terminal for the last time and go to your DEMO directory and enter this command:
truffle compile
truffle migrate --network ropsten
If everything is running well, you should see an output like this

You can double check the deployment transaction by taking your contract address (mine was 0x7a2c5bd8ff6f5a49c337dcf2a28882683a7ba949) and looking it up on https://ropsten.etherscan.io/
Since writing to the Blockchain is beyond the scope of this tutorial, if you wish to test your contract’s ability to store employees into your system on the network, this is a quick and easy tutorial on how to do so: https://coursetro.com/posts/code/99/Interacting-with-a-Smart-Contract-through-Web3.js-%28Tutorial%29
Congrats! Your contract is now on the Ropsten Network!
Step 7: PubNub Functions
The magic of PubNub lies in the fact that Functions allows you to deploy a block of JavaScript code globally within seconds. Since any public Ethereum contract can be accessed through JSON RPC calls, this allows us to do some very cool things. From data processing to Blockchain surveillance, developers are able to call multiple Blockchain functions to receive data and have separate JavaScript code to asynchronously interact with that data all in realtime!
Infura allows read-only interactions with the Blockchain, which means you can’t sign transactions, but that’s ok because not only does signing transactions requires the sacrifice of exposing your private key, but also requires actual Ethereum blocks to be mined which could take a long time. Here at PubNub, we’re all about things that run less than a quarter of a second!
In order to execute Ethereum Json RPC calls into your PubNub Functions you must first sign up for a free account here.

Once you created your account navigate to this page and click the “Create New App” and Name your App.
Enter into your App and hit the “Functions” tab on the left side and click “Create Module”.
Fill out the proper information.
 You should now be at this page.
Follow the proper buttons to create a new function. If you need help, you can use the “Guide Me” button to assist you.
For the “Event Type” of your function, it should be set to “On Request”
Name a URI Path.
Once your function is created, follow this template to make the basic JSON RPC calls. You can add in whatever other code you desire to handle the data up to 64Kbs.
export default (request, response) => {
    const xhr = require("xhr");
    const http_options = {
        "method": "POST", // or PUT
            //Follow the Json RPC format stated on the JSON RPC ethereu Wiki page
        "body": {"jsonrpc":"2.0","method":"eth_call","params":[{"to": "Contract Address", "data": "ABI econded data"},"latest"],"id":1}
    };
    //api key
    const url = "https://ropsten.infura.io/7grxKFmNG4uXUzkH2ptY";

    return xhr.fetch(url, http_options).then((x) => {
        const body = JSON.parse(x.body);
        console.log(body);
        return response.send();
    });

};
To test the RPC calls, go to the left-hand side of the page and change the payload tester option from GET to POST like this:
 Lastly, hit the post button and if your request went through successfully you should see a 200 response output like this.

In my example, I called my GetHours function for the 0th employee and the response looks correct as I have not inputed any employee hours into my punchcard yet!
And that’s it! Now you have the power to interact with any public contract function and pull data from it WHENEVER you want WHEREVER you want!
Try PubNub today!


