

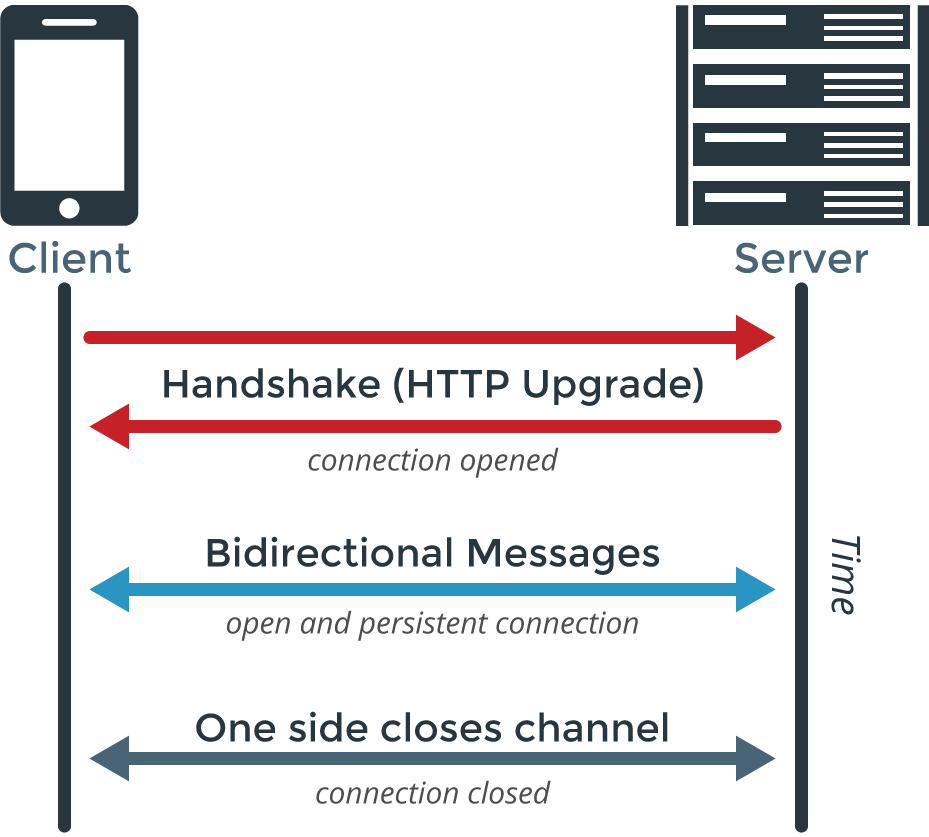
The WebSocket protocol provides an always-on connection between a client and a server for bi-directional communication. This is great for applications that require a realtime connection, such as multiplayer games, IoT devices, and chat apps. In this tutorial, we are going to set up a simple Android client that will connect to a WebSocket server using Spring Boot.
Android WebSocket Client
For the Android client, we are going to make a simple demo app that contains four image buttons of cute animals. To get started, initialize a new project on Android Studio, with a Basic Activity, called JavaWebSocketClient. We are going to use a lightweight WebSocket client library for the app, which can be found in this repo. In order to use this library, we have to add it to the build.gradle file in the app directory. Add the following to the dependencies and sync the project:
dependencies {
    // Add this
    implementation 'tech.gusavila92:java-android-websocket-client:1.2.2'
    implementation fileTree(dir: 'libs', include: ['*.jar'])
    ...
}
Make sure to include the internet access permission in the manifest file:
<uses-permission android:name="android.permission.INTERNET" />
Connect the Client to the Server
Go to MainActivity.java, import the following packages and set up onCreate():
import android.os.Bundle;
import android.support.v7.app.AppCompatActivity;
import android.util.Log;
import android.view.View;
import android.widget.TextView;
import java.net.URI;
import java.net.URISyntaxException;
import tech.gusavila92.websocketclient.WebSocketClient;

public class MainActivity extends AppCompatActivity {
  private WebSocketClient webSocketClient;

  @Override
  protected void onCreate(Bundle savedInstanceState) {
    super.onCreate(savedInstanceState);
    setContentView(R.layout.animal_sounds);
    createWebSocketClient();
  }
}
Next, create a new method createWebSocketClient():
  private void createWebSocketClient() {
    URI uri;
    try {
      // Connect to local host
      uri = new URI("ws://10.0.2.2:8080/websocket");
    }
    catch (URISyntaxException e) {
      e.printStackTrace();
      return;
    }

    webSocketClient = new WebSocketClient(uri) {
      @Override
      public void onOpen() {
        Log.i("WebSocket", "Session is starting");
        webSocketClient.send("Hello World!");
      }

      @Override
      public void onTextReceived(String s) {
        Log.i("WebSocket", "Message received");
        final String message = s;
        runOnUiThread(new Runnable() {
          @Override
          public void run() {
            try{
              TextView textView = findViewById(R.id.animalSound);
              textView.setText(message);
            } catch (Exception e){
                e.printStackTrace();
            }
          }
        });
      }

      @Override
      public void onBinaryReceived(byte[] data) {
      }

      @Override
      public void onPingReceived(byte[] data) {
      }

      @Override
      public void onPongReceived(byte[] data) {
      }

      @Override
      public void onException(Exception e) {
        System.out.println(e.getMessage());
      }

      @Override
      public void onCloseReceived() {
        Log.i("WebSocket", "Closed ");
        System.out.println("onCloseReceived");
      }
    };

    webSocketClient.setConnectTimeout(10000);
    webSocketClient.setReadTimeout(60000);
    webSocketClient.enableAutomaticReconnection(5000);
    webSocketClient.connect();
  }
This may look like a lot, but really, we are doing four key things in this method:
- Starting a new connection to the localhost “ws://10.0.2.2:8080/websocket”.
- Sending a message to the server once a connection is opened.
- Displaying the messages sent from the server on the app.
- Setting timeouts and automatic reconnection.
Now that we connected the client to the server, let’s set up the method to send messages to the server.
Send Messages to the Server
In MainActivity.java, add the following to sendMessage():
public void sendMessage(View view) {
   Log.i("WebSocket", "Button was clicked");

   // Send button id string to WebSocket Server
   switch(view.getId()){
     case(R.id.dogButton):
       webSocketClient.send("1");
       break;

     case(R.id.catButton):
       webSocketClient.send("2");
       break;

     case(R.id.pigButton):
       webSocketClient.send("3");
       break;

     case(R.id.foxButton):
       webSocketClient.send("4");
       break;
   }
 }
When a button is pressed, the button id is sent to the server. This method is called from the file animal_sounds.xml, which you can get from my Java WebSocket Programming Repo. Make sure to modify the file strings.xml under the values directory so you won’t get any errors in the XML file.
The last thing to do on the client-side is to add the images for the animals in the drawable directory. The images are made by Freepik from www.flaticon.com.
Run the Android app in your emulator:

Nothing happens right now because the server is not set up. Let’s do that right now!
Spring Boot WebSocket Server
For our server, we will use Spring Boot which makes it easy to create production-grade Spring applications with minimum configurations. To quickly bootstrap our project, we will use Spring Initializr. We will generate a Gradle project, but you can also generate a Maven project if you prefer. Configure the Initializr like the screenshot below and make sure to add WebSocket as a dependency:

Generate the project to download a zip file. Once you unzip the file, go to the src directory and keep on clicking the subdirectories until you get to the JavaWebSocketServerApplication.java file.
package com.example.javawebsocketserver;

import org.springframework.boot.SpringApplication;
import org.springframework.boot.autoconfigure.SpringBootApplication;

@SpringBootApplication
public class JavaWebSocketServerApplication {
  public static void main(String[] args) {
    SpringApplication.run(JavawebsocketserverApplication.class, args);
  }
}
Add two files to the directory: WebSocketHandler.java and WebSocketConfiguration.java.
Handle the WebSocket Messages
We have to handle the incoming messages that arrive in the server. To do so, in WebSocketHandler.java inherit the class AbstractWebSocketHandler to implement the method handleTextMessage(). Add the following code to the file:
package com.server.javawebsocketserver;

import org.springframework.web.socket.TextMessage;
import org.springframework.web.socket.WebSocketSession;
import org.springframework.web.socket.handler.AbstractWebSocketHandler;
import java.io.IOException;

public class WebSocketHandler extends AbstractWebSocketHandler {
    @Override
    protected void handleTextMessage(WebSocketSession session, TextMessage message) throws IOException {
        String msg = String.valueOf(message.getPayload());
        // Send back unique message depending on the id received from the client
        switch(msg){
            case("1"):
                System.out.println("Dog button was pressed");
                session.sendMessage(new TextMessage("Woooof"));
                break;

            case("2"):
                System.out.println("Cat button was pressed");
                session.sendMessage(new TextMessage("Meooow"));
                break;

            case("3"):
                System.out.println("Pig button was pressed");
                session.sendMessage(new TextMessage("Bork Bork"));
                break;

            case("4"):
                System.out.println("Fox button was pressed");
                session.sendMessage(new TextMessage("Fraka-kaka-kaka"));
                break;

            default:
                System.out.println("Connected to Client");
        }
    }
}
Inside the method, we simply get the string value of the message payload and do a switch expression to check the value of the message with the value of each case. A unique message with the animal sound is sent to the client.
Configure the WebSocket Request Handling
In WebSocketConfiguration.java, implement the interface WebSocketConfigurer and add the following code to the file:
package com.server.javawebsocketserver;

import org.springframework.context.annotation.Configuration;
import org.springframework.web.socket.config.annotation.EnableWebSocket;
import org.springframework.web.socket.config.annotation.WebSocketConfigurer;
import org.springframework.web.socket.config.annotation.WebSocketHandlerRegistry;

@Configuration
@EnableWebSocket
// Add this annotation to an @Configuration class to configure processing WebSocket requests
public class WebSocketConfiguration implements WebSocketConfigurer {
    @Override
    public void registerWebSocketHandlers(WebSocketHandlerRegistry registry) {
        registry.addHandler(new WebSocketHandler(), "/websocket");
    }
}
We set up the method registerWebSocketHandlers to configure the WebSocketHandler to the path “/websocket“.
That is all for the server-side. Now that we have everything set up, let’s start the WebSocket server and run the app!
Send Data between Server and Client
In the terminal, go to the root directory of your Spring Boot project and run the following command to start the server:
gradle bootRun
Next, run the Android client in Android Studio and once the app loads, click any of the four buttons.

Play around with the Android app and see how messages are sent from client-to-server with WebSockets!
Update the Android Client to Pub/Sub
Sending data client-to-server or server-to-client is not difficult and can be done pretty fast. But what if you want to send data client-to-client? You can’t directly connect clients without implementing some routing and broker logic on the server.
There are several tools we can use to make this task less time-consuming. One such tool is Socket.IO, which sets up a real-time, bidirectional connection between clients. This is a great open-source tool to use, but we still need to set up a server and connect the client to the server. Is there an easier way to securely and reliably send data between clients without manually setting up a server? With PubNub, we can.
 PubNub provides the realtime infrastructure to power any device that speaks TCP. We can stream data from client-to-client, client-to-server or server-to-client using PubNub’s Global Data Stream Network in under 100 ms! With PubNub, an always-on connection is made between the devices connected to the channel, similar to WebSockets. The best part is that you don’t have to worry about setting up a server and maintaining the server because PubNub is serverless and is infinitely scalable.
To see how PubNub simplifies the process of sending data from client-to-client, we will modify the Android app we built earlier. But first, sign up for a free PubNub account to get your free Pub/Sub API keys. Sign up and log in using the form below:
Modify the Android Client
To differentiate the updated app from the old app, create a new Android project called PubNubJavaClient. In order to use PubNub’s Android SDK, add the following to the build.gradle file in the app directory and sync the project:
dependencies {
    implementation group: 'com.pubnub', name: 'pubnub-gson', version: '4.25.0' // Add this
    implementation fileTree(dir: 'libs', include: ['*.jar'])
    ...
}
Include the following permissions to the manifest file:
<uses-permission android:name="android.permission.INTERNET" />
<uses-permission android:name="android.permission.ACCESS_NETWORK_STATE" />
Everything else, except MainActivity.java, is the same. From the previous app, add the following files to the updated app: animal_sounds.xml, strings.xml and the images from the drawable directory. Once you finish this, go to MainActivity.java to add the new code. Import the following packages and set up onCreate():
import android.support.v7.app.AppCompatActivity;
import android.os.Bundle;
import android.view.View;
import android.widget.TextView;
import com.pubnub.api.PNConfiguration;
import com.pubnub.api.PubNub;
import com.pubnub.api.callbacks.PNCallback;
import com.pubnub.api.callbacks.SubscribeCallback;
import com.pubnub.api.models.consumer.PNPublishResult;
import com.pubnub.api.models.consumer.PNStatus;
import com.pubnub.api.models.consumer.pubsub.PNMessageResult;
import com.pubnub.api.models.consumer.pubsub.PNPresenceEventResult;
import java.util.Arrays;

public class MainActivity extends AppCompatActivity {
  PubNub pubnub;
  TextView textView;

  @Override
  protected void onCreate(Bundle savedInstanceState) {
    super.onCreate(savedInstanceState);
    setContentView(R.layout.animal_sounds);

    initPubNub(); // Initialize PubNub
  }
Make a call to initPubNub() to initialize PubNub:
public void initPubNub(){
  PNConfiguration pnConfiguration = new PNConfiguration();
  pnConfiguration.setPublishKey("ENTER_YOUR_PUB_KEY"); // REPLACE with your pub key
  pnConfiguration.setSubscribeKey("ENTER_YOUR_SUB_KEY"); // REPLACE with your sub key
  pnConfiguration.setSecure(true);
  pubnub = new PubNub(pnConfiguration);

  // Listen to messages that arrive on the channel
  pubnub.addListener(new SubscribeCallback() {
    @Override
    public void status(PubNub pub, PNStatus status) {
    }

    @Override
    public void message(PubNub pub, final PNMessageResult message) {
      // Replace double quotes with a blank space
      final String msg = message.getMessage().toString().replace("\"", "");
      textView = findViewById(R.id.animalSound);

      runOnUiThread(new Runnable() {
        @Override
        public void run() {
          try{
            // Display the message on the app
            textView.setText(msg);
          } catch (Exception e){
              System.out.println("Error");
              e.printStackTrace();
          }
        }
      });
    }

    @Override
    public void presence(PubNub pub, PNPresenceEventResult presence) {
    }
  });

  // Subscribe to the global channel
  pubnub.subscribe()
    .channels(Arrays.asList("global_channel"))
    .execute();
}
We do three key things in this method:
- Initialize the PubNub client API. Make sure to replace “ENTER_YOUR_PUB_KEY” and “ENTER_YOUR_SUB_KEY” with your Pub/Sub keys.
- Set up a listener to get notified of messages that arrive on the channel. As we did earlier, display the message on the app for the client to see.
- Subscribe to the global channel where messages will be published.
When the user presses a button, the method sendMessage() is called:
// This method is called when a button is pressed
public void sendMessage(View view) {
  // Get button ID
  switch(view.getId()){
    case(R.id.dogButton):
      publishMessage("Woooof");
      break;

    case(R.id.catButton):
      publishMessage("Meooow");
      break;

    case(R.id.pigButton):
      publishMessage("Bork Bork");
      break;

    case(R.id.foxButton):
      publishMessage("Fraka-kaka-kaka");
      break;
  }
}
This method is similar to what we did earlier, except now we publish the actual message, the animal sound, to the global channel and not the server. We use publishMessage() as a helper function to publish the message.
public void publishMessage(String animal_sound){
  // Publish message to the global chanel
  pubnub.publish()
    .message(animal_sound)
    .channel("global_channel")
    .async(new PNCallback<PNPublishResult>() {
      @Override
      public void onResponse(PNPublishResult result, PNStatus status) {
        // status.isError() to see if error happened and print status code if error
        if(status.isError()) {
          System.out.println("pub status code: " + status.getStatusCode());
        }
      }
    });
}
That is all we need to get the app up-and-running!
Send Data Between Clients
Run the Android app in two emulators to see messages appear in realtime.

Now that you know how to send data with WebSockets in Java, make sure to check out the other tutorials in Socket Programming in Python and WebSocket Programming in Node.js.
Have suggestions or questions about the content of this post? Reach out at devrel@pubnub.com.
Try PubNub today!


