

IN THIS ARTICLE

We’ve updated our SDKs, and this code is now deprecated.
Learn more in our Push Notification Overview and Documentation.
You may be wondering if it’s possible to send Android push notifications from web apps written in JavaScript without setting up your own server. Well, it absolutely is when you combine the PubNub Push APIs with PhoneGap!
In this step-by-step tutorial, you will learn how to set up Google Cloud Messaging, how to receive push notifications to Android using PhoneGap, and how to send push notifications using PubNub.
Prerequisites
You need to be familiar with PhoneGap Command Line Interface, or its open-source version, Cordova. For the first time PhoneGap developer, you should begin with the previous article, Converting Your JavaScript App to an Android App w/ PhoneGap
Interactive Demo
I have created this demo, which simulates an Internet of Things desktop controller that lets you change room temperature. When you set it over 80F, it sends your Android device a push notification. You need an Android app and desktop web to try this out:
- On your Android device, download and install the demo apk
- On your desktop browser, Access the web app, and follow the instructions on the web site
1. Using Google Cloud Messaging
Google Cloud Messaging (GCM) is a service for Android devices to send and receive Android push notification messages. The typical flow looks like:
To register a device:
- An Android device sends a Sender ID to GCM server
- GCM server sends back the Registration ID to the device
- Your server (in this case, you don’t need your own server because you are going to use PubNub network!) store the registration ID
To send a push notification:
- Your server (PubNub network) sends a request to GCM with the registration ID
- GCM sends a push notification to the device
How Google Cloud Messaging works
1.1. Setting up Your Google Project
To enable GCM service, you must configure in Google Developer Console.
- Go to Google Dev Console at cloud.google.com/console
- Create a project
- On Project Dashboard, click Enable API button
- Turn on Google Cloud Messaging for Android

Setting up Google Project
1.2. Getting Your API Key
Also, you will need your API key to be able to use the service. Keep this key to enable PubNub Push API later.
- From the left menu on Dashboard, select Credentials
- Under Public API Access, click Crete new Key
- Select Server key
- click Create

Getting API key
1.3. Getting Your Sender ID
Copy the Project Number, which you should find on the top of the Project Dashboard. This is your GCM Sender ID you will need to enter in your Cordova app later. Finally, you are ready to use Android push notifications!
1.4. What You Are Going to Develop with GCM
Let’s start developing!
You are going to create an Android app to register the device to GCM, and receive notifications, also a web interface to send notifications to the registered Android device via GCM.
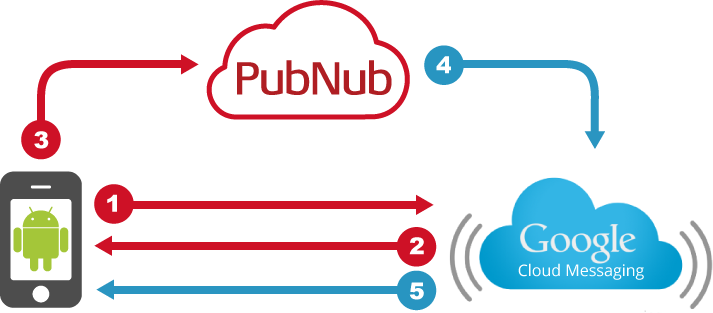
This diagram below is the same as the GCM diagram, shown at Section 1 intro, plus a user-flow from a desktop browser is included to suit the demo for this tutorial. The desktop is where a user changes room temperature, as publishing the information to PubNub service (step 4 in gray). If the room temperature setting is above 80F, PubNub connects to GCM (step 5) to send a push notification to the registered device (step 6).

PubNub JavaScript API to send push notification to Android via GCM
Let’s start with an Android app. The Android app will take care the step 1, 2, 3 and 6 shown in the diagram.
2. Developing Android App with Cordova
In this example, I am using PhoneGap’s open-sourced sibling, Cordova. First, create a project using Cordova CLI.
$ cordova create push-demo com.mydomain.push PushDemo
$ cd push-demo
$ cordova platform add android
2.1. Installing Cordova Push Plugin
Cordova Push Plugin allows your application to receive push notifications on Android, as well as Amazon Fire OS, iOS, Windows Phone and Windows8 devices. The plugin can be automatically installed via the Cordova CLI:
$ cordova plugin add https://github.com/phonegap-build/PushPlugin.git
This will install PushNotification.js file under /plugins directory, and you need to copy this to somewhere under /www, where you will be working.
2.2. Using GCM with Cordova
Include the PushNotification.js and pubnub.js in /www/index.html
Here, you will be writing an Android app as a companion app that goes with a desktop interface. What it does is just registering a device to obtain an Registration ID (explained at Section 1), so your JavaScript web app can send it push notifications.
When you created a new project template, you should already have an /www/index.js with a few functions that PhoneGap uses have already filled in. Where the addEventListener method registers for deviceready event type, change the name of the listener to the starting point of your app, let’s call it init. And in your init function, create a plugin instance, then register the device as follows:
The Sender ID is the one you have obtained when you registered at Google API Project earlier (See Section 1.3). Define seccessHandler and errorHandler callbacks, also the ecb event callbacks as follows:
2.3. Testing on Android Emulator
To test GCM push notifications on emulators, you need to enable the feature first. Otherwise, Sender ID is never registered and the event is never called. To enable it on an emulator, you need to:
- Open Eclipse
- Open Android Virtual Device Manager
- Choose an emulator from the list to edit
- Switch the Target to Google APIs (Google inc.) from whatever you have set, such as Android 4.4

How to test push on Android emulator
If you haven’t set up an emulator yet, please review my previous tutorial.
When you are ready, to quickly test if you get your device’s registration ID, replace the deviceRegistered function with alert(e.regid), where registered event is received.
The registration ID should be a long alphanumerical string like, APA91bERgbCFiAaR5axxHISeMDlCYfJB7pe95StxxxxNETEkBxgWY-HkxTXkBc9Ja9w_Cvb….
Finally, build the Cordova app on either an emulator or a real deviece. In the next steps, you will be writing a web interface to send a push message to the registered device. The entire source code of this index.js used to build the actual demo Android app is on Gist.
3. Sending Android Push Notifications from a Web Site
Now your Android device is ready to receive push notifications via GCM, so let’s create a desktop web to send messages. The browser app will take care of the step 4 and 5 in the diagram shown earlier.
Normally, to be able to send messages to GCM, you need to set up your server. However, with using PubNub Mobile Push Gateway, you can can instantly deliver platform specific push notifications by just write front-end JavaScript and even run it on places like GitHub pages. It really eliminates the burden of developing an additional server side component!
3.1. Creating a Web Page
From now on, you no longer use Cordova. Just ceate a new web page with HTML, CSS and JavaScript. Don’t forget to include pubnub.js to your index.html, then initialize PubNub.
In the demo app, I am simulating an Internet of Things user interface with a fake temperature controller. Once a user sets the temperature too high, let’s say, 80F, it sends your device a push notification via GCM. This is a simplified code to handle the user interaction:
3.2. Using PubNub Mobile Push Gateway
To use the feature, you need to activate the feature at Admin portal. Enable it by clicking Add at Push Notifications box. You need to enter the GCM API key that you have obtained at Google API Dashboard earlier (See Section 1.2). There are two step to send a message via GCM-
- Register a device to PubNub channel
- Send a message to GCM service
T0 register a device to a channel, use mobile_gw_provision API. The basic usage is as follows:
Note: In the code, I used a static value for the gcm_regid to simplify the code sample, however in a real scenario, you are handling multiple devices. You should take advantage of PubNub Storage/Playback Service– store a registration ID from Cordova app, and grab the ID from web!
Once the device is registered to PubNub, it calls the callback that sends a message payload to GCM service. Use a PubNub message object, PNmessage, then use gcm to set the GCM message object.
Hooray! Now you should be able to send push notifications to your device!

Notification sent to Moto 360 Android watch
Again, I used a simplified code sample to keep the tutorial easier to follow, but if you wish for the entire source code of the web app demo, you can view it on GitHub, and the source code for index.js in Cordova app is on Gist.
I hope you enjoyed this tutorial. In a week or two, we’ll be releasing the this tutorial for iOS, so stay tuned!
 | Source code: The source code is available in the github repository |


