IN THIS ARTICLE

We’ve updated our SDKs, and this code is now deprecated.
Learn more in our Push Notification Overview and Documentation.
![]() When developing mobile applications for smart phones and tablets, there is no “one size fits all” solution for realtime data propagation. This is because each mobile operating system provides its own solution for native application push notifications.
When developing mobile applications for smart phones and tablets, there is no “one size fits all” solution for realtime data propagation. This is because each mobile operating system provides its own solution for native application push notifications.
In iOS, this mechanism is APNs, or Apple Push Notification Service. In Android, the mechanism for native applications is Google Cloud Messaging (GCM) notifications.
To clarify the use cases a bit: when an app is in the foreground, PubNub’s channels will do a great job for providing realtime data streams. The tricky case happens when the app is in the background, when the user has its phone locked, and especially when the user doesn’t have access to an internet connection via WiFi or LTE.
To cope with these tricky cases, the easiest solution is mobile push notifications. Google provides an amazing service called Google Cloud Messaging, which we described in our Android push notifications with GCM overview.
If your application is destined for multiple platforms, the PubNub SDK makes your life easier by supporting APNs and GCM out of the box. Even if you don’t support multiple platforms yet, using the PubNub support for GCM will streamline your code by using a single set of libraries for PubNub Data Streams as well as GCM notifications.
Getting Started
If you took a look at the end of our previous article, you have all the necessary information to get your developing environment setup: getting the proper API Keys, getting the right dependencies, etc. Make sure you have Google Play Services available.
Our App
We are going to take a look at the basic blocks of code you’ll need to make your own application with GCM-enabled. For this reason, we will keep the code minimal, with a very basic user interface. This article will only review the key elements of the code.
Our application is going to receive GCM Mobile Push Notifications and send them over PubNub.
The most important element here is that we want our app to receive these notifications even if the app is not on the foreground: it must be able to work even if the screen is off and the phone is locked.
To do so we will need 3 classes:
- An Activity which controls the view. We will be able to register, unregister and send push notifications from this screen.
- A Service which will receive the GCM message and show it to the user as a notification, regardless of if our app is on the foreground.
- A Broadcast Receiver. This class will need to be registered in the manifest. Its role is to listen for system events for example. In our case it will be listening for received GCM messages. The receiver will open s partial wake lock to allow the CPU to run our Service even if the screen is off. We must release the wake lock as soon as our service is done.
Ready? Let’s roll. Create a new project with the usual hello-world activity, get the dependencies and we are good to go.
Manifest
Let’s start with our manifest. We’ll want to add some permissions under the manifest markup.
Next step is to register our Broadcast Receiver and Service. You should already have that last line in your manifest if you added the google play services properly.
Broadcast Receiver
We are going to start by creating a new class which extends WakefulBroadcastReceiver.
This is fairly simple code. When the broadcast receiver receives the event, the overridden method is called. It launches our service.
However, note that we did not use a BroadcastReceiver but a WakefulBroadcastReceiver. This simplifies our task: we a normal broadcast receiver, we would need to wake up the CPU if the screen is off, launch the service and put the phone back to sleep. This requires manipulating the Android PowerManager and WakeLock. The WakefulBroadcastReceiver takes care of all that for us. Pretty neat.
The Service
A broadcast receiver by design cannot execute long tasks. It must call other classes to do its work. We need to create a new class. We cannot start a new activity because we do not want the user to be forced to switch to our app. Instead we use a service. It will be able to execute tasks in the background.
We decided to keep it simple. The message content is included in the intent extras. There are various message types, in this code we are only considering the most common case which will probably a message of type message. We extract its content and feed it to a method which creates the notification to the user.
The last line releases the wake lock which was provided by our WakefulBroadcastReceiver.
This is fairly classic code to create a notification which redirects to our main activity when clicked on.
This is pretty good!
So far we have a receiver which waits for “received GCM message” events and starts a partial wake lock for our service to generate the notification. Once the notification is created, we release the wake lock.
Now our next step is to register our app to the Google Cloud Messaging service!
Main Activity
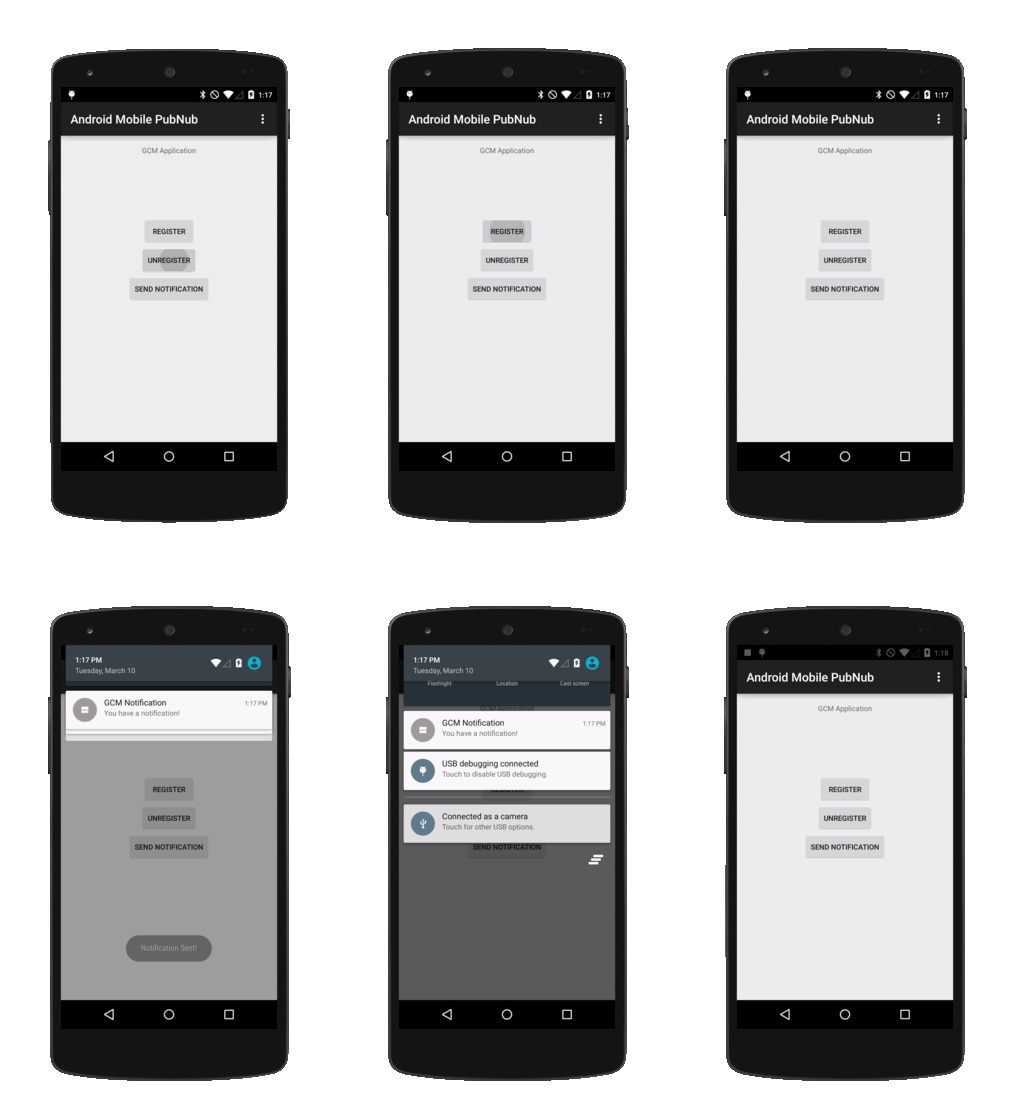
We are not get into the details of the user interface and the code wiring the buttons, feel free to make your own UI/UX. The code samples are just guides to create your own app. This is what our very basic and sober UI looks like:
Our code so far receives the notifications, but we do need to tell Google Cloud Messaging which device should receive these notifications. This step is called registering the app.
We need to send the “sender id” to the GCM servers. This sender id is your project’s number which is available on the google developer’s console. If you followed our GCM notification overview, you should be all set.
When we register an app, we will receive a registration ID which we must store. We decided to store it in the shared preferences. Our code follows several steps:
- Check if Google Play Services are available – If not, abort.
- Check if we are already registered. If so, abort.
- Register to GCM and receive our registration ID.
- Store our registration ID.
Registration
Note, regId is a class variable.
We start our registration process by checking it Google Play Services are available -we will look into that part of the code in a second. If they are, another piece of our code will retrieve that data from the shared preferences. If we return an empty string, we aren’t registered and need to register in the background, off of the main thread.
Checking Google Services
The code is fairly self explanatory.
Fetching the Registration Id
We look for the registration ID in the shared preferences. If they are not available, we return an empty string.
Requesting The Registration Id
This task may take longer time and needs to be executed off of the main thread. Most of the code is straightforward. We are calling 2 methods which we will describe in a second. Not that we are registering with the SENDER_ID which was provided by the google console.
Our next step is to send the registration Id to PubNub!
Setting Up PubNub
Our app will be communicating with PubNub’s servers thanks to a PubNub instance. This instance is initialized at startup with our PubNub account keys.
To get your unique pub/sub keys, you’ll first need to sign up for a PubNub account. Once you sign up, you can get your unique PubNub keys in the PubNub Developer Dashboard. Our free Sandbox tier should give you all the bandwidth you need to build and test your messaging app with the web messaging API.
Now that we have our PubNub instance, we can send the registration Id to PubNub!
It’s as simple as that! PubNub already has access to our Google Play Server API Key. Google recognizes our app thanks to the sender Id. Now PubNub needs to manage the devices which will receive notifications.
To clear out any possible confusion, this enables push notification for the device for this given channel. Other devices may be subscribed to the same channel, and enabling or disabling push notifications will only impact the current device and not all the ones subscribed to this given channel.
Saving the Registration id
Sending Notifications
Sending a notification requires creating a JSON object. It is then added to a PubNub GCM specific message (the message is formatted for you).
Note that we have to create the callback methods which will be fired when the message is published:
At this point you can pretty much already have a functioning app! The next step is to unregister your App!
Unregister
The steps are similar to registration. We simply need to unregister the app to GCM servers, remove the registration Id from memory.
You are now all set! We look forward to seeing you create more awesome apps with PubNub! If you want to learn more about PubNub, GCM, and Apple APNs for push notifications, our experts discuss in the video below:


