IN THIS ARTICLE
Building a realtime Android chat app can be challenging. With tons of solutions, services, and open-source options available, choosing the right stack isn’t always clear. In this tutorial, we’ll use PubNub to power our Android chat app.
We’ll start with the basics, writing an Android chat application in Kotlin that can send (publish) and receive (subscribe) data between Android phones.
What is the publisher/subscriber model?
To understand the publisher/subscriber pattern, imagine a classroom. In the classroom, think of the teacher as a publisher and the students as the subscribers. Whenever the teacher writes something on the board (publishes) all the students can see it.
Using PubNub, there are data conduits called channels. In our analogy, channels are classrooms. With PubNub, there is no limit of publishers and subscribers.
In our example, PubNub plays the role of the school. Facilitating the teachers (publishers) and students (subscribers) to be able to communicate. PubNub also bakes-in crucial functionality such as granting permissions and in-transit data manipulation, so you can make secure 1-to-1 chats.
The full Android Chat Example GitHub repository is available as well.
Configuring and Creating the Android Project
To start off, we’ll need to make sure that we have Android Studio configured. To get it set up, download Android Studio. Once that’s done, run it and go through the one-time setup.
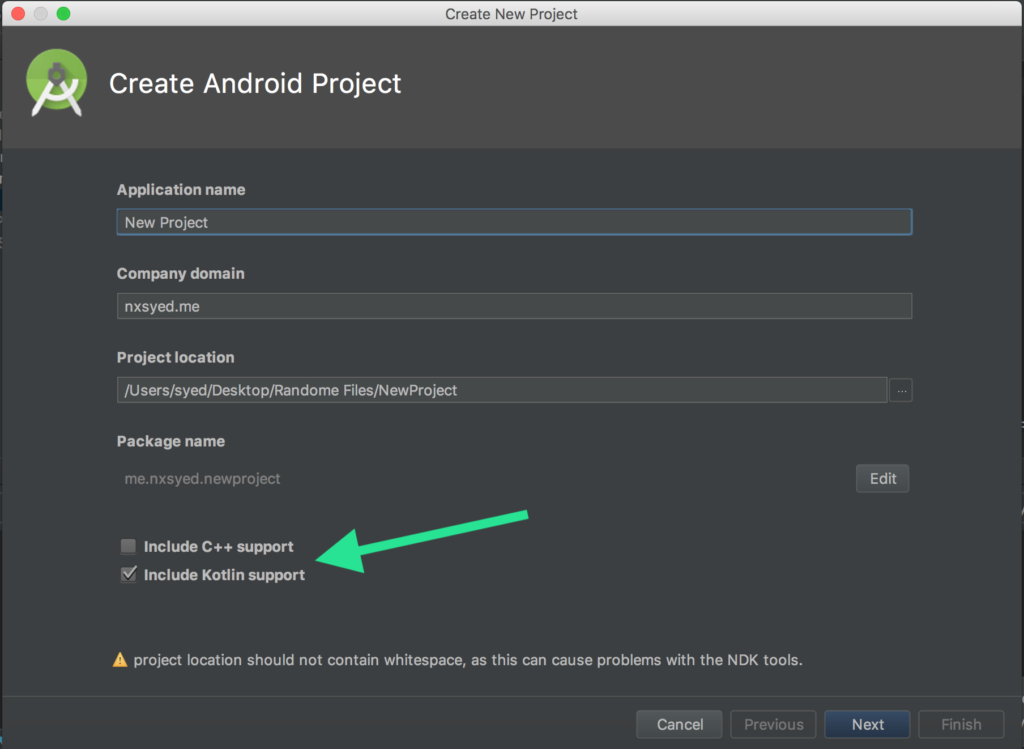
Great, now that we have Android Studio, create a new project. To build this project in Kotlin, we need to make sure that we check the Kotlin checkbox during the setup. For most of the setup, clicking “Next” on all of the default settings is fine.
The next step is adding PubNub to our project. The best way to do that is to add the dependency in the app level Gradle file of your project.
dependencies {
    implementation group: 'com.pubnub', name: 'pubnub-gson', version: '4.20.0'
    // … Other code
}
Creating a Frontend in XML for the Android app
We’ll make the front-end show both sides of the publisher-subscriber pattern. We’ll add a TextView that will show the latest message published. Also, we’ll add a TextEdit that will allow the user to input and publish a message.
<?xml version="1.0" encoding="utf-8"?>
<android.support.constraint.ConstraintLayout xmlns:android="http://schemas.android.com/apk/res/android"
    xmlns:app="http://schemas.android.com/apk/res-auto"
    xmlns:tools="http://schemas.android.com/tools"
    android:layout_width="match_parent"
    android:layout_height="match_parent"
    tools:context=".MainActivity">
    <TextView
        android:id="@+id/textViewSubscribe"
        android:layout_width="wrap_content"
        android:layout_height="wrap_content"
        android:layout_marginBottom="8dp"
        android:layout_marginEnd="8dp"
        android:layout_marginStart="8dp"
        android:layout_marginTop="8dp"
        android:text="Messages received will be displayed here"
        app:layout_constraintBottom_toBottomOf="parent"
        app:layout_constraintEnd_toEndOf="parent"
        app:layout_constraintStart_toStartOf="parent"
        app:layout_constraintTop_toTopOf="parent" />
    <EditText
        android:id="@+id/editTextPublish"
        android:layout_width="wrap_content"
        android:layout_height="45dp"
        android:layout_marginBottom="8dp"
        android:layout_marginEnd="8dp"
        android:layout_marginStart="8dp"
        android:layout_marginTop="8dp"
        android:ems="10"
        android:hint="Enter message to send"
        android:inputType="text|textPersonName"
        app:layout_constraintBottom_toBottomOf="parent"
        app:layout_constraintEnd_toEndOf="parent"
        app:layout_constraintStart_toStartOf="parent"
        app:layout_constraintTop_toBottomOf="@+id/textView" />
</android.support.constraint.ConstraintLayout>
NOTE: You must ask for user permission for the application to run properly at runtime. The line of code below must be included in AndroidManifest.xml.
<uses-permission android:name="android.permission.INTERNET" />
Publishing and Subscribing in an Android App
At this point, we’ll head over to PubNub and signup for a free account.
This allows us to send and receive chat app messages with our own API keys. Once we’ve signed up, we can edit our MainActivity.kt file, specifically the OnCreate function, to add our logic.
First, import these libraries and dependencies to the top of your file:
import com.pubnub.api.PNConfiguration
import com.pubnub.api.PubNub
import com.pubnub.api.callbacks.PNCallback
import com.pubnub.api.models.consumer.PNPublishResult
import com.pubnub.api.models.consumer.PNStatus
import com.pubnub.api.callbacks.SubscribeCallback
import com.pubnub.api.models.consumer.pubsub.PNMessageResult
import com.pubnub.api.models.consumer.pubsub.PNPresenceEventResult
import android.widget.EditText
import android.widget.TextView
import android.view.View
import android.view.KeyEvent
import java.util.Arrays
Then we’re going to configure our PubNub object with your PubNub publish/subscribe keys.
val pnConfiguration = PNConfiguration()
pnConfiguration.subscribeKey = "ENTER_YOUR_PUBNUB_SUBSCRIBE_KEY"
pnConfiguration.publishKey = "ENTER_YOUR_PUBNUB_PUBLISH_KEY"
val pubNub = PubNub(pnConfiguration)
After configuring PubNub, we can add front-end components in our MainActivity.kt file. We’ll configure an event handler for when the user hits the enter button on their keyboard. This will tell our app that the user wants to send their message, and we can publish their text with PubNub.
val publishText = findViewById<EditText>(R.id.editTextPublish)
val subscribeText = findViewById<TextView>(R.id.textViewSubscribe)
publishText.setOnKeyListener(View.OnKeyListener { v, keyCode, event ->
            if (keyCode == KeyEvent.KEYCODE_ENTER && event.action == KeyEvent.ACTION_UP) {
                pubNub.run {
                    publish()
                            .message(publishText.text.toString())
                            .channel("whiteboard")
                            .async(object : PNCallback<PNPublishResult>() {
                                override fun onResponse(result: PNPublishResult, status: PNStatus) {
                                    if (!status.isError) {
                                        println("Message was published")
                                    }else {
                                        println("Could not publish")
                                    }
                                }
                            })
                }
                return@OnKeyListener true
            }
            false
        })
Great! The next step is to listen for incoming messages. We’ll do that by subscribing to the same channel that we’re publishing to. We’ll also be adding a listener which will take a callback as a parameter. We’ll override the SubscribeCallback object available in the PubNub library.
var subscribeCallback: SubscribeCallback = object : SubscribeCallback()  {
            override fun status(pubnub: PubNub, status: PNStatus) {
            }
            override fun message(pubnub: PubNub, message: PNMessageResult) {
                runOnUiThread {
                    subscribeText.text = message.message.toString()
                }
            }
            override fun presence(pubnub: PubNub, presence: PNPresenceEventResult) {
            }
}
pubNub.run {
            addListener(subscribeCallback)
            subscribe()
                    .channels(Arrays.asList("whiteboard")) // subscribe to channels
                    .execute()
}
In the end, our OnCreate function should look similar to this.
override fun onCreate(savedInstanceState: Bundle?) {
        super.onCreate(savedInstanceState)
        setContentView(R.layout.activity_main)
        val publishText = findViewById<EditText>(R.id.editTextPublish)
        val subscribeText = findViewById<TextView>(R.id.textViewSubscribe)
        var subscribeCallback: SubscribeCallback = object : SubscribeCallback()  {
            override fun status(pubnub: PubNub, status: PNStatus) {
            }
            override fun message(pubnub: PubNub, message: PNMessageResult) {
                runOnUiThread {
                    subscribeText.text = "${subscribeText.text}
 ${message.message.toString()}"
                }
            }
            override fun presence(pubnub: PubNub, presence: PNPresenceEventResult) {
            }
        }
        val pnConfiguration = PNConfiguration()
        pnConfiguration.subscribeKey = "ENTER_YOUR_PUBNUB_SUBSCRIBE_KEY"
        pnConfiguration.publishKey = "ENTER_YOUR_PUBNUB_PUBLISH_KEY"
        val pubNub = PubNub(pnConfiguration)
        pubNub.run {
            addListener(subscribeCallback)
            subscribe()
                    .channels(Arrays.asList("Chat")) // subscribe to channels
                    .execute()
        }
        publishText.setOnKeyListener(View.OnKeyListener { v, keyCode, event ->
            if (keyCode == KeyEvent.KEYCODE_ENTER && event.action == KeyEvent.ACTION_UP) {
                pubNub.run {
                    publish()
                            .message(publishText.text.toString())
                            .channel("Chat")
                            .async(object : PNCallback<PNPublishResult>() {
                                override fun onResponse(result: PNPublishResult, status: PNStatus) {
                                    if (!status.isError) {
                                        println("Message was published")
                                    }else {
                                        println("Could not publish")
                                    }
                                }
                            })
                }
                return@OnKeyListener true
            }
            false
        })
} And that’s it! We have built a simple Android application using Kotlin.


