IN THIS ARTICLE
Welcome back! In the previous article, we explored smart home automation via a garage door opener service using LiftMaster, PubNub, and Node.js. The context is the growing popularity of two main areas, the Smart Car and Smart Home. Integration of Smart Home door and access control seems like a natural tie-in with future Smart Car location tracking and geo-fencing events.
Smart Cars are able to communicate their location, perform certain tasks autonomously, interact with other vehicles and traffic features and access critical data on an almost constant basis to keep drivers informed. At the same time, Smart Home capabilities are improving exponentially year over year. The number of home-connected devices has grown tremendously: to cameras and baby monitors, fire alarms and security, lighting, door locks, gate and garage door openers, and even the world of appliances.
In this article, we build on our previous service and create a User Interface for Realtime Garage Door Control using LiftMaster, PubNub and AngularJS. With 120 lines of HTML & JavaScript, we create a capable UI that is easily extensible to new components and device types. If you don’t have a LiftMaster-compatible Garage Door opener, don’t fret – the patterns and techniques we use will be easily adaptable to other devices (or even your own custom-built integration).
Going back to the context of Smart Home and Smart Cars, there are 3 primary requirements that come to mind. The first is High Availability. For services that provide infrastructure to homes, cars, and commercial and industrial applications, there can be no downtime. Secondly, High Performance is a must. When coordinating activities between vehicles or other location-based devices, response time is critical for user experience and building trust. Lastly and perhaps most importantly, High Security is essential. As these services will be carrying payloads for device control, vehicle and home access, there must be clear capabilities for locking down and controlling access to authorized users and applications.
These 3 requirements, Availability, Performance, and Security, are exactly where the PubNub Data Stream Network comes into the picture. PubNub is a global data stream network that provides “always-on” connectivity to just about any device with an internet connection (there are now over 70+ SDKs for a huge range of programming languages and platforms). PubNub’s Publish-Subscribe messaging provides the mechanism for secure channels in your application, where servers and devices can publish and subscribe to structured data message streams in realtime: messages propagate worldwide in under a quarter of a second (250ms for the performance enthusiasts out there).
So to summarize, in this article, we’ll be making the garage door respond to our UI events:
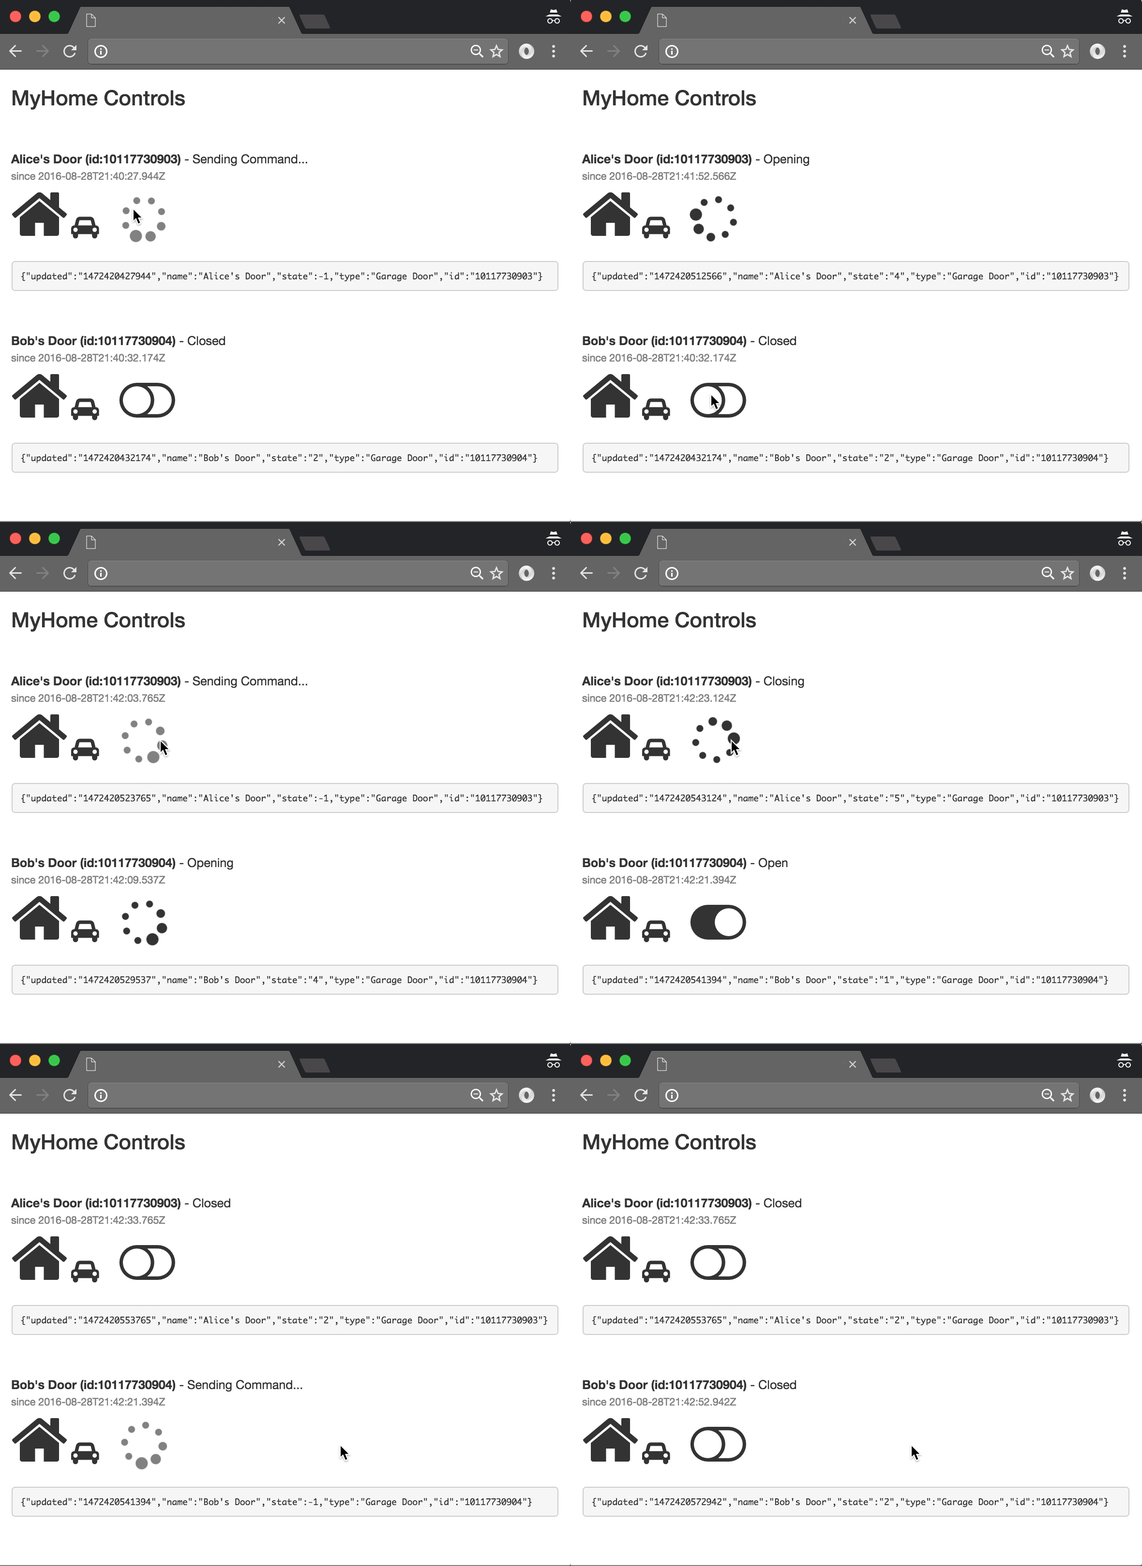
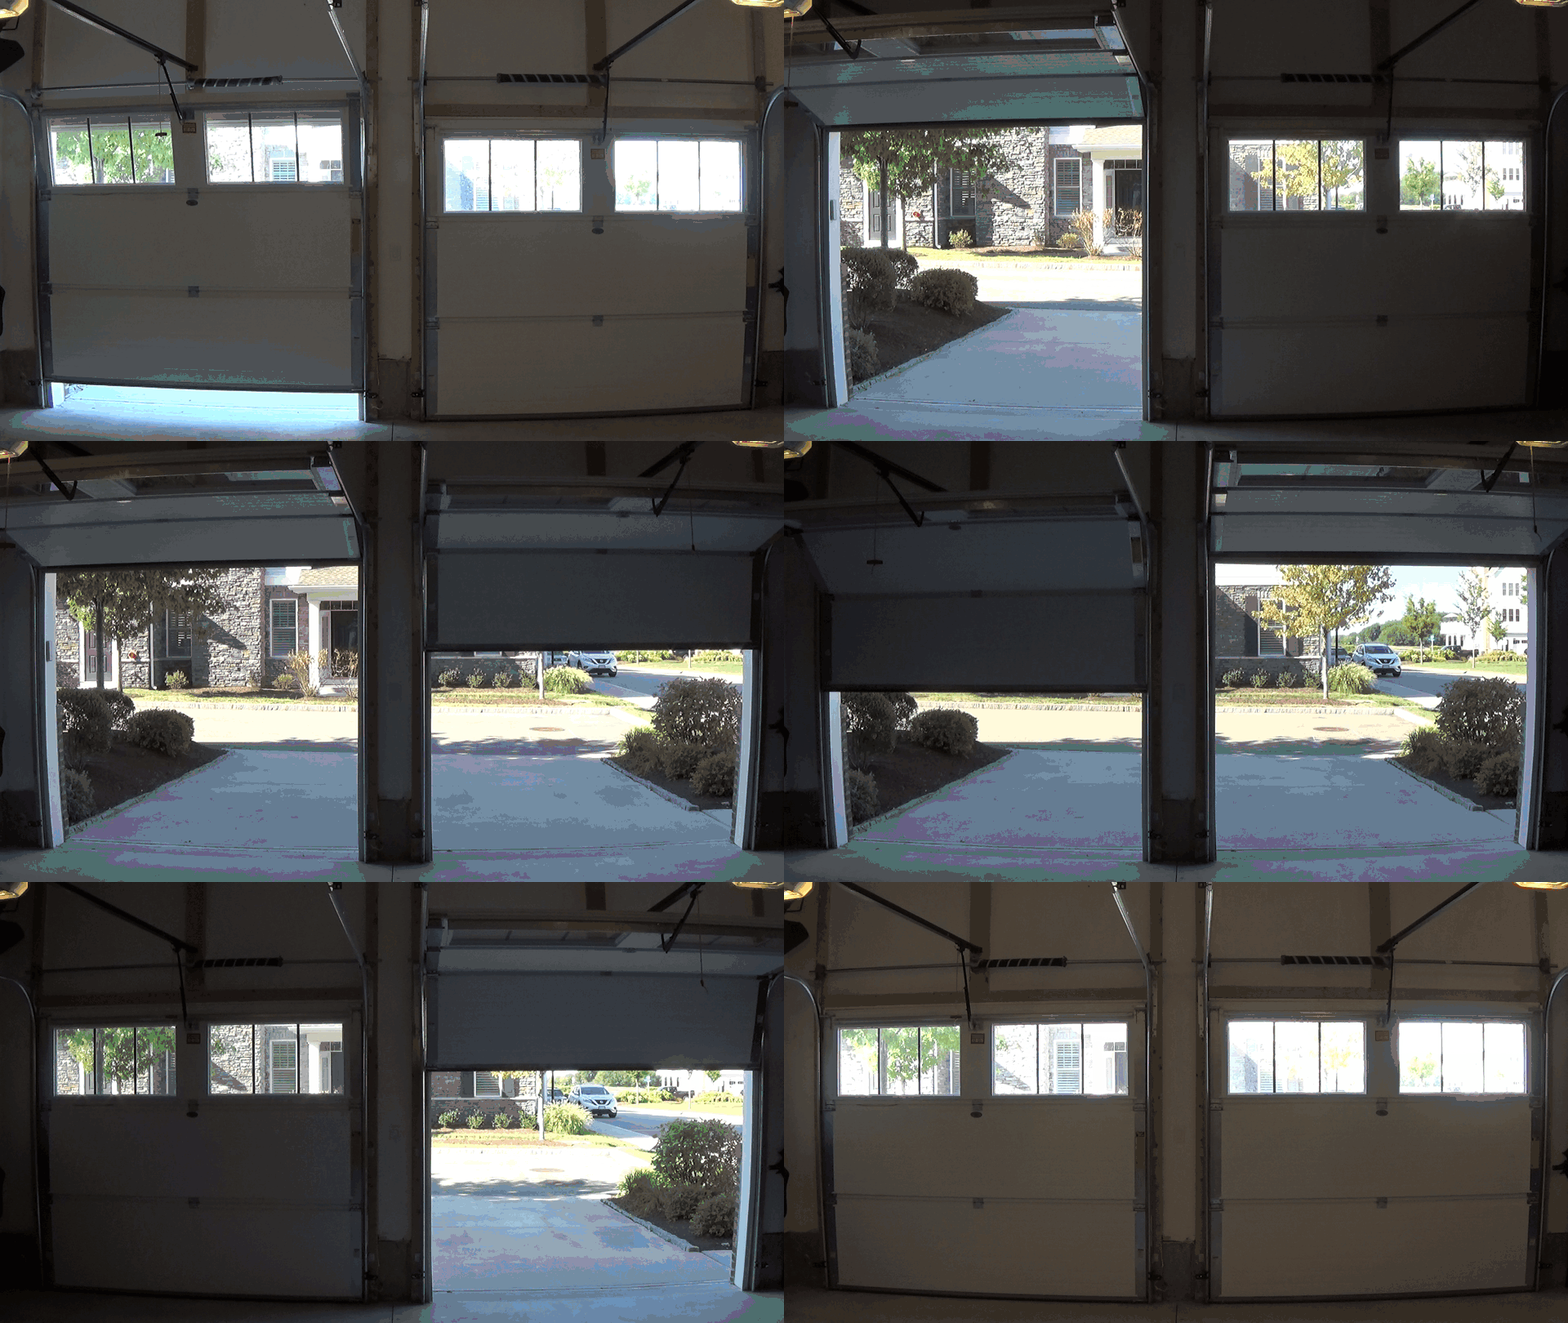
You might not want your garage doors to be quite so active. But you get the idea…
System Prerequisites
Here’s the rough sketch of what we needed from the previous article:
- PubNub account. We’ll use PubNub as the integration layer between the MyQ service and all the other components we’ll be building.
- Garage Door(s). Or not! You can hook up the opener to whatever you like, and this JavaScript won’t mind.
- LiftMaster Garage Door Opener(s) with MyQ support. The thing that does the magic that makes the doors go up and down.
- LiftMaster MyQ Bridge. This is optional (for doors without native WiFi support), so you might not need it in your case.
- LiftMaster MyQ Account. This account provides the web management API for connected garage door(s) features.
- Node.js liftmaster module. This Node.js module bridges between our Node.js app and the LiftMaster MyQ API.
- The app running on Node.js. Our 124 lines of JavaScript code running on a node-enabled server.
Hopefully you were able to get everything going from the previous article, so hooking up the UI from this one should be a snap!
PubNub’s JavaScript API
PubNub plays together really well with Node.js because the PubNub Node.js SDK (part of the PubNub JavaScript SDK family) is extremely robust and has been battle-tested over the years across a huge number of mobile and backend installations. The SDK is currently on its 4th major release, which features a number of improvements such as isomorphic JavaScript, new network components, unified message/presence/status notifiers, and much more. NOTE: for compatibility with the PubNub AngularJS SDK, this UI code will use the PubNub JavaScript v3 API syntax.
The PubNub JavaScript SDK is distributed via Bower or the PubNub CDN (for Web) and NPM (for Node), so it’s easy to integrate with your application using the native mechanism for your platform. In our case, it’s as easy as including the CDN link from a `script` tag.
That note about API versions bears repeating: the Garage Door service we implement in this article uses the PubNub JS API v4, but the user interface in the upcoming article uses the v3 API (since it needs the AngularJS API, which still runs on v3). We expect the AngularJS API to be v4-compatible soon. In the meantime, please stay alert when jumping between the backend and front-end JS code!
Developer Keys
The first things you’ll need before you can create a realtime application with PubNub are publish and subscribe keys from PubNub (you probably already took care of this if you already followed the steps in the previous article). If you haven’t already, you can create an account, get your keys and be ready to use the PubNub network in less than 60 seconds.
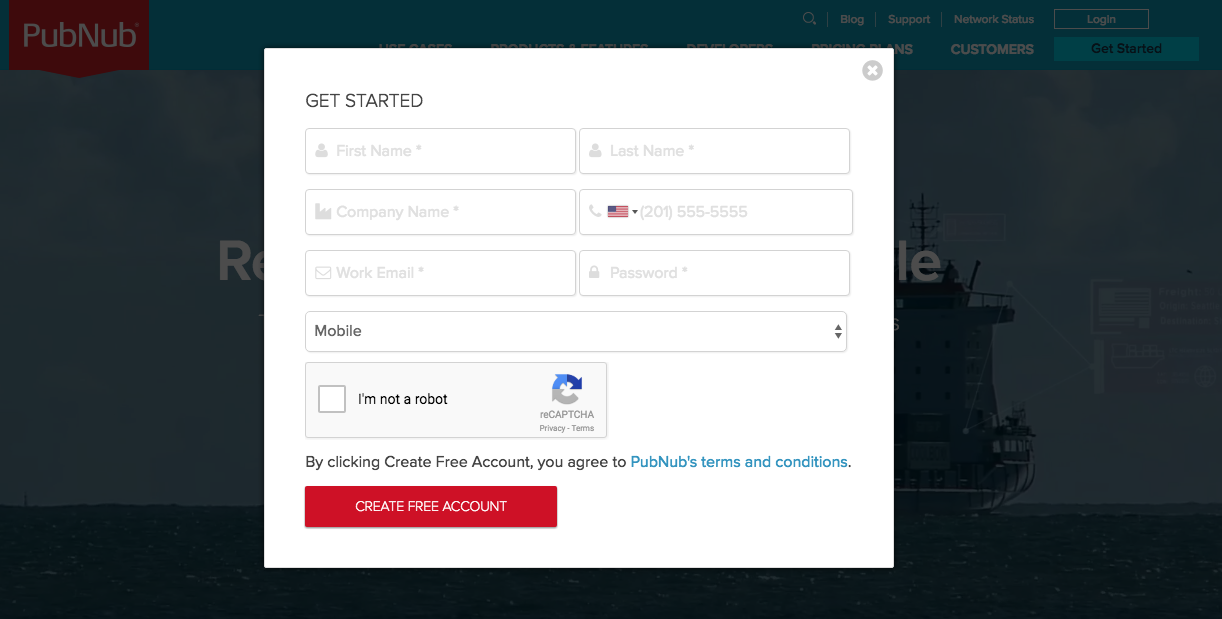
- Step 1: go to the signup form.
- Step 2: create a new application, including publish and subscribe keys.
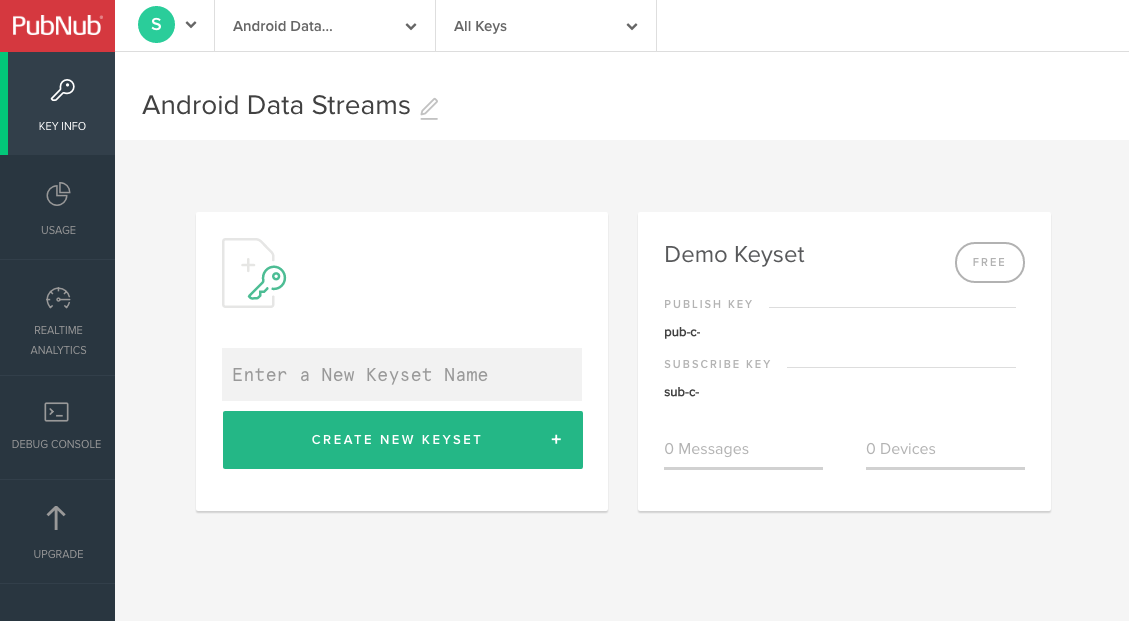
The publish and subscribe keys look like UUIDs and start with “pub-c-” and “sub-c-” prefixes respectively. Keep these handy – you’ll need to plug them in when initializing the PubNub object in your JavaScript application.
- Step 3: make sure the application corresponding to your publish and subscribe key has the Presence add-on enabled
That’s it, nicely done!
Overview
Let’s look at the application at the high level before we dive in:
- The Garage Doors are connected to the LiftMaster MyQ API via the bridge (or their internal WiFi connection, if applicable).
- Our JavaScript code continuously queries the LiftMaster API, sends the current status to PubNub, and bridges incoming control messages from PubNub to the appropriate Garage Door.
- The PubNub Service provides channels for connecting our components, as well as a Presence feature that allows us to store the device state as custom attributes in the channel membership.
- Our User Interface connects to the PubNub channels using the AngularJS API, receives status updates and sends commands to the Garage Door component.
- Any Additional Components we might build will be able to subscribe to door status and/or send device control commands to the PubNub channels in the same manner as the API (if we let them).
We mentioned this in the previous article, but if all we wanted to do was make the doors go up and down on command, we probably wouldn’t need a data stream integration layer. However, as soon as we start connecting more and more devices and expect them to be able to talk to each other, that’s where PubNub is the big win. PubNub provides the standard APIs, patterns and security that we can use to implement a solution that scales to thousands and millions of devices.
That said, let’s move onto the code itself!
Diving into the Code
You’ll want to grab these 121 lines of HTML & JavaScript and save them to a file, say, garage_ui.html.
The first thing you should do after saving the code is to replace two values in the JavaScript:
- YOUR_PUB_KEY: with the PubNub publish key mentioned above.
- YOUR_SUB_KEY: with the PubNub subscribe key mentioned above.
If you don’t, the UI will not be able to communicate with anything and probably clutter your console log with entirely too many errors.
For your convenience, this code is also available as a Gist on GitHub, and a Codepen as well. Enjoy!
<!doctype html>
<html>
<head>
  <script src="https://cdn.pubnub.com/pubnub-3.15.1.min.js"></script>
  <script src="https://ajax.googleapis.com/ajax/libs/angularjs/1.5.6/angular.min.js"></script>
  <script src="https://cdn.pubnub.com/sdk/pubnub-angular/pubnub-angular-3.2.1.min.js"></script>
  <script src="https://cdnjs.cloudflare.com/ajax/libs/underscore.js/1.8.3/underscore-min.js"></script>
  <link rel="stylesheet" href="https://netdna.bootstrapcdn.com/bootstrap/3.0.2/css/bootstrap.min.css" />
  <link rel="stylesheet" href="https://maxcdn.bootstrapcdn.com/font-awesome/4.6.3/css/font-awesome.min.css" />
</head>
<body>
<div class="container" ng-app="PubNubAngularApp" ng-controller="MyHomeCtrl">

<h3>MyHome Controls</h3><br /><br />
<ul class="list-unstyled">
  <li ng-repeat="(uuid, data) in devices">
    <b>{{data.name}} (id:{{uuid}})</b> - {{STATES[data.state]}}<br/>
    <small style="color:gray">since {{getDate(data.updated)}}</small><br />
    <div>
      <i class="fa fa-home fa-5x"></i>
      <i class="fa fa-car fa-2x"></i>

      <span ng-click="toggleDoor(uuid)">
        <i class="fa fa-4x fa-spinner fa-spin" ng-show="data.state == -1" style="color:gray"></i>
        <i class="fa fa-4x fa-toggle-on" ng-show="data.state == 1"></i>
        <i class="fa fa-4x fa-toggle-off" ng-show="data.state == 2"></i>
        <i class="fa fa-4x fa-spinner fa-spin" ng-show="data.state == 4"></i>
        <i class="fa fa-4x fa-spinner fa-spin" ng-show="data.state == 5"></i>
      </span>
    </div><br />
    <pre>{{data}}</pre><br /><br />
  </li>
</ul>
</div>
<script>
angular.module('PubNubAngularApp', ["pubnub.angular.service"])
.controller('MyHomeCtrl', function($rootScope, $scope, Pubnub) {
  $scope.devices    = {};
  $scope.STATES     = {
    '-1':'Sending Command...',
    '1': 'Open',
    '2': 'Closed',
    '4': 'Opening',
    '5': 'Closing'
  };
  $scope.msgChannel   = 'MyHome';
  $scope.prsChannel   = 'MyHome-pnpres';
  $scope.ctrlChannel  = 'MyHome_Ctrl';
  if (!$rootScope.initialized) {
    Pubnub.init({
      publish_key: 'YOUR_PUB_KEY',
      subscribe_key: 'YOUR_SUB_KEY',
      ssl:true
    });
    $rootScope.initialized = true;
  }
  var msgCallback = function(payload) {
    if (payload.uuids) {
      _(payload.uuids).forEach(function (v) {
        $scope.$apply(function() {
          if (v.state && v.state.type == "Garage Door") {
            $scope.devices[v.uuid] = v.state;
          }
        });
      });
    } else if (payload.action == "state-change" && payload.uuid) {
      $scope.$apply(function() {
        if (payload.data && payload.data.type == "Garage Door") {
          $scope.devices[payload.uuid] = payload.data;
        }
      });
    }
  };
  $scope.getDate = function(ts) {
    return new Date(parseInt(ts)).toISOString();
  };
  $scope.toggleDoor = function(uuid) {
    var cbFn = function(result) {
      var targetState = null;
      if (result.state == "2") {
        targetState = "open";
      } else if (result.state == "1") {
        targetState = "closed";
      }

      if (!targetState) {
        return;
      }

      Pubnub.publish({
        channel: $scope.ctrlChannel,
        message: {
          target   : uuid,
          newState : targetState
        }
      });

      $scope.$apply(function() {
        $scope.devices[uuid].state = -1;
      });
    };

    Pubnub.state({channel:$scope.msgChannel, uuid:uuid, callback:cbFn});
  };
  Pubnub.subscribe({ channel: [$scope.msgChannel, $scope.prsChannel], message: msgCallback, presence:msgCallback });
  Pubnub.here_now({ channel:$scope.msgChannel, state:true, callback: msgCallback });
});
</script>
</body>
</html>
OK, that’s a lot to digest all at once – let’s take a look at the code piece by piece.
Dependencies
First up, we have the JavaScript code & CSS dependencies of our application.
<!doctype html>
<html>
<head>
  <script src="https://cdn.pubnub.com/pubnub-3.15.1.min.js"></script>
  <script src="https://ajax.googleapis.com/ajax/libs/angularjs/1.5.6/angular.min.js"></script>
  <script src="https://cdn.pubnub.com/sdk/pubnub-angular/pubnub-angular-3.2.1.min.js"></script>
  <script src="https://cdnjs.cloudflare.com/ajax/libs/underscore.js/1.8.3/underscore-min.js"></script>
  <link rel="stylesheet" href="https://netdna.bootstrapcdn.com/bootstrap/3.0.2/css/bootstrap.min.css" />
  <link rel="stylesheet" href="https://maxcdn.bootstrapcdn.com/font-awesome/4.6.3/css/font-awesome.min.css" />
</head>
<body>
For folks who have done front-end implementation with AngularJS before, these should be the usual suspects:
- PubNub JavaScript client: to connect to our SmartHome data stream integration channel.
- AngularJS: were you expecting a niftier front-end framework? Impossible!
- PubNub Angular JavaScript client: provides PubNub services in AngularJS quite nicely indeed.
- Underscore.js: we could avoid using Underscore.JS, but then our code would be less awesome.
In addition, we bring in 2 CSS features:
- Bootstrap: in this app, we use it just for vanilla UI presentation.
- Font-Awesome: we love Font Awesome because it lets us use truetype font characters instead of image-based icons. Pretty sweet!
Overall, we were pretty pleased that we could build a nifty UI with so few dependencies. And with that… on to the UI!
User Interface
Here’s what we intend the UI to look like:
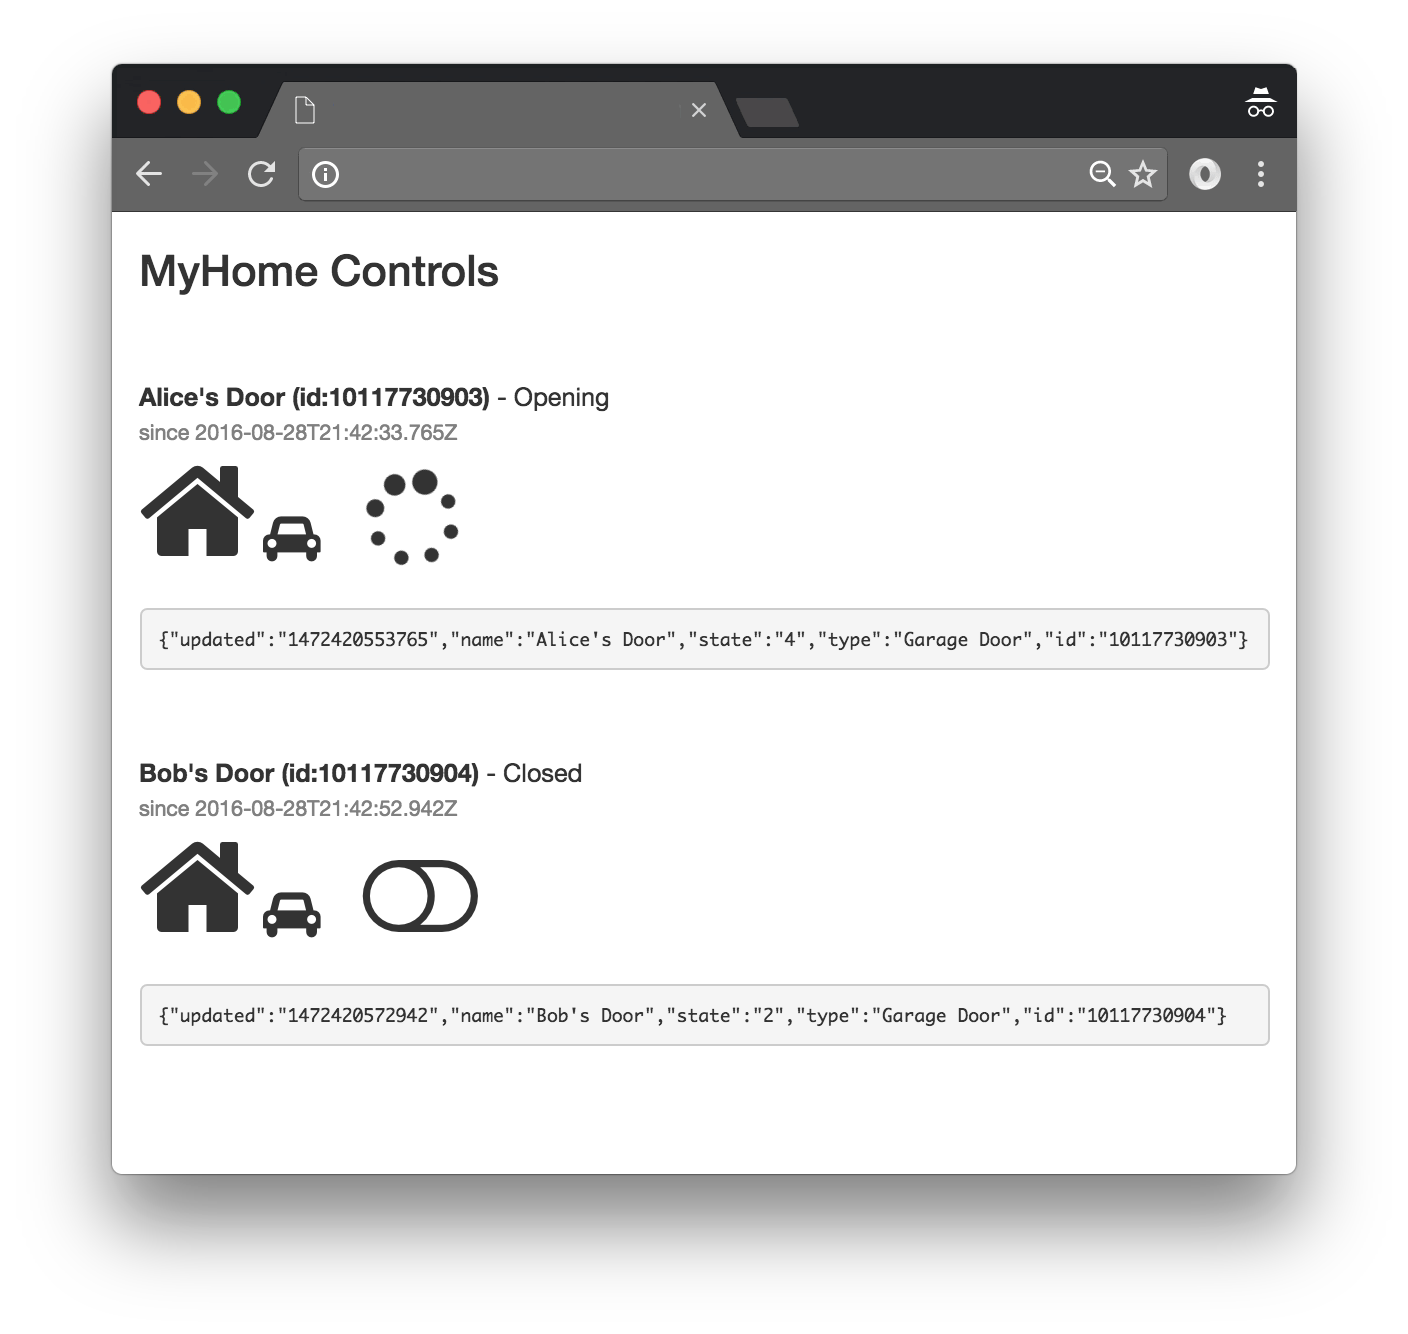
The UI is pretty straightforward – everything is inside a div tag that is managed by a single controller that we’ll set up in the AngularJS code. That h3 heading should be pretty self-explanatory.
<div class="container" ng-app="PubNubAngularApp" ng-controller="MyHomeCtrl">
<h3>MyHome Controls</h3><br /><br />
Our UI consists of a list with garage door switches in each row. We iterate over the devices in the devices map in the controller scope using a trusty ng-repeat.
<ul class="list-unstyled">
  <li ng-repeat="(uuid, data) in devices">
The first couple lines of text in each list item provide the door’s name, id, state, and the time the state last changed. That is, the last time the door transitioned, not the last time we received a status refresh (which would be less than exciting since the status refreshes every 3s).
    <b>{{data.name}} (id:{{uuid}})</b> - {{STATES[data.state]}}<br/>
    <small style="color:gray">since {{getDate(data.updated)}}</small><br />
We display a house and a car icon for each device, just to make it look nice.
    <div>
      <i class="fa fa-home fa-5x"></i>
      <i class="fa fa-car fa-2x"></i>
The following code implements the toggle button in the UI. When the state is “-1”, “4”, or “5” (meaning “Pending Command”, “Opening”, or “Closing” respectively), it displays a spinner for the pending command. Otherwise, it displays a “toggle-off” switch when the door is closed, or a “toggle-on” switch when the door is open. Thanks to Font Awesome for making it easy!
      <span ng-click="toggleDoor(uuid)">
        <i class="fa fa-4x fa-spinner fa-spin" ng-show="data.state == -1" style="color:gray"></i>
        <i class="fa fa-4x fa-toggle-on" ng-show="data.state == 1"></i>
        <i class="fa fa-4x fa-toggle-off" ng-show="data.state == 2"></i>
        <i class="fa fa-4x fa-spinner fa-spin" ng-show="data.state == 4"></i>
        <i class="fa fa-4x fa-spinner fa-spin" ng-show="data.state == 5"></i>
      </span>
Finally, we close out the list element with a pre tag containing the state (we figure it’ll help with debugging, but you’ll likely remove it in your app). Then, all we have to do is close out the ul and the enclosing div tags!
    </div><br />
    <pre>{{data}}</pre><br /><br />
  </li>
</ul>
</div>
Wow, that’s a lot of UI in just a handful of code (thanks, AngularJS)!
AngularJS Code
Right on! Now we’re ready to dive into the AngularJS code. It’s not a ton of JavaScript, so this should hopefully be pretty straightforward.
The first lines we encounter set up our application (with a necessary dependency on the PubNub AngularJS service) and a single controller (which we dub MyHomeCtrl). Both of these values correspond to the ng-app and ng-controller attributes from the preceding UI code.
<script>
angular.module('PubNubAngularApp', ["pubnub.angular.service"])
.controller('MyHomeCtrl', function($rootScope, $scope, Pubnub) {
Next up, we initialize a bunch of values. First is a map of device UUIDs to device state JSON objects, which starts out empty. Then, we have a constant map from LiftMaster API codes to their friendly String counterparts.
After that, we set up three channel name variables:
- The msgChannel is the channel where we receive status messages.
- The prsChannel is the channel where we receive presence “state-change” events.
- The ctrlChannel is the channel where we’ll send commands (and hopefully the server is listening).
  $scope.devices    = {};
  $scope.STATES     = {
    '-1':'Sending Command...',
    '1': 'Open',
    '2': 'Closed',
    '4': 'Opening',
    '5': 'Closing'
  };
  $scope.msgChannel   = 'MyHome';
  $scope.prsChannel   = 'MyHome-pnpres';
  $scope.ctrlChannel  = 'MyHome_Ctrl';
We initialize the Pubnub object with our PubNub publish and subscribe keys mentioned above (they should be the same as the ones running on the server). We set a scope variable to make sure the initialization only occurs once. NOTE: this uses the v3 API syntax.
  if (!$rootScope.initialized) {
    Pubnub.init({
      publish_key: 'YOUR_PUB_KEY',
      subscribe_key: 'YOUR_SUB_KEY',
      ssl:true
    });
    $rootScope.initialized = true;
  }
The next thing we’ll need is a realtime message callback called msgCallback; it takes care of all the realtime messages we need to handle from PubNub. In our case, we have 2 main scenarios.
In the first case, the inbound message has a uuids property: that means it is a here_now() function payload (from upcoming code below), and we should update the device state with all of the JSON objects in the payload.
Alternatively, the message is a state-change event, and the payload has a uuid property. This means it is a realtime state-change event for a single member of the channel, so we update the corresponding device’s state if its type equals the “Garage Door” string literal.
  var msgCallback = function(payload) {
    if (payload.uuids) {
      _(payload.uuids).forEach(function (v) {
        $scope.$apply(function() {
          if (v.state && v.state.type == "Garage Door") {
            $scope.devices[v.uuid] = v.state;
          }
        });
      });
    } else if (payload.action == "state-change" && payload.uuid) {
      $scope.$apply(function() {
        if (payload.data && payload.data.type == "Garage Door") {
          $scope.devices[payload.uuid] = payload.data;
        }
      });
    }
  };
The getDate() function is just a tiny helper that takes the “epoch seconds” value from the LiftMaster API and turns it into an ISO timestamp string. For your application, you’ll probably use a nifty JavaScript library and turn it into friendlier string.
  $scope.getDate = function(ts) {
    return new Date(parseInt(ts)).toISOString();
  };
We create a toggleDoor() function that takes the Garage Door UUID (which is the same as the door.id in the LiftMaster API), and toggles the door’s state. That is, opens it when closed, or closes it when open. We call the PubNub.state() function to know what the latest state of the door is. If the door is in an intermediate state, the function returns and the command is ignored.
To send the door operation command, we just publish a message to the control channel with the specified door and target state. The Garage Door component server will receive this message and send the request to the LiftMaster MyQ API.
Lastly, we also temporarily set the door state to “Sending Command…”; this way, there will only be one pending command from the UI, and the status will refresh on the next update (which should be around 3s, depending on the server’s refresh rate from the API).
  $scope.toggleDoor = function(uuid) {
    var cbFn = function(result) {
      var targetState = null;
      if (result.state == "2") {
        targetState = "open";
      } else if (result.state == "1") {
        targetState = "closed";
      }

      if (!targetState) {
        return;
      }

      Pubnub.publish({
        channel: $scope.ctrlChannel,
        message: {
          target   : uuid,
          newState : targetState
        }
      });

      $scope.$apply(function() {
        $scope.devices[uuid].state = -1;
      });
    };

    Pubnub.state({channel:$scope.msgChannel, uuid:uuid, callback:cbFn});
  };
In the main body of the controller, we subscribe() to the message and presence channels (using the JavaScript v3 API syntax) and bind the events to the callback function we just created.
Then, we call Pubnub.here_now() to initialize the user interface with the currently connected devices (which hopefully already includes the garage doors if you have the node.js server from the previous article running).
  Pubnub.subscribe({ channel: [$scope.msgChannel, $scope.prsChannel], message: msgCallback, presence:msgCallback });
  Pubnub.here_now({ channel:$scope.msgChannel, state:true, callback: msgCallback });
});
</script>
</body>
</html>
And that’s it! Not bad for a hundred-odd lines of HTML & JavaScript!
Running the Code
Running the code is super simple – just upload the HTML file to your favorite web server and navigate to the corresponding URL. NOTE: you’ll want to make sure it’s protected by some kind of access control, otherwise you’ll potentially have unauthorized folks tampering with your doors!
For testing, we used http-server with node.js.
# install http-server (requires node.js + npm)
sudo npm install -g http-server
# run the server, serving files in current directory on localhost
# (which should include garage_ui.html of course)
http-server -a localhost -p 8000 .
Thanks to this post for helping us find a localhost replacement for Python SimpleHTTPServer!
Generalizing to Other Devices and Applications
We think this is pretty neat, but there is nothing special here about the process of integrating LiftMaster with PubNub. We saved some time because there is already an unofficial Node.js-enabled API for the LiftMaster, but if you dive into that code you’ll see that it’s not too tough to adapt it to other devices, even running embedded on a device itself.
It’s also worth noting that in the code for the UI, there is nothing specifically tied to Garage Doors there. This pattern and technique of using a status channel and control channel could work just as easily for lighting control, door lock operation, and many of the other Smart Home applications you might think of!
Conclusion
Thank you so much for staying with us this far! Hopefully it’s been a useful endeavor. The goal was to convey our experience in how to build a Node.js app and AngularJS UI that:
- Authenticates to the LiftMaster MyQ service using the node-liftmaster module.
- Bridges LiftMaster device status to a PubNub channel.
- Accepts commands to open/close Garage Doors from a PubNub channel.
- Provides a simple but effective UI in less than 125 lines of HTML & JavaScript.
If you’ve been successful thus far, you should be able to start using PubNub as an integration hub and realtime communications layer for all of your Smart Home needs.
In future articles, we hope to dive deeper into more components for the Smart Home and Smart Car, plus other things we haven’t thought of yet. Can’t wait!
Stay tuned, and please reach out anytime if you feel especially inspired or need any help!
Resources
- https://admin.pubnub.com/#/register
- https://www.pubnub.com/docs
- https://www.pubnub.com/products/realtime-messaging/
- https://www.pubnub.com/products/presence/
- https://www.myliftmaster.com/
- http://underscorejs.org/
- http://getbootstrap.com/
- http://fontawesome.io/
- https://www.amazon.com/Functional-JavaScript-Introducing-Programming-Underscore-js/dp/1449360726
- https://github.com/chadsmith/node-liftmaster
- https://coderwall.com/p/jsd5mw/raspberry-pi-garage-door-opener-with-garagepi
- https://www.pubnub.com/docs/nodejs-javascript/pubnub-javascript-sdk
- https://www.pubnub.com/docs/web-javascript/pubnub-javascript-sdk
- https://www.pubnub.com/blog/whats-new-javascript-sdk-v-4/
- https://libraries.io/bower/pubnub
- https://www.pubnub.com/docs/web-javascript/pubnub-javascript-sdk
- https://www.npmjs.com/package/pubnub
- https://gist.github.com/sunnygleason/a92d40be61aad6742de391f4ea44e8cb
- https://www.engadget.com/2015/02/03/irl-a-month-controlling-my-coffeemaker-over-wifi/
- https://www.pubnub.com/blog/streaming-vehicle-data-and-events-in-realtime-with-automatic-part-1/
- https://www.pubnub.com/blog/building-raspberry-pi-smart-home-part-1/
- https://www.pubnub.com/support/


