IN THIS ARTICLE
Never before have we lived in an era, where every “thing” could seamlessly be interconnected by the Internet. The idea of Internet of Things (IoT) has continually transformed our world by presenting innovative solutions to numerous problems using an Event Driven Pub/Sub Architecture. For example, to solve the exhausting problem of finding parking in crowded spaces, parking garages have installed live electronic dashboards showing which spots are available by subscribing to status updates published from individual sensors in a parking lot. Building such an IoT app can be challenging due to a number of hurdles.
One of these hurdles is hosting a server capable of handling messages sent between the mobile app and the sensor devices in realtime. Another is hosting a wifi network capable of supporting every single embedded sensor device in the smart parking lot.
By using PubNub and Soracom alongside each other, however, developers can quickly circumvent these challenges. With PubNub’s realtime platform, developers can easily build complex IoT solutions without worrying about tedious tasks such as hosting servers. Additionally, with Soracom Air and Soracom Beam, developers can easily build IoT solutions that utilize LTE, instead of a restrictive WFI network.
Tutorial Overview
In this tutorial, we will build a Smart Parking Simulation using Raspberry Pi and an ultrasonic sensor to detect whether a parking spot is occupied or vacant. We will use Soracom Air to send messages from the sensor to PubNub via cellular data. Then using PubNub’s Publish-Subscribe API, we will make live parking data instantly available to all the app’s mobile users. This is shown in the following diagram.
For the full source code, click here.

To build this demo, you will need:
- Raspberry Pi (Any Version)
- Breadboard
- HC-SR04 Ultrasonic Sensor
- 1 Female-female + 6 male-female jumper wires
- 1 1k Ω resistor and 1 2k Ω resistor
- MicroSD card + MicroSD to SD Adapter
- Huawei USB Stick Modem
- Soracom Air Sim Card
Raspberry Pi Setup
1. Raspbian OS Installation
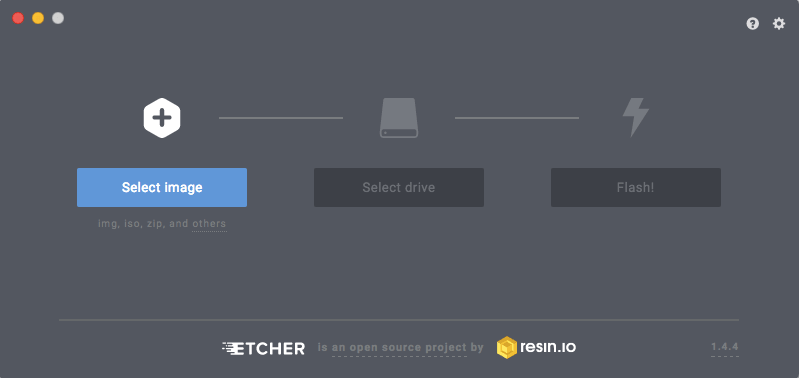
If you haven’t already, make sure to install the Raspbian OS onto your Raspberry Pi. To do this, we will first install it locally on our computer. This will be of disk image format, so we will need to flash the disk before using it. You can use Etcher to flash the disk onto your microSD card Adapter.
Once the Raspbian OS files are on our microSD card Adapter, we may remove the microSD card from the adapter and then insert it into the bottom slot of our Raspberry Pi. With the OS installed, you may now boot up the Raspberry Pi by plugging in a keyboard, mouse, monitor, and power source.
2. Configure Sensor
- Plug 3 of our male-female jumper wires into the HC-SR04 ultrasonic sensor in the VCC, Echo, and GND slots. Plug one of our female-female jumper wires into the Trig slot of the sensor.
- Plug the VCC wire into the positive rail of our breadboard and the GND wire into the negative rail.
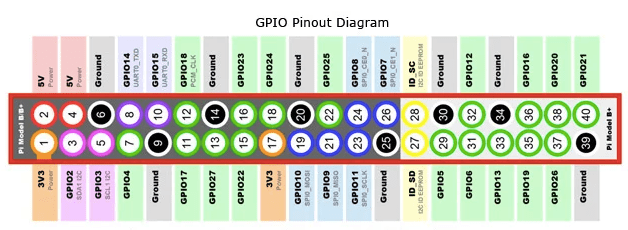
- Plug GPIO 5V on the Raspberry Pi to the positive rail of our breadboard and GPIO GND to the negative rail.
- Plug the Trig wire into GPIO 23.
- Plug the Echo wire into a blank rail on the breadboard.
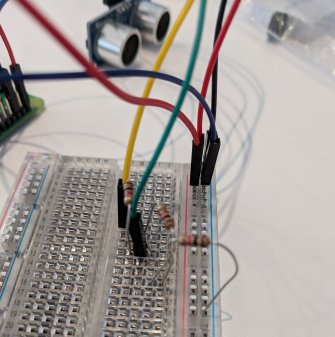
- Link another blank rail using a 1k Ω resistor. (The reason, we need resistors is so we can lower the voltage output to ensure that our Raspberry Pi is not damaged by the sensor configuration)
- Then link a blank rail using a 2k Ω resistor to the negative rail of our breadboard leaving a space. If you do not have a 2k Ω resistor, you could create a series of 2 1k Ω resistors, as shown in the following picture.

- In the space we have left, we will use a male-female jumper wire to link to GPIO 24.
Congrats, we have now completed the configuration of our ultrasonic sensor. If you find yourself stuck with the configuration of the sensor, check out this tutorial for a more detailed explanation. While you are building your circuit, remember that on the breadboard’s blank rails current flows horizontally and on the breadboard’s positive and negative rails, current flows vertically. Next, we will set up PubNub and Soracom into our IoT app.
PubNub Setup
First, we will create our app in the PubNub Admin Console (It’s free). After creating the app in the console, you will see the publish and subscribe keys which we will use in the next step to connect PubNub and Soracom.
Soracom Setup
Register SIM
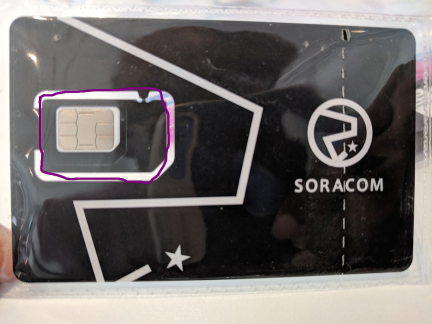
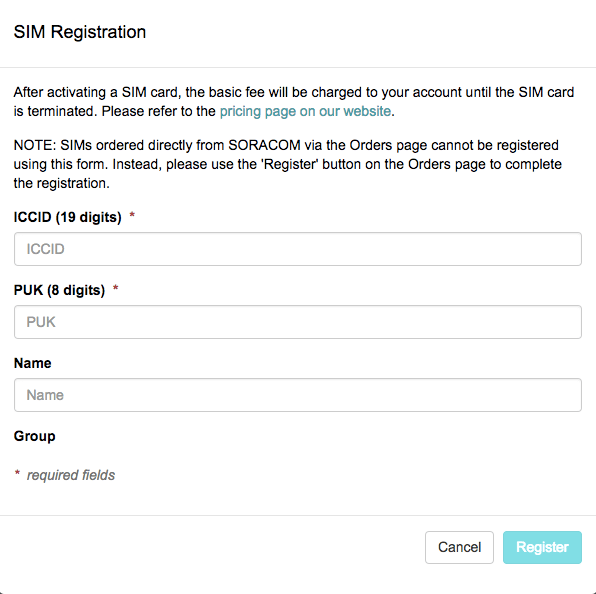
We will head on over to the Soracom Admin Console. Here we will click Register SIM and input the ICCID and PUK digits, which you can find on the back of your Soracom Air Sim Card.
USB Modem Configuration
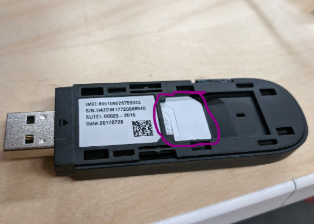
After registering our SIM card, we will remove the SIM chip (shown with the purple circle I’ve drawn around it in the image above). Then we will insert it into Huawei USB Stick Modem. Make sure that you have slid the SIM card all the way in, the right way facing up.
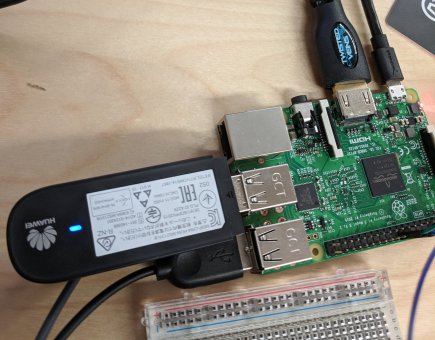
In order to have our Raspberry Pi running on cellular data, we will simply plug the Huawei USB Stick Modem into the USB port of the Raspberry Pi. A solid blue light (not blinking) shows that the modem is successfully picking up 3g data. If it is blinking it means it is still attempting to connect.
Once, we have a solid blue light, we must add our USB Stick Modem to the Raspberry Pi’s Network Manager. To do this first install the Network Manager onto the Raspberry Pi. In your Raspberry Pi’s terminal type the following.
sudo apt-get update && sudo apt-get install network-manager
Then to connect our USB Stick Modem to our Soracom Account we must type the following command from our Raspberry Pi terminal. Substitute <ENTER_USERNAME> and <ENTER_PASSWORD> with your respective account credentials.
sudo nmcli con add type gsm ifname "*" con-name soracom apn soracom.io user <ENTER_USERNAME> password <ENTER_PASSWORD>
To make this configuration go into effect, we must reboot our Raspberry Pi.
sudo reboot
Now to ensure that your USB Modem is being recognized by your Raspberry Pi’s Network Manager type in:
ifconfig
You should see a ppp0 (your USB Modem) show up. Then type the following 3 terminal commands to ensure that you’ve downloaded Soracom’s ppp route metric script and that the script is run every time the USB modem is plugged in or restarted.
sudo curl -o /etc/NetworkManager/dispatcher.d/90.set_ppp_route_metric https://soracom-files.s3.amazonaws.com/handson/90.set_ppp_route_metric
sudo chmod +x /etc/NetworkManager/dispatcher.d/90.set_ppp_route_metric
sudo /etc/NetworkManager/dispatcher.d/90.set_ppp_route_metric ppp0 up
Now, our USB Stick modem should be properly configured. If you’re still stuck on configuring the USB Stick Modem, make sure you read thoroughly over these Soracom docs.
MQTT Setup
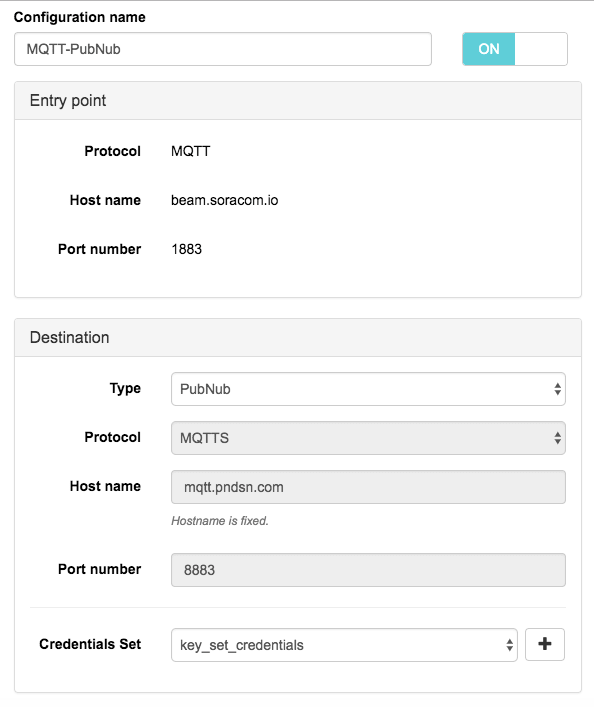
MQTT (Mosquitto) is the name of the protocol we will use in order to publish messages to our PubNub channel from the Raspberry Pi IoT App. In the Admin Console, we will open up the side navigation bar link titled Groups to add a new Group. We will call this new group, Beam-Soracom. Under basic settings for this new group, click on Soracom Beam. Here, we will create a MQTT Entry Point. Ensure that you have the following inputted when creating the MQTT Entry Point. You will need to specify the Destination Type as PubNub. Where you see Credentials Set, we will add our PubNub credentials (Publish and Subscribe Key) to allow our Soracom device to publish messages to our PubNub channel.
Then, we will select our Registered SIM card in the Admin Console and set its group to the one we just created, called Beam-Soracom. Ensure that you have clicked activate on our Registered SIM card, so that it is active and picking up data.
Now, we must install mosquitto-clients package onto our Raspberry Pi, so that we are able to use MQTT’s publish method. In the Raspberry Pi’s terminal run the following command.
sudo apt-get update && sudo apt-get install mosquitto-clients
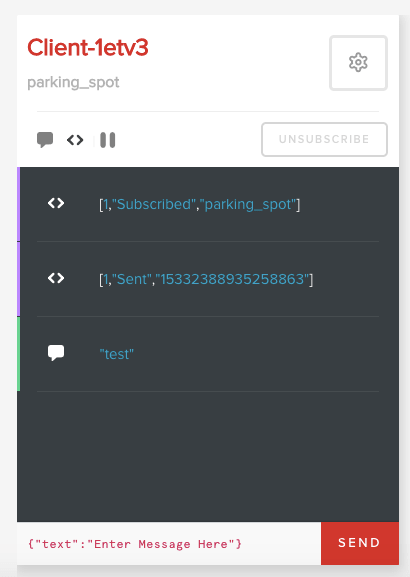
With mosquitto-clients installed, we may test our mosquitto_pub command, which we will use to publish a message to our PubNub channel. The format of our mosquitto_pub command will be as follows. After -t we will insert our channel name, parking_spot. And after -m we will insert a test message “test”. Pull up your Debug View on the PubNub Admin Console. Once you run the command below on the Raspberry Pi’s terminal, you should see that the message has successfully been published to our PubNub channel.
mosquitto_pub -h beam.soracom.io -p 1883 -t parking_spot -m "test"
Now our Soracom Air Device is able to successfully publish messages from our Raspberry Pi to our PubNub channel. With this set up, we are ready to start writing the code to publish from the ultrasonic sensor and subscribe from the Android mobile app.
Publish – Ultrasonic Sensor Python Script
We will write our python code in a script called sensor_publish.py (this script must be inside the Raspberry Pi!). Begin by importing some of the modules we’ll need at the top of the script. The RPI.GPIO module will allow us to obtain data from the sensors. The time module will allow us to periodically obtain readings from the sensor. Signal and sys will allow us to write our method that kills the script and stops reading the sensor data when the user uses the command ^C. Subprocess and json will allow us to parse our boolean into the appropriate JSON String format and send it to our PubNub channel.
import RPi.GPIO as GPIO
import time
import signal
import sys
import subprocess
import json
Sensor Setup
After importing our modules, we must ensure that our GPIO object is using Raspberry Pi Board Pin Numbers. We will do this with the following line.
GPIO.setmode(GPIO.BCM)
We must then assign values to our input and output pins. Our input pin is called ECHO and our output pin is called TRIG. ECHO is connected to pin 18 (GPIO 24) and TRIG is connected to pin 16 (GPIO 23), as you can verify on your Raspberry Pi setup. Also we must initialize our occupied variable which we will use to keep track of the last updated status of the parking spot. We will initialize it to False.
TRIG = 23
ECHO = 24
occupied = False
Next, we will define our function that will set up our sensor. We’ll name this function setup_sensor(). Here we must define which pin is our input and which is our output. We will call this function later in our main function.
def setup_sensor():
  GPIO.setup(TRIG, GPIO.OUT)
  GPIO.setup(ECHO, GPIO.IN)
Obtain Sensor Distance Reading
We will use the function get_distance() to obtain the data of how far an object is from our sensor. This function will perform a calculation on how long the pulse signal took to go and come back from the object. Using the time it took, it will compute the distance from the sensor to the object.
def get_distance():
  # set Trigger to HIGH
  GPIO.output(TRIG, True)
  # set Trigger after 0.01ms to LOW
  time.sleep(0.00001)
  GPIO.output(TRIG, False)
  startTime = time.time()
  stopTime = time.time()
  # save start time
  while 0 == GPIO.input(ECHO):
    startTime = time.time()
  # save time of arrival
  while 1 == GPIO.input(ECHO):
    stopTime = time.time()
  # time difference between start and arrival
  TimeElapsed = stopTime - startTime
  # multiply with the sonic speed (34300 cm/s)
  # and divide by 2, because there and back
  distance = (TimeElapsed * 34300) / 2
  return distance
Publishing Parking Space Availability
We will be publishing our parking space’s availability in the main function of our python script. This will be the function that is executed once the script is started. The main function must do the following actions in order.
- Set up the sensor
- Perform an initial check on the availability of the parking space
- Check to see if status has changed (every 5 seconds): If it has changed then publish message of new status. Store this status as the new last updated status.
To set up the sensor we will call the function we defined earlier, setup_sensor(). Next it will do an initial check to see if the parking space is available or vacant. We will define method initial_check() to do this.
We will then have a loop that is executed every 5 seconds to check the new distance reading of the car. If the distance reading obtained by function get_distance() is greater than 7cm (the length of the parking space in my model), then we can infer that the parking space is vacant. The distance it is picking up is simply noise in this case. If it is less than 7cm, then we know that the parking space is being occupied by a car.
In order to minimize expenses and maximize efficiency, we will only update the status of the parking space if the sensor shows that the status has changed since the last reading. This is shown below:
if __name__ == '__main__':
  setup_sensor()
  initial_check()
  while True:
    if (occupied and (get_distance() >= 7)) or (not occupied and (get_distance() < 7)):
         // TODO toggle the availability of the parking space and publish new status
    time.sleep(5)
Our initial_check() function will assign our variable occupied to the current status of the parking space. We must publish this using the subprocess module we imported earlier. With this module, we are able to run terminal commands from a python script. Using the method Popen(), we simply pass an array of strings from the command as you would type it in a terminal. After -m, we want to pass the message encoded as a JSON String, with key “occupied” and value the variable occupied. We can do this by calling our helper method convertToJsonString() which takes a boolean and converts it into a JSON string message that we can send.
def initial_check():
  occupied = True if get_distance() < 7 else False
  subprocess.Popen(["mosquitto_pub", "-h", "beam.soracom.io", "-p", "1883", "-t", "parking_spot", "-m", convertToJsonString(occupied)], stdout=subprocess.PIPE)
  print(occupied)
def convertToJsonString(occupied):
  dictionary_object = {
    "occupied": occupied
  }
  return json.dumps(dictionary_object)
Finally, inside our loop that is executed every 5 seconds in our main function, we will have the following code. This will toggle the occupied boolean and then publish it to our parking_spot channel, if it is different from its last updated status.
occupied = not occupied
subprocess.Popen(["mosquitto_pub", "-h", "beam.soracom.io", "-p", "1883", "-t", "parking_spot", "-m", convertToJsonString(occupied)], stdout=subprocess.PIPE)
print(occupied)
Kill Script
We must also ensure that our python script can be killed properly. We define close() as the function that’s called when a user kills the script with the command ^C. In here, we can clean up our sensor readings with the line GPIO.cleanup().
def close(signal, frame):
  print("
Turning off ultrasonic distance detection...
")
  GPIO.cleanup()
  sys.exit(0)
signal.signal(signal.SIGINT, close)
Congrats, we have now written a python script that publishes updates of the parking space’s status.
Subscribe – Android Mobile App
Now that our sensor is successfully publishing data to our PubNub channel, we must set up the mobile app so it is subscribed to the channel containing parking spot availability data.
We must first add the following gradle dependencies into our Module build.gradle file in order to utilize the PubNub Android SDK.
implementation group: 'com.pubnub', name: 'pubnub-gson', version: '4.12.0'
Next, we will add the following Android Manifest Permissions to allow our app to use the internet.
<uses-permission android:name="android.permission.INTERNET" />
<uses-permission android:name="android.permission.ACCESS_NETWORK_STATE" />
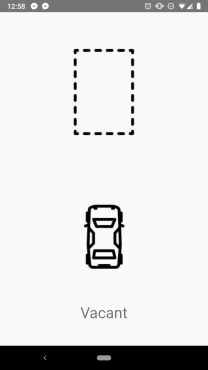
For this mobile app, we will build one Activity, the MainActivity class. This Activity will contain a basic view consisting of 3 UI-Elements.
- TextView for stating availability
- ImageView for car icon
- ImageView for parking space icon
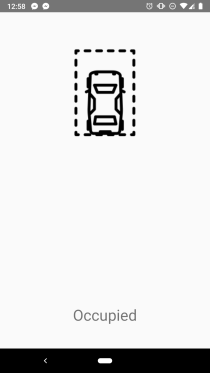
We will use the TextView to state whether the parking space is available and we will have a simple animation showing the car icon inside of the parking space or outside of it. The parked car will have a Y position of 203f and the not parked car will have a Y position of 903f. In order to show whether the parking spot is vacant or occupied we will toggle its position between the two using an animation.
First, we’ll declare the fields of our MainActivity class.
PubNub pubNub;
TextView occupiedText;
ImageView car, parkingSpot;
float outsideCar = 903f;
float parkedCar = 203f;
Then, we will instantiate the UI elements with the method findViewById() inside our activity’s onCreate() method. We must ensure that the Main Activity layout file has the following UI elements included with the appropriate ID’s as specified below. The Id’s I’ve chosen are occupiedText, car, and parkingspot. To see my complete layout file, click here.
occupiedText = findViewById(R.id.occupiedText);
car = findViewById(R.id.car);
parkingSpot = findViewById(R.id.parkingspot);
Now we must instantiate our PubNub instance, so we can make calls to the PubNub API from within our Android App. In order to do this, we will write the following code and pass the Subscribe Key and Publish Key that we generated when creating the app in the PubNub Admin Console.
PNConfiguration pnConfiguration = new PNConfiguration();
pnConfiguration.setSubscribeKey("ENTER_SUBSCRIBE_KEY_HERE");
pnConfiguration.setPublishKey("ENTER_PUBLISH_KEY_HERE");
pnConfiguration.setSecure(true);
pubNub = new PubNub(pnConfiguration);
Now, that we have instantiated our PubNub instance, we can subscribe to the channel our sensor is publishing parking availability data to, parking_spot. In order to do this, we will need to add a callback listener for when a message has been published to the channel. Then we must actually subscribe to the channel. This is shown below.
pubNub.addListener(new SubscribeCallback() {
      @Override
      public void status(PubNub pubnub, PNStatus status) {
      }
      @Override
      public void message(PubNub pubnub, PNMessageResult message) {
         // HANDLE MESSAGE
      }
      @Override
      public void presence(PubNub pubnub, PNPresenceEventResult presence) {
      }
  });
  pubNub.subscribe()
          .channels(Arrays.asList("parking_spot")) // subscribe to channels
          .execute();
We will then implement the logic of handling the message. We want to essentially toggle the availability of the parking spot in our mobile app UI by checking its current status of occupancy. Thus, we will check the message just published to our channel to see if the parking spot is now available or occupied. In the case that it is available, we will call our helper method carLeaveAnimation(). In the case that it is occupied, we will call our helper method carEnterAnimation(). Thus inside our message() method we have the following.
final boolean occupied = message.getMessage().getAsJsonObject().get("occupied").getAsBoolean();
 runOnUiThread(new Runnable() {
     public void run() {
         if(occupied)
         {
             carEnterAnimation();
         }
         else
         {
             carLeaveAnimation();
         }
     }
 });
In carEnterAnimation(), we simply set the textview to say occupied. We also call the animate() method on the car’s imageview and move its Y position into the parking space (to the Y-coordinate value stored in variable, parkedCar). In carLeaveAnimation(), we simply set the textview to say available and call the animate() method on the car’s imageview to move its Y position outside the parking space (to the Y-coordinate value, outsideCar).
private void carEnterAnimation()
{
    car.animate().y(parkedCar).setDuration(1500);
    occupiedText.setText("Occupied");
}
private void carLeaveAnimation()
{
    car.animate().y(outsideCar).setDuration(1500);
    occupiedText.setText("Vacant");
}
That’s it for our mobile app! Now it successfully receives updates from the sensor on the availability of our parking spot.
Running App
To start the sensor, simply enter the directory in which your script is located from the Raspberry Pi terminal. Then execute the following command.
python sensor_publish.py
You will see that your sensor has now been turned on and is checking the distance readings. Run the Android mobile app and you should see that the mobile app’s UI will update and display the status of the parking spot.
Conclusion
Congrats! We have now built a simple Smart Parking IoT app. For the full source code, click here. By integrating PubNub and Soracom, we have built an IoT app that uses LTE to send realtime messages from the Raspberry Pi. Instead of being restricted by a wifi network, our Smart Parking IoT app is extremely portable and perfect for use outdoors.
For more information on how to link your ultrasonic sensor to PubNub’s realtime data charting framework, Project EON, check out this blog post on our website.


