

IN THIS ARTICLE
We’re creating a lot of data on a daily basis. Websites, devices, services, people. It’s become more important than ever before to be able to organize, sort, process and sift through this information overload to make better decisions and understand customer behavior. In times like this, data science comes to the rescue.
Data science includes processes and systems that extract knowledge or insights from data in various forms, like statistics, data mining, and predictive analytics.
In this tutorial, we’ll walk through building realtime analytics with Keen IO and PubNub, allowing you to track and stream analytical data as it happens.
Keen IO
Keen IO allows you to easily collect, explore, and visualize your data. They provide analytics-as-a-service. Here is what Keen IO platform offers:
- Track any event from your website, app, game, or device and store it with Keen. No need to manage your own database for event data. You can get started very fast with their SDKs, add geolocation and device info in your data, and add third party integrations.
- Write your own customized query without writing SQL and still have access to commonly used functions like sum, average, median etc.
- Complex visualizations with pre-built templates. It also gives the ability to generate custom reports.
How Realtime Analytics Works
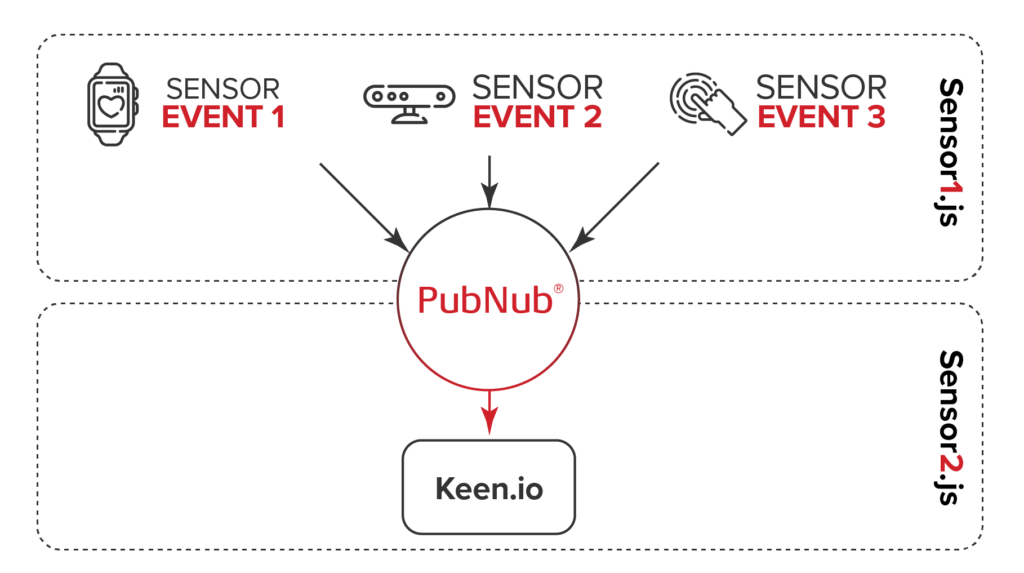
Our code has two parts:
- The server side code responsible for publishing the event data to PubNub channel (done by server1.js file).
- The server side code responsible for passing on the data from PubNub to Keen IO (done by server2.js file).
Source to PubNub code:
You can find the source code Clicking here.
Here, we will be replicating a situation where we have multiple events and some random integer related to that event is sent to PubNub. And the data is getting published every 1 second using Cron job.
(cron is a Linux utility which schedules a command or script on your server to run automatically at a specified time and date. A cron job is the scheduled task itself. Cron jobs can be very useful to automate repetitive tasks.)
First, we require two packages: pubnub and cron. You can install them using:
npm install pubnub -save
npm install cron -save
The server side script looks like this:
server1.js file
var pubnub = require("pubnub")({    // Initialize PubNub
   subscribe_key: 'YOUR_SUBSCRIBE_KEY', // always required
   publish_key: 'YOUR_PUBLISH_KEY' // only required if publishing
});
var cron = require('cron'); // Initialize Cron

// Some sample events
var events = ["Event1", "Event2", "Event3"]
// Selecting an event randomly and generating a name for it
function randomEvent(){
var event = events[Math.floor(Math.random()*events.length)];
return (event + "_data");
}

// Generating a random number between high and low value
function randomIntInc (low, high) {
   return Math.floor(Math.random() * (high - low + 1) + low);
}

// Specifying what job cron needs to perform, at what interval should it repeat.
var cronJob = cron.job("*/1 * * * * *", function(){
   pubnub.publish({
       channel: "keen-pubnub", // channel’s name to publish
       message: {"event": randomEvent(), "value": randomIntInc(0,9)}, //data to be published
       callback: function(m){console.log(m)}
   });
});

// Starting the Cron job
cronJob.start();
“*/1 * * * * *” is the cron time format to specify at what interval should it repeat the task. You can learn more about the cron format Clicking here.
PubNub to Keen IO Code
Along with PubNub, you need to install one more package:
npm install keen-js -save
The server side script looks like this:
server2.js file
var Keen = require('keen.io'); // Initialize KeenIO
var pubnub = require("pubnub")({ // Initialize PubNub
   subscribe_key: 'YOUR_SUBSCRIBE_KEY' // always required
});
// Configure instance. Only projectId and writeKey are required to send data.
var client = Keen.configure({
   projectId: "YOUR_PROJECT_ID",
   writeKey: "YOUR_WRITE_KEY"
});
pubnub.subscribe({
   channel : "keen-pubnub", // Subscribing to PubNub's channel
   message : function(message){
       // Sending the message from PubNub to KeenIO
       client.addEvent(message.event, {"value": message.value}, function(err, res) {
           if (err) {
               console.log(err);
           } else {
               console.log(res);
           }
       });
   }
})
You will have to log in to Keen IO to create a project. The Project ID and API Keys are available on the Project Overview page. You can find more info about how to use Keen IO’s JavaScript SDK Clicking here.
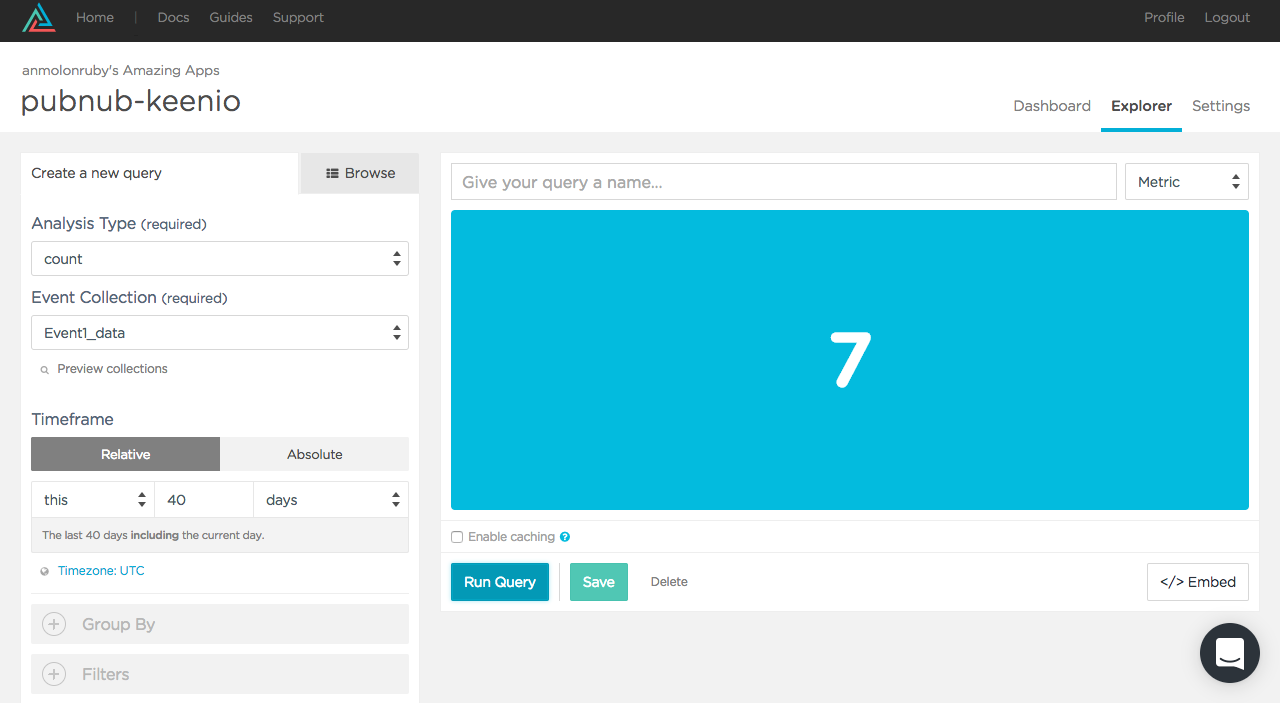
Here is a snapshot how Keen IO’s explorer look from where you can query through the data:
Conclusion
This stack is suitable for solutions where you have a source from where a lot of data is coming (of different events), transmission of that data in realtime is absolute requirement and you need to run analytics over that in equal speed.
Let’s say, we want to analyze San Francisco’s microclimates. Once we get the data using PubNub stream and shifted it to Keen IO, we can use the inbuilt functions of Keen to find average, minimum, maximum data points and get insights.
Try PubNub today!


