IN THIS ARTICLE
We’ve progressed as developers from creating applications with complex functionality to focusing on creating experiences that retain our users. Amazing UI’s and clear-cut user flows are becoming the goal for many emerging/existing applications.
While some industries are still trying to migrate towards a mobile-centric model there are different takes on the next methods to improve the UI and UX. Voice, AR and VR, just to name a few, have become contenders to break the simple model of interacting with a screen and have started to trend more towards augmenting real human interactions. This means that people have begun to abstract their interactions farther away from tapping on a screen to shaking their phones or talking to their device.
The more we delve into these experiences we start to realize the backbone in making them fluid is by providing real-time responses, exceeding a users expectation of augmentation and making the experience as integrated as possible.
To explore the possibility of how we can connect the ideas of real-time and the paradigm of user-experiences we’re going to make a project involving Amazon’s Alexa. The main idea is to show how we can improve an existing experience by innovating how people interact.
This is where what we’ll call Smart-Intercom comes in, an Alexa skill that we’ll build which will enable people to augment the typical house intercom experience by letting our voice device allow the speaker to communicate in real-time with the homeowner.
All the code is available on GitHub and a live demo is available here of the frontend.
Interaction Model
Having little to no interface when dealing with a voice application makes it inherently important to develop some sort model that describes how our user interacts without an application and what happens before, during and after that interaction.
Currently, the ecosystem is fairly new and there are different terms for different things, but it’s better to break down these bigger concepts into something more digestible. We can split our model into two different actions.
Invocations and Responses
The idea here is that Alexa (and other voice devices) are essentially waiting for some sort of invocation. This invocation just tells the device that it needs to do something or begin a certain flow. Associated with the invocation is then some sort of response, this could lead into something else or provide whatever the invoker was asking.
How PubNub Can Help
Analysing the Invocation and Response pattern we can see that the most difficult part of the interaction would be the response. This is where PubNub comes in. We can use PubNub Functions to make smart and real-time responses to what our users invoke.
In this model, we can use PubNub as a way to handle a lot of the custom logic that Alexa or Google Assistant can’t do by itself. In the example of the smart-intercom, we’d want to contact the owner of the home, so we’d use PubNub to check whether this is the person the visitor is looking for (Invoker). At the moment Alexa allows for API requests, which makes PubNub the perfect solution to execute logic remotely.
Designing Interaction Models
Unfortunately, it seems like creating voice applications is still fairly difficult if we use the conventional approach. The development tools that are out there are not very intuitive and leave developers stranded with complex design patterns.
Luckily, we can create our flow with a site made by the development community called Storyline. It’s fairly simple and without any coding, we can build out the interaction.
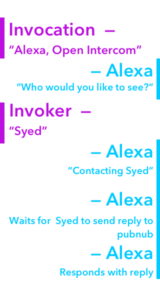
The general flow of the smart-intercom application looks something like this:
Here we can see that the user first invokes our application.
Alexa then replies with the question of who the invoker would like to see.
The invoker replies
Alexa then carries out the logic of reaching out.
Making some sort of companion app that pushes to a PubNub channel and then sends some data to the PubNub channel which Alexa grabs using an API request.
Alexa then gives the reply to the person that invoked the app.
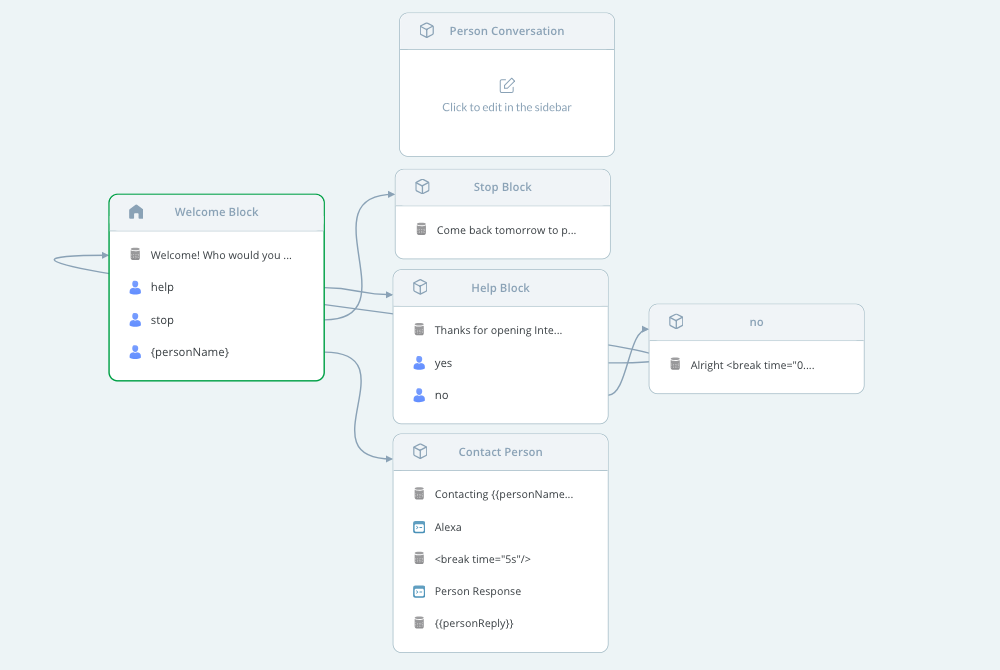
So let’s see how this would look in storyline.
Though Storyline is a fairly intuitive tool, let’s break down what’s going on here:
The arrows indicate where each action leads to. Many of the blocks you see in the image above, such as the help block, are actually there by default. The only thing we’re adding here is the “Contact Person” block in the second column.
The reasoning behind this is because when our application is invoked, we have a 3rd user option which we’ve created that allows our user to enter the person they’d like to see. We then store that response in the variable.
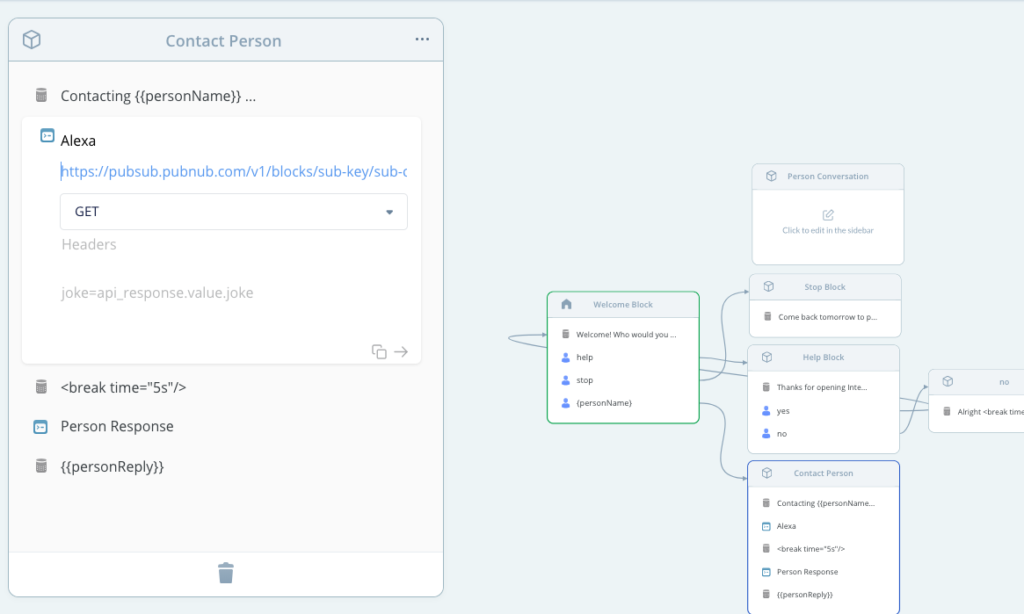
Once the user has given a person name we enter into the “Contact Person” block and we make Alexa do an API request. This request then goes to our PubNub Function that handles the incoming messages from our companion App. We’ll have to wait for a preset amount of time then fetch for the data. This works perfectly because just in case the owner isn’t available we could send a generic reply to let the invoker know.
Companion App and PubNub Functions
We can start off by creating the mobile app. Here specifically we’re going to be using React Native, but if you want to use Android or iOS we have SDKs available.
You’ll first have to create a PubNub account to get your pub/sub keys.
Then, create a new React-Native app. we can do that by running the following command:
npx create-react-native-app pubnub-alexa
This will create a boilerplate project that has all the things we need to start building. Next, we can navigate into the pubnub-alexafolder we just create and get our project running. We’ll also install the pubnub-react library so that we won’t have to worry about it when we build.
cd pubnub-alexa
npm i --save pubnub-react
npm i
npm start
Then we can go into our app.js file and add the things necessary to have our app connect to PubNub.
First import PubNub.
import PubNubReact from 'pubnub-react';
Then adding a constructor in our component which initializes our PubNub object and then lets our object subscribe to a channel once the component has mounted.
constructor(props) {
  super(props);
  this.pubnub = new PubNubReact({
    publishKey: 'Your Publish Key',
    subscribeKey: 'Your Subscribe Key'
  });
  this.pubnub.init(this);
}
componentWillMount() {
  this.pubnub.subscribe({
    channels: ['Alexa']
  });
}
In our main render method lets quickly make a list of pre-determined responses. You can go ahead and design that yourself, but I’ll be using the and design library to make my interface look a bit sleeker.
import { Button, Input, List } from 'antd';
// Other Code
render() {
    const messages = [
        'Ok I\'ll be there in 5 mins',
        'Call my number 415-xxx-6631',
        'Alright, the door is open'
      ];
    return (
      <div className="App">
        <List
          header={<div>Choose a preselected response</div>}
          bordered
          dataSource={messages}
          renderItem={item => (<List.Item>
            <Button onClick={this.publish.bind(this, item)} type="primary">{item}</Button>
            </List.Item>)
            }
        />
      </div>
    );
  }
When everything is added, our app.js file should look something like this.
mport React, { Component } from 'react';
import PubNubReact from 'pubnub-react';
import { Button, Input, List } from 'antd';
import './App.css';
class App extends Component {
constructor(props) {
  super(props);
  this.pubnub = new PubNubReact({
    publishKey: 'Your Pub Key',
    subscribeKey: 'Your Sub Key'
  });
  this.pubnub.init(this);
}
componentWillMount() {
  this.pubnub.subscribe({
    channels: ['Alexa']
  });
  this.pubnub.getMessage('notify', (msg) => {
    console.log(msg);
    this.notify(msg.message);
  });
}
publish(userMessage) {
  this.pubnub.publish(
    {
        message: {
            message:userMessage
        },
        channel: 'Alexa',
        storeInHistory: true
    },
    (status, response) => {
        // handle status, response
    }
);
}
notify(message) {
  if (!("Notification" in window)) {
    alert("This browser does not support system notifications");
  }
  else if (Notification.permission === "granted") {
    if(typeof message === 'string' || message instanceof String){
      var notification = new Notification(message);
    }else{
      var notification = new Notification("Hello World");
    }
  }
  else if (Notification.permission !== 'denied') {
    Notification.requestPermission(function (permission) {
      if (permission === "granted") {
        var notification = new Notification("Hello World");
      }
    });
  }
}
  render() {
    const messages = [
        'Ok I\'ll be there in 5 mins',
        'Call my number 415-xxx-6631',
        'Alright, the door is open'
      ];
    return (
      <div className="App">
        <List
          header={<div>Choose a preselected response</div>}
          bordered
          dataSource={messages}
          renderItem={item => (<List.Item>
            <Button onClick={this.publish.bind(this, item)} type="primary">{item}</Button>
            </List.Item>)
            }
        />
      </div>
    );
  }
}
The next step would be to make our PubNub Function which connects our Alexa skill to our companion application.
We’ll make an on request function because then it would allow us to create API requests from the Alexa skill.
The function will look like this.
let headersObject = request.headers;
    let paramsObject = request.params;
    let methodString = request.method;
    let bodyString = request.body;
    // Set the status code - by default it would return 200
    response.status = 200;
    // Set the headers the way you like
    response.headers['X-Custom-Header'] = 'CustomHeaderValue';

    console.log(paramsObject);

    if (paramsObject.action == "notify"){
        return pubnub.publish({
            "channel": "notify",
            "message": "Someone is at your door!"
        }).then((publishResponse) => {
            console.log(`Publish Status: ${publishResponse[0]}:${publishResponse[1]} with TT ${publishResponse[2]}`);
            return response.send();
        });

    }else{
        return pubnub.history({
            channel : "Alexa",
            count : 1,
            includeTimetoken : true
    }).then((res) => {
        res['messages'].forEach((value, index) => {
            console.log("message:", value.entry, "timetoken:", value.timetoken);
        });
        return response.send({'message' : res['messages'][0].entry.message});
    });

    }
};
All the function does is check whether the parameter that we send during our API request and performs some actions based on that.
In our Alexa skill, we had a block called “Contact Person”. In here we make two API calls to our function. Both calls add a parameter called “Action”. The first one says “notify” to let the companion app that for someone is at the door.
Wrapping Up
So we now have an Alexa app that allows the person interacting with the Alexa app to interact with someone else in real-time. Nice, but how do we take this to the next level? Of course, you can go deeper and make connections to IoT devices. The front-end allows users to now perform actions based on a request made from Alexa. Now it’s up to you to decide what those actions are.
All the code is available on GitHub and a live demo is available here of the frontend.


