IN THIS ARTICLE
Hello, and welcome back to our series on Android development with Fabric and PubNub! In previous articles, we’ve shown how to create a powerful chat app with Android, Fabric, and Digits. In this blog entry, we highlight 2 key technologies, Twitter Fabric (mobile development toolkit) and Nuance Speech Kit (a world-class speech toolkit). With these technologies, we can accelerate mobile app development and build an app with several realtime data features that you will be able to use as-is or employ easily in your own data streaming applications:
- Send chat messages to a PubNub channel (Chat) : using the PubNub plugin for realtime messaging and Publish/Subscribe API.
- Use Live Dictation to enter a chat message (Chat) : using the Nuance Speech Recognition API.
- Use Text-to-Speech to read inbound chat messages (Chat) : using the Nuance Text-to-Speech API.
- Display current and historical chat messages (Chat) : using the PubNub plugin and History API.
- Display a list of what users are online (Presence) : using the PubNub plugin and Presence API.
- Log in with Digits auth (Login) : using the Digits plugin for Fabric allowing the easiest mobile user authentication possible.
PubNub provides a global realtime Data Stream Network with extremely high availability and low latency. With PubNub, it’s possible for data exchange between devices (and/or sensors, servers, you name it – essentially anything that can talk TCP) in less than a quarter of a second worldwide. And of that 250ms, a large part comes from the last hop – the data carrier itself! As 4G LTE (5G won’t be far away) and realtime computing gain traction, those latencies will decrease even further.
Twitter Fabric is a development toolkit for Android (as well as iOS and some Web capabilities) that gives developers a powerful array of options:
- Familiar dev toolkit for iOS, Android and Web Applications : a unified developer experience that focuses on ease of development and maintenance.
- Brings best-of-breed SDKs all in one place : taking the pain out of third-party SDK provisioning and using new services in your application.
- Streamlined dependency management : Fabric plugin kits are managed together to consolidate dependencies and avoid “dependency hell”.
- Rapid application development with task-based sample code onboarding : You can access and integrate sample code use cases right from the IDE.
- Automated Key Provisioning : sick of creating and managing yet another account? So were we! Fabric will provision those API keys for you.
- Open Source, allowing easier understanding, extension and fixes.
Nuance is a high-quality SDK on the Fabric platform enabling easy voice recognition and speech-to-text capabilities (iOS and HTML/JavaScript implementations are also available). In our application, this will allow us to create an easy button-push for dictation of chat messages as well as a new menu option that allows us to use text-to-speech to read incoming messages out loud.
This may seem like a lot to digest. How do all these things fit together exactly?
- We are building an Android app because we want to reach the most devices worldwide.
- We use the Fabric plugin for Android Studio, giving us our “mission control” for plugin adoption and app releases.
- We adopt Best-of-Breed services (like PubNub) rapidly by quickly integrating plugin kits and sample code in Fabric.
- We use PubNub as our Global Realtime Data Stream Network to power the Chat and Presence features.
- In addition, we’ll use Nuance speech kit for Fabric to provide the best voice recognition and text-to-speech possible.
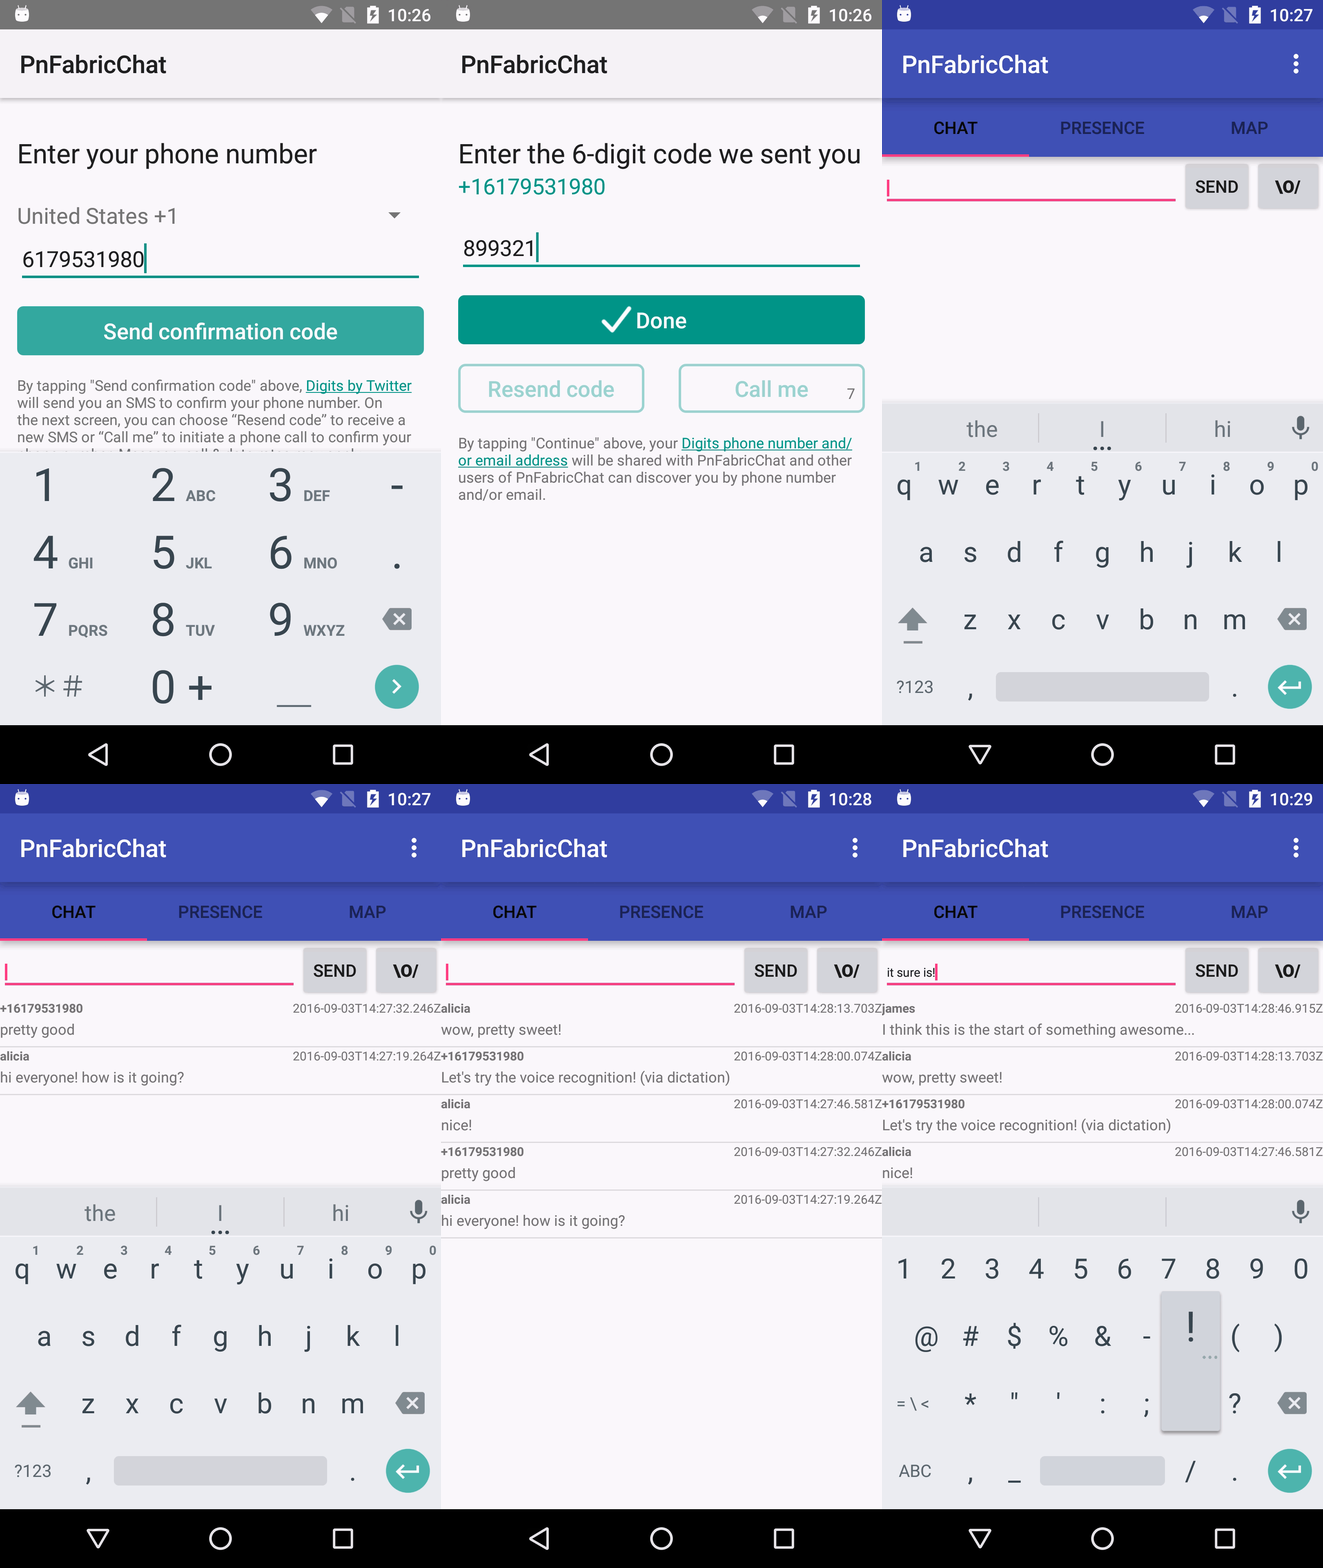
As you can see in the animated GIF above, once everything is together, we have built an application very quickly that provides a great feature set with relatively little code and integration pain. This includes:
- Log in with Digits phone-based authentication (or your own alternative login mechanism).
- Send & receive chat messages (or whatever structured realtime data you like).
- Enter chat messages via dictation.
- Read incoming chat messages out loud using text-to-speech.
- Show a list of users online (or devices/sensors/vehicles, etc.).
This all seems pretty sweet, so let’s move on to the development side…
Sign up with Fabric
If you haven’t already, you’ll want to create a Fabric account like this:
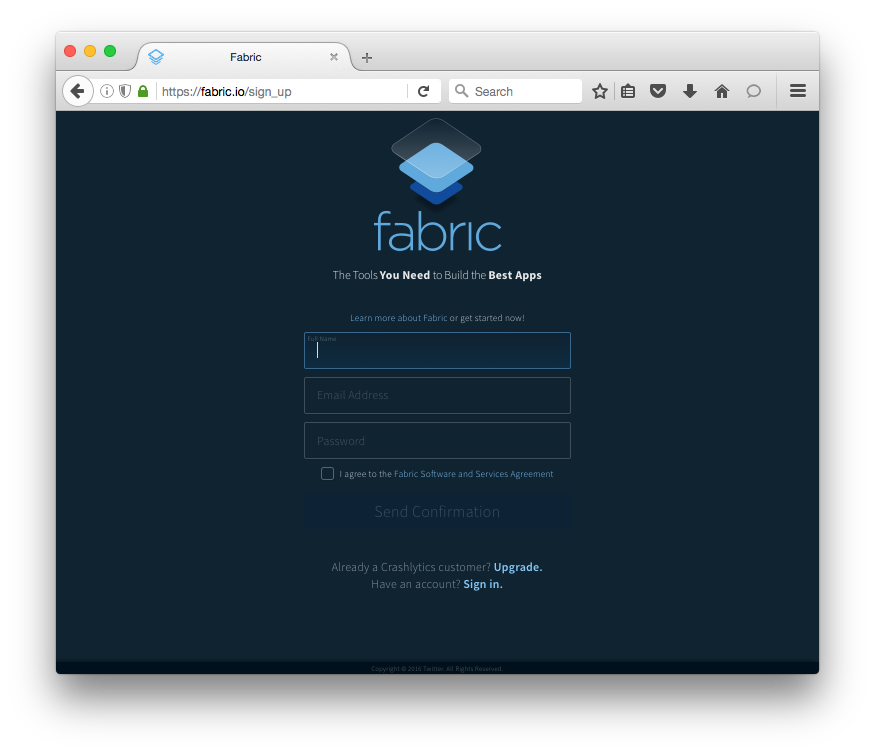
You should be on your way in 60 seconds or less!
Android Studio
In Android studio, as you know, everything starts out by creating a new Project.
In our case, we’ve done much of the work for you – you can jumpstart development with the sample app by downloading it from GitHub, or the “clone project from GitHub” feature in Android Studio if prefer. The Git url for the sample app is:
https://github.com/sunnygleason/pubnub-android-fabric-chat-ext.git
Once you have the code, you’ll want to create a Fabric Account if you haven’t already.
Then, you can integrate the Fabric Plugin according to the instructions you’re given. The interface in Android Studio should look something like this, under Preferences > Plugins > Browse Repositories:
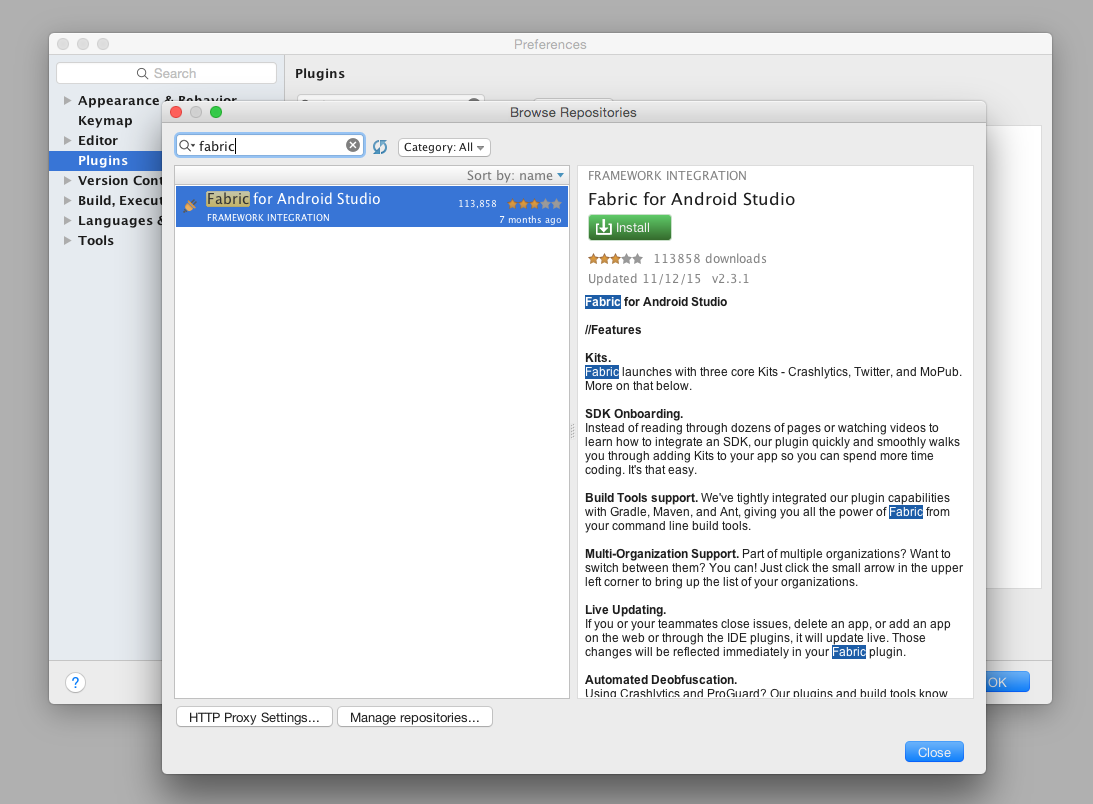
Once everything’s set, you’ll see the happy Fabric Plugin on the right-hand panel:
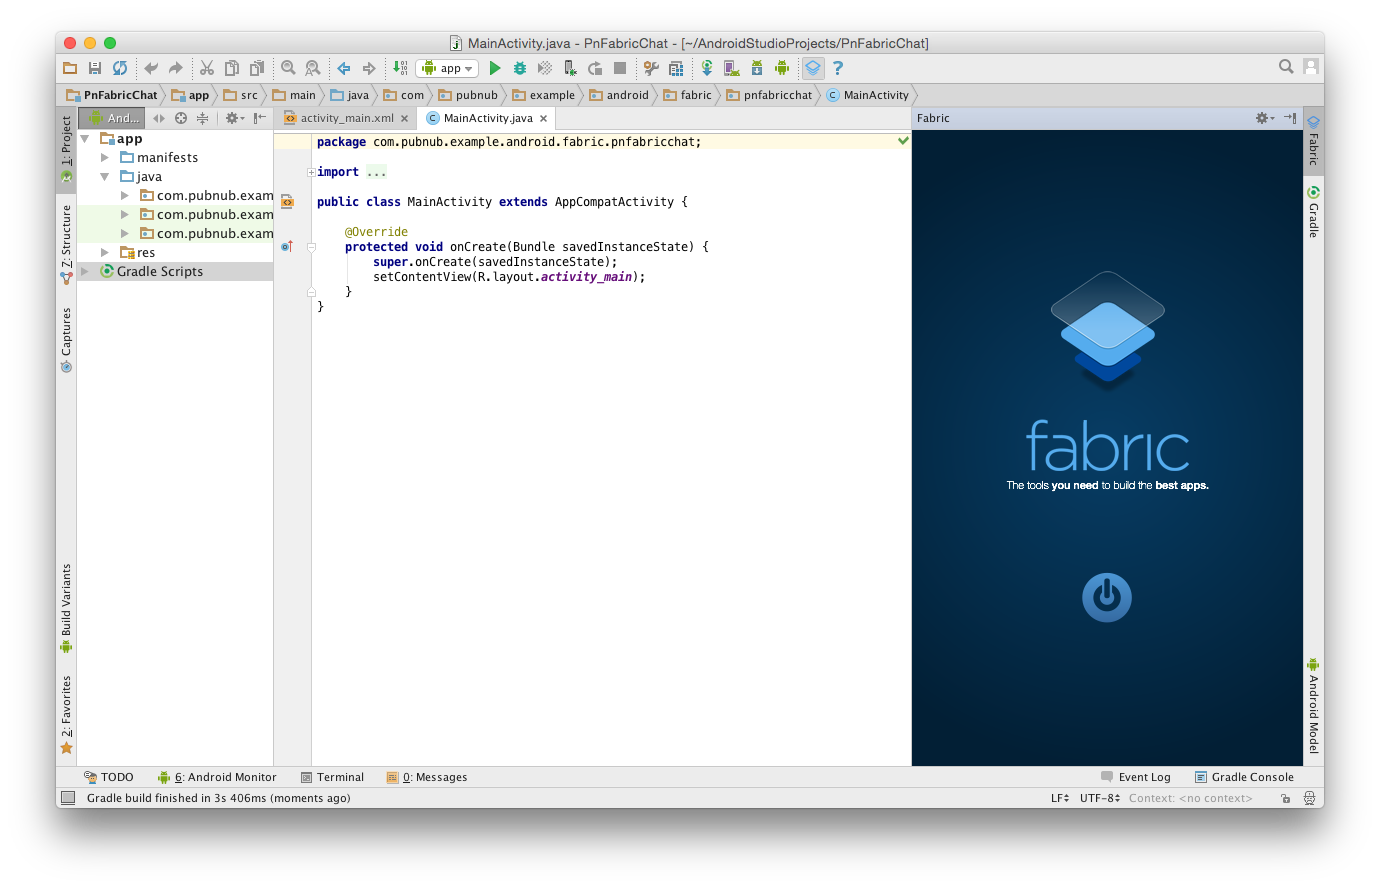
Click the “power button” to get started, and you’re on your way!
Nuance SDK Integration
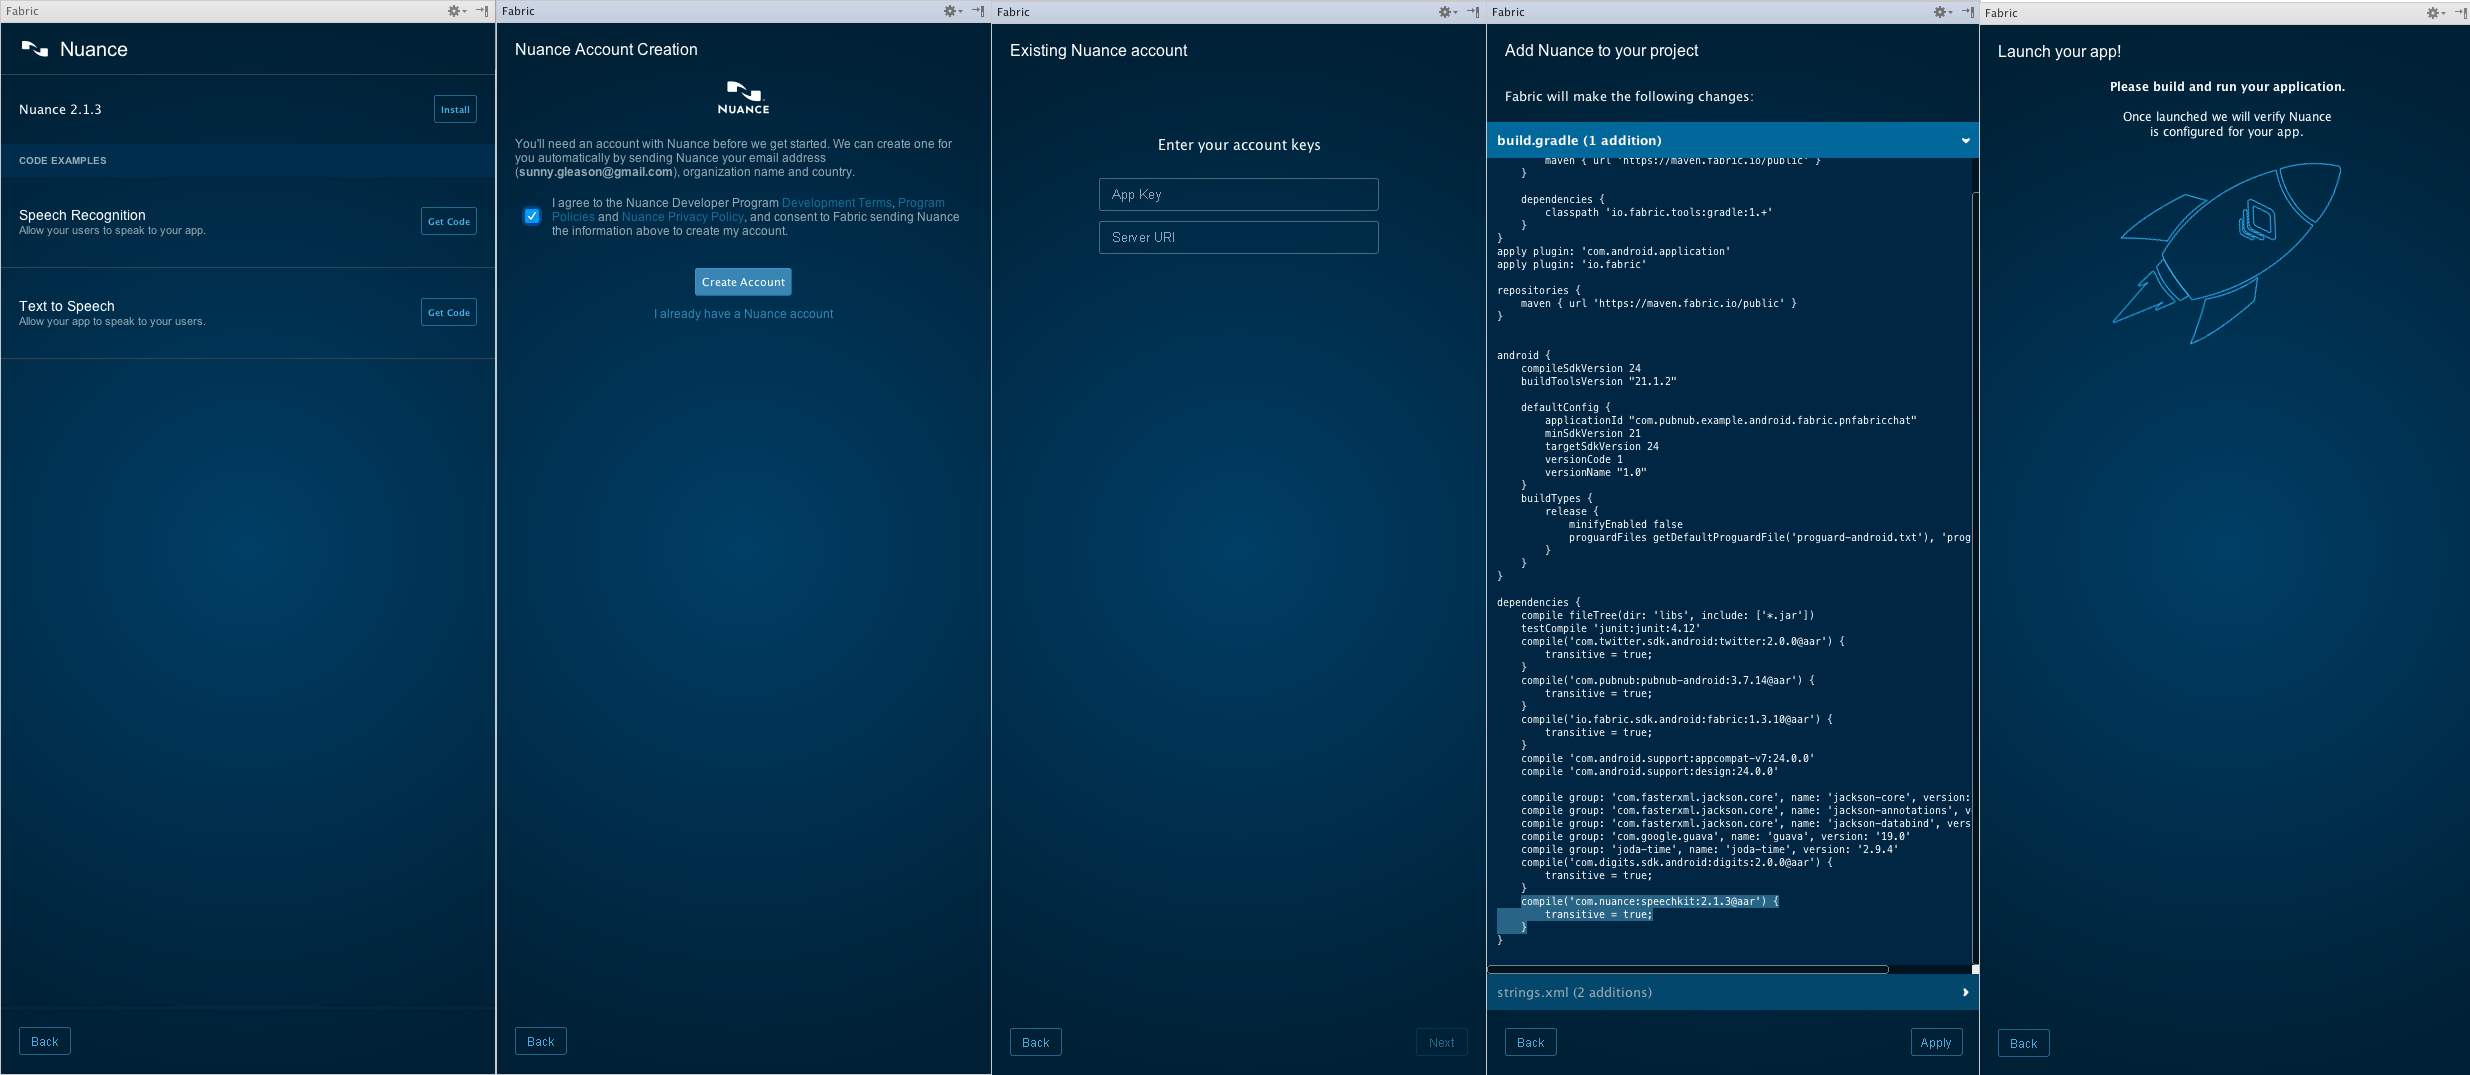
Adding Nuance is an easy 4-step process:
- Click to Install from the list of Fabric kits
- Enter your Nuance keys or have Fabric create a new account
- Integrate any Sample Code you need to get started
- Launch the App to verify successful integration… and that’s it!
Here’s a visual overview of what that looks like:
PubNub SDK Integration
Adding PubNub is just as easy:
- Click to Install from the list of Fabric kits
- Enter your PubNub keys or have Fabric create a new account
- Integrate any Sample Code you need to get started
- Launch the App to verify successful integration
Look familiar? That’s the beauty of Fabric!
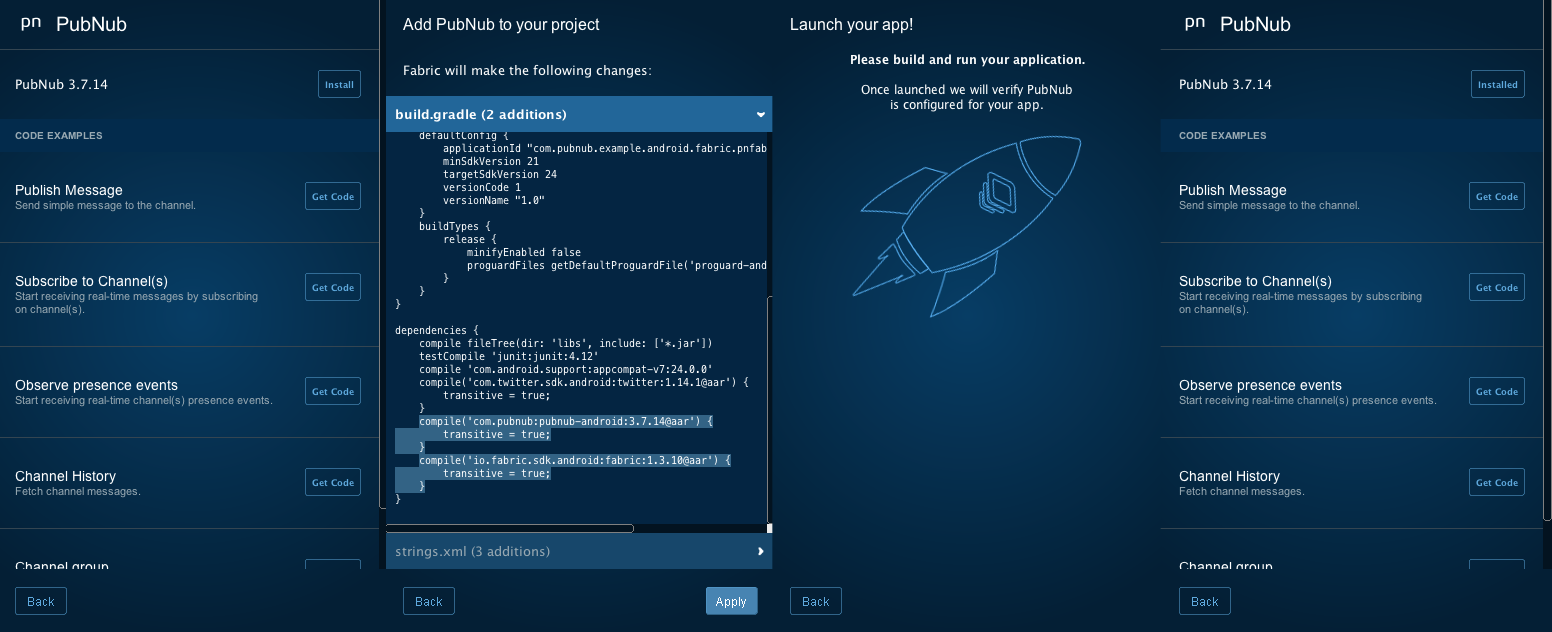
Using this same process, you can integrate over a dozen different toolkits and services with Fabric.
Additional Background Information
This article builds on the application described in the previous article in the series. If you would like more information about the core features and implementation, please feel free to check it out! There is also a pre-recorded training webinar available, as well as ongoing live webinars!
Navigating the Code
Once you’ve set up the sample application, you’ll want to update the publish and subscribe keys in the Constants class, your Twitter API keys in the MainActivity class, your Fabric API key in the AndroidManifest.xml, and Nuance API keys in strings.xml. These are the keys you created when you made a new PubNub and Nuance accounts and PubNub application in previous steps. Make sure to update these keys, or the app won’t work!
Here’s what we’re talking about in the Constants class:
package com.pubnub.example.android.fabric.pnfabricchat;
public class Constants {
    ...
    public static final String PUBLISH_KEY = "YOUR_PUBLISH_KEY";            // replace with your PN PUB KEY
    public static final String SUBSCRIBE_KEY = "YOUR_SUBSCRIBE_KEY";        // replace with your PN SUB KEY
    ...
}
These values are used to initialize the connection to PubNub when the user logs in.
And in the MainActivity:
public class MainActivity extends AppCompatActivity {
    private static final String TWITTER_KEY = "YOUR_TWITTER_KEY";
    private static final String TWITTER_SECRET = "YOUR_TWITTER_SECRET";
    ...
}
These values are necessary for the user authentication feature in the sample application.
And in the AndroidManifest.xml:
<?xml version="1.0" encoding="utf-8"?>
<manifest xmlns:android="http://schemas.android.com/apk/res/android"
    package="com.pubnub.example.android.fabric.pnfabricchat">
    ...
    <application ...>
        ...
        <meta-data
            android:name="io.fabric.ApiKey"
            android:value="YOUR_API_KEY" />
        ...
    </application>
    ...
</manifest>
This is used by the Fabric toolkit to integrate features into the application.
Here’s where to integrate Nuance in the strings.xml:
<resources>
    ...
    <string name="com.nuance.appKey" translatable="false">YOUR_NUANCE_APPKEY</string>
    <string name="com.nuance.url" translatable="false">YOUR_NUANCE_URL</string>
    ...
</resources>
As with any Android app, there are 2 main portions of the project – the Android code (written in Java), and the resource files (written in XML).
The Java code contains 2 Activities, plus packages for each major feature: chat, presence, and speech. (The mapbox package is for an upcoming article on presence mapping with the Mapbox API – stay tuned!)
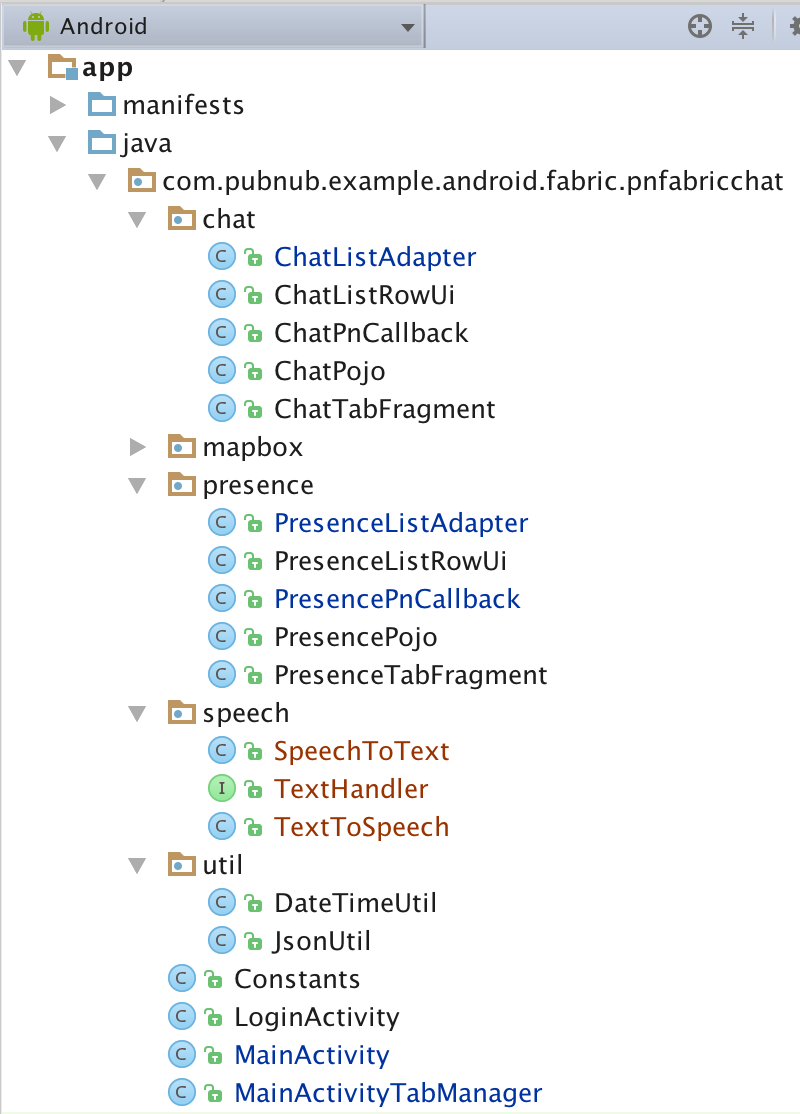
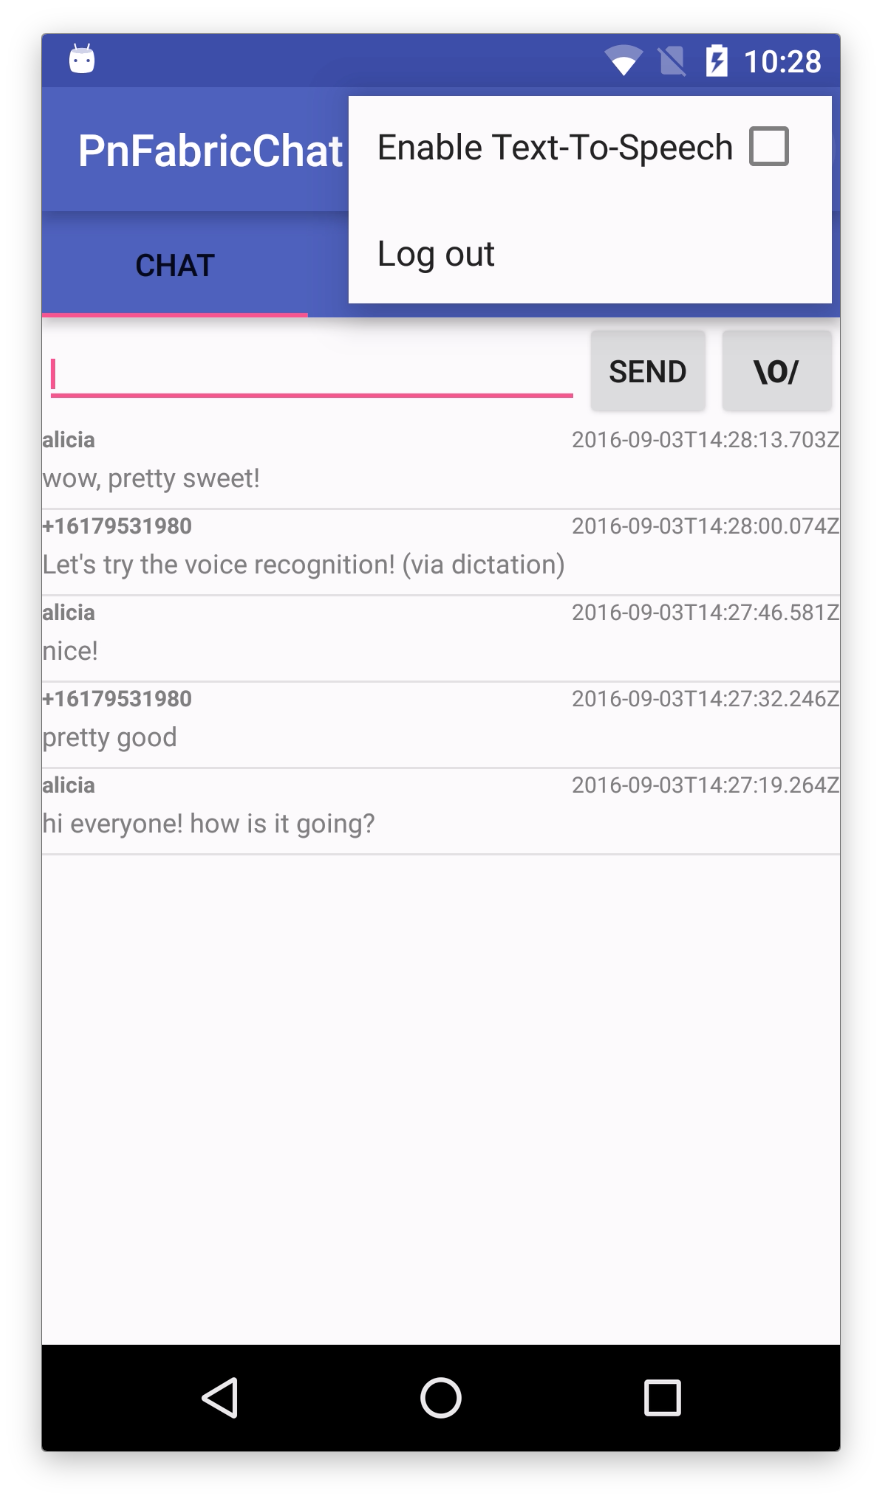
The resource XML files include layouts for each activity, fragments for the 2 tabs, list row layouts for each data type, and a menu definition with a single option for “logout”.
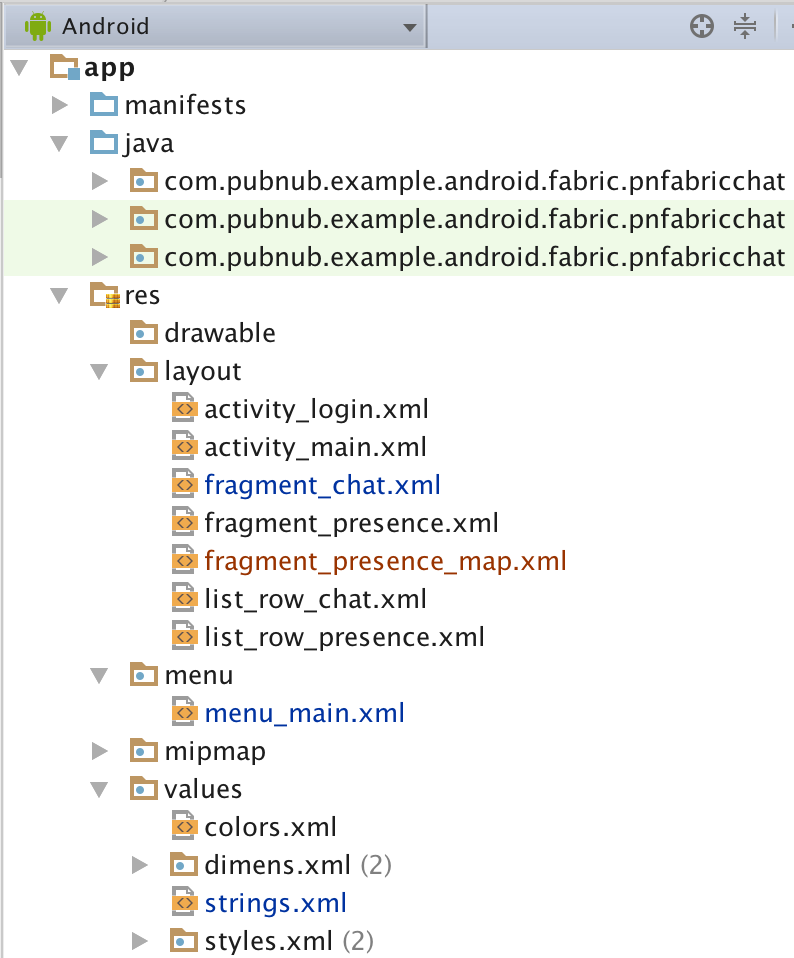
Whatever you need to do to modify this app, chances are you’ll just need to tweak some Java code or resources. In rare cases, you might add some additional dependencies in the build.gradle file, or modify permissions or behavior in the AndroidManifest.xml.
In the Java code, there is a package for each of the main features:
- chat : code related to implementing the realtime chat feature.
- presence : code related to implementing the online presence list of users.
- speech : helper code for working with speech-to-text and text-to-speech.
For ease of understanding, there is a common structure to each of these packages that we’ll dive into shortly.
Android Manifest
The Android manifest is very straightforward – we need 3 permissions (INTERNET, RECORD_AUDIO, and ACCESS_NETWORK_STATE), and have 2 activities: LoginActivity (for login), and MainActivity (for the main application).
The XML is available here and described in the previous article.
Layouts
Our application uses several layouts to render the application:
- Activity : the top-level layouts for
LoginActivityandMainActivity. - Fragment : layouts for our the tabs,
ChatandPresence. - Row Item : layouts for the the types of
ListView,ChatandPresence.
These are all standard layouts that we pieced together from the Android developer guide, but we’ll go over them all just for the sake of completeness.
Activity Layouts
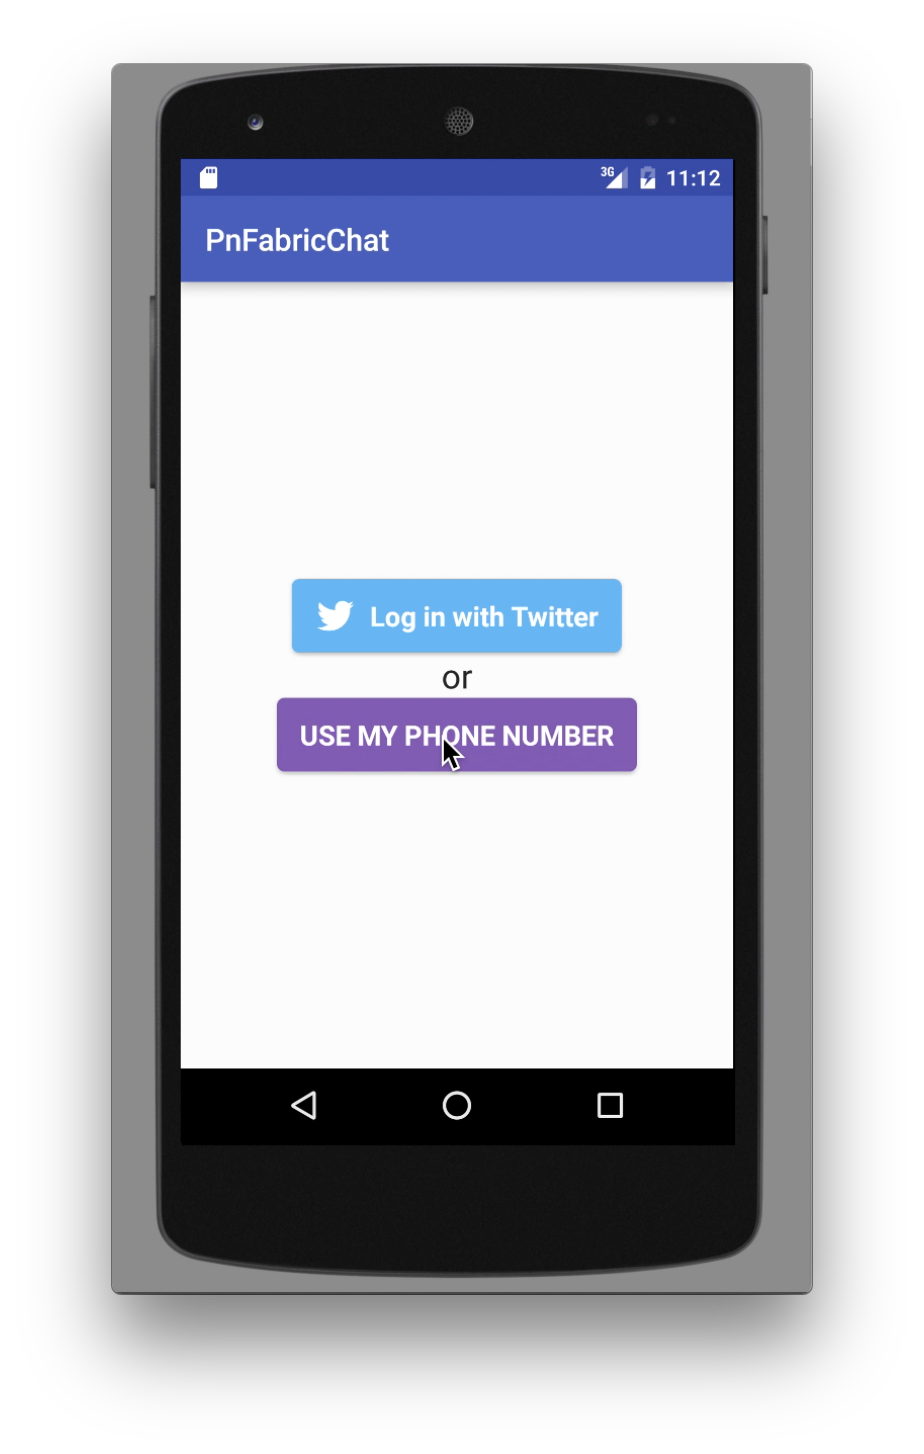
The login activity layout is pretty simple – it’s just one button for the Twitter login, and one button for the super-awesome Digits auth.
The XML is available here and described in the previous article.
It results in a layout that looks like this:
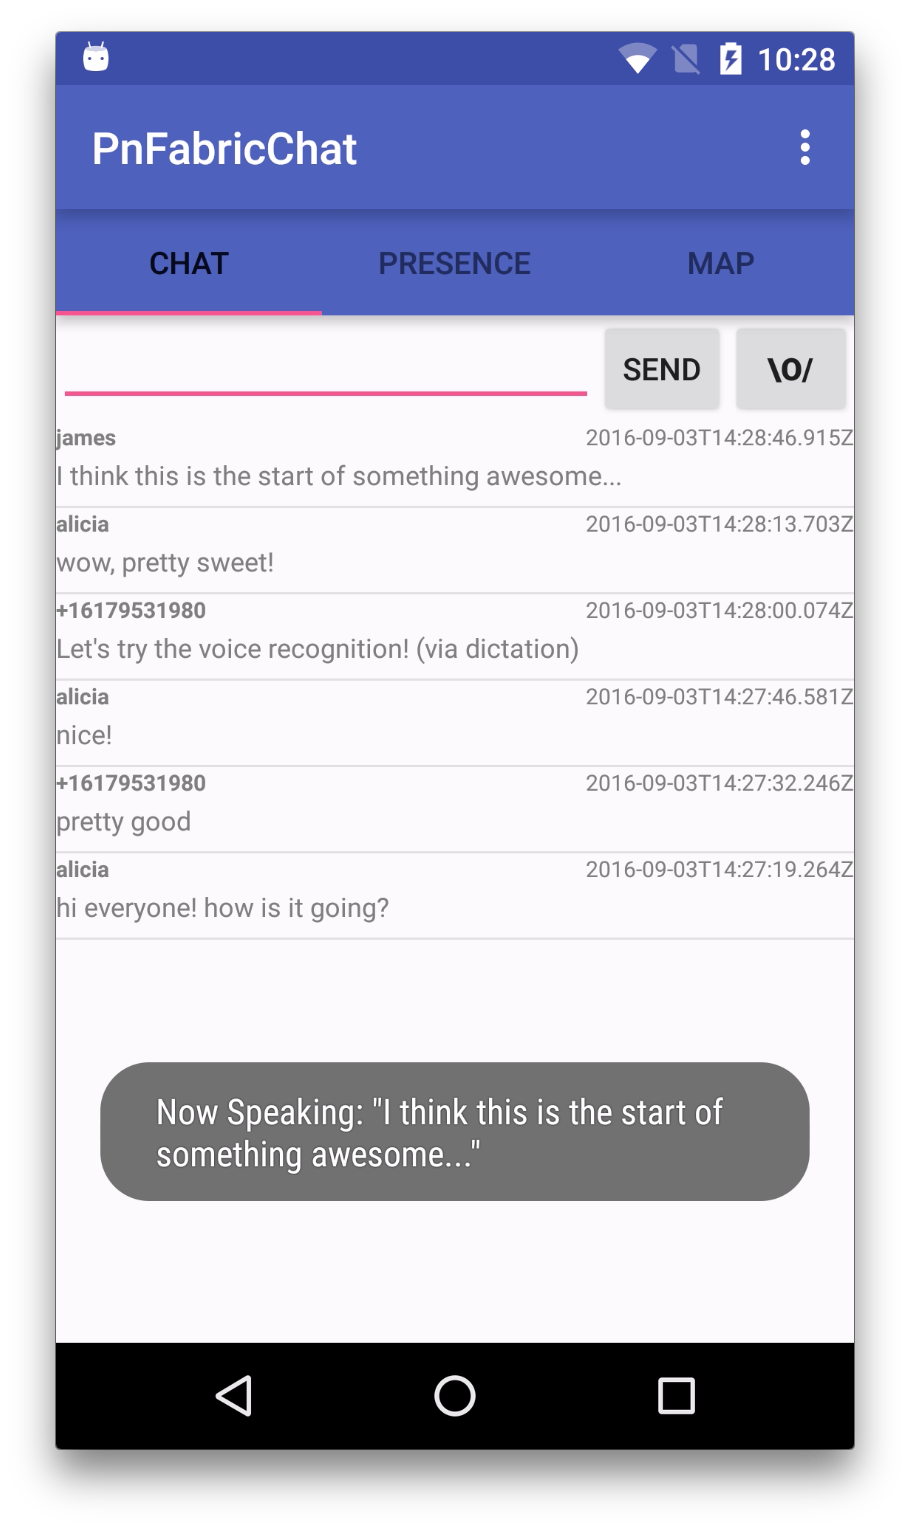
The Main Activity features a tab bar and view pager – this is pretty much the standard layout suggested by the Android developer docs for a tab-based, swipe-enabled view:
The XML is available here and described in the previous article.
It results in a layout that looks like this:
The new menu option for text-to-speech looks like this:
Fragment Layouts
Ok, now that we have our top-level views, let’s dive into the tab fragments.
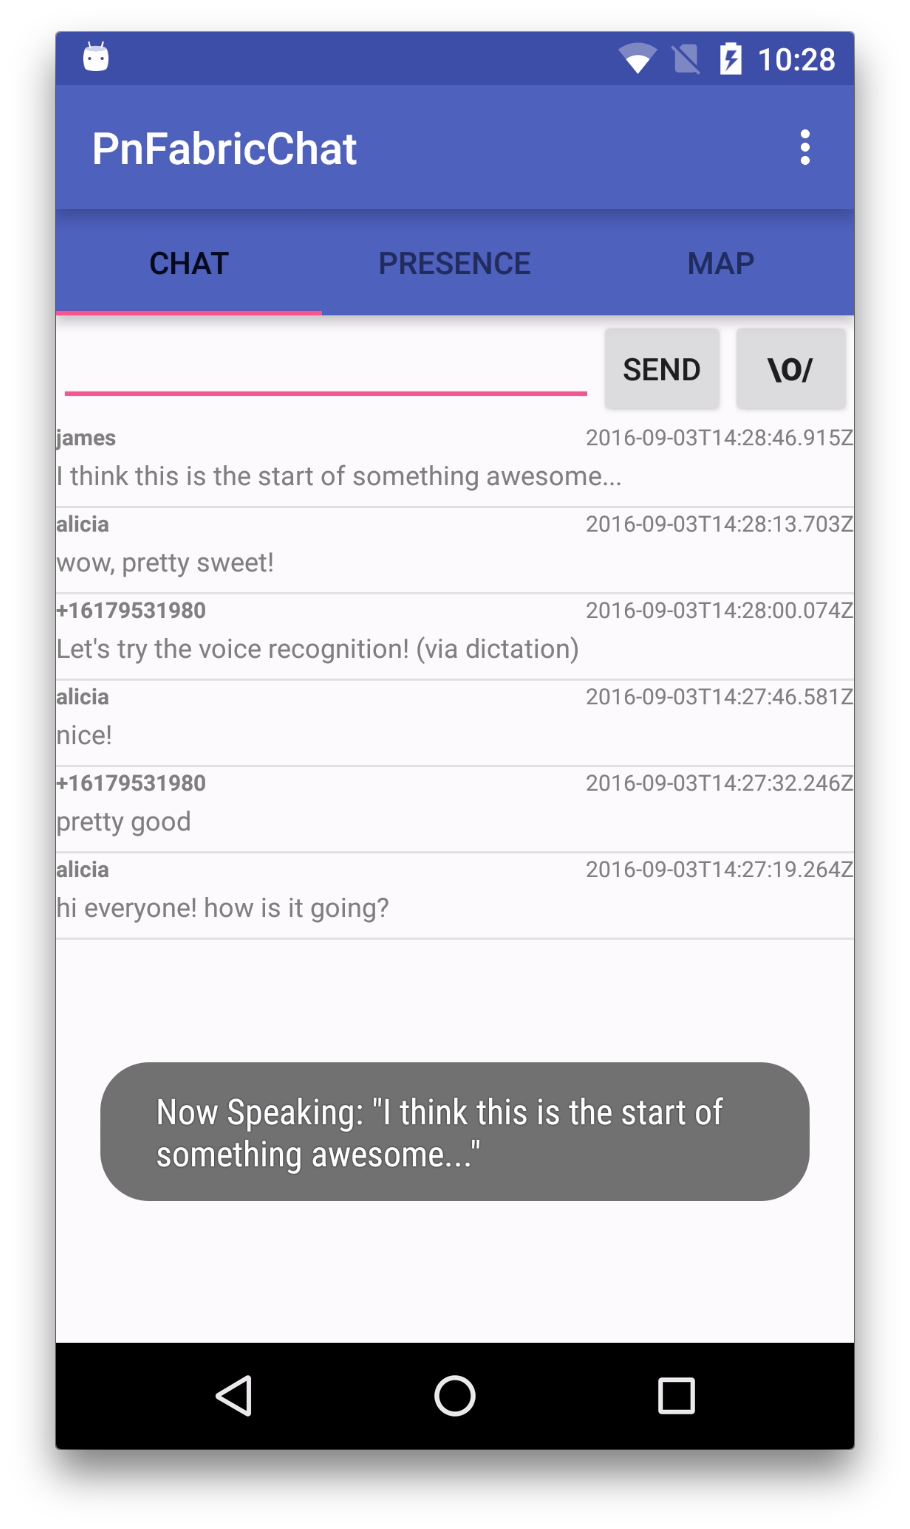
The chat tab layout features a bar for sending a new message (that’s what the GridLayout named “relativeLayout” is for, to create a “send message” section including a “start dictation” button), with a scrolling ListView below.
<?xml version="1.0" encoding="utf-8"?>
<RelativeLayout xmlns:android="http://schemas.android.com/apk/res/android"
    android:orientation="vertical" android:layout_width="match_parent"
    android:layout_height="match_parent">
    <GridLayout
        android:layout_width="match_parent"
        android:layout_height="wrap_content"
        android:layout_alignParentTop="true"
        android:rowCount="1"
        android:columnCount="3"
        android:id="@+id/relativeLayout">
        <EditText
            android:layout_width="wrap_content"
            android:layout_height="wrap_content"
            android:id="@+id/new_message"
            android:textSize="10sp"
            android:layout_centerVertical="true"
            android:layout_alignEnd="@+id/sender"
            android:layout_gravity="fill_horizontal">
            <requestFocus />
        </EditText>
        <Button
            style="?android:attr/buttonStyleSmall"
            android:layout_width="wrap_content"
            android:layout_height="wrap_content"
            android:text="Send"
            android:id="@+id/sendButton"
            android:onClick="publish" />
        <Button android:text="\\o/"
            android:layout_width="57dp"
            android:layout_height="wrap_content"
            android:onClick="toggleReco"
            android:textStyle="bold" />
    </GridLayout>
    <ListView
        android:id="@+id/chat_list"
        android:layout_height="match_parent"
        android:layout_width="match_parent"
        android:layout_below="@+id/relativeLayout" />
</RelativeLayout>
Combined with the ChatListRowUi layouts, it will create a view that looks like this:
Row Layouts
A chat row contains very few data attributes: just sender, timestamp, and the message itself:
The XML is available here and described in the previous article.
Java Code
In the code that follows, we’ve categorized things into a few areas for ease of explanation. Some of these are standard Java/Android patterns, and some of them are just tricks we used to follow PubNub or other APIs more easily.
- Activity : these are the high-level views of the application, the Java code provides initialization and UI element event handling.
- Pojo : these are Plain Old Java Objects representing the “pure data” that flows from the network into our application.
- Fragment : these are the Java classes that handle instantiation of the UI tabs.
- RowUi : these are the corresponding UI element views of the Pojo classes (for example, the
senderfield is represented by anTextViewin the UI). - PnCallback : these classes handle incoming PubNub data events (for publish/subscribe messaging and presence).
- Adapter : these classes accept the data from inbound data events and translate them into a form that is useful to the UI.
That might seem like a lot to take in, but hopefully as we go into the code it should feel a lot easier.
LoginActivity
The LoginActivity is pretty basic – we just include code for instantiating the view and setting up Digits login callbacks. If you look at the actual source code, you’ll also notice code to support Twitter auth as well.
The Java code is available here and described in the previous article.
We attach the login event to a callback with two outcomes: the success callback, which extracts the phone number and moves on to the MainActivity to display a Toast message; and the error callback, which does nothing but Log (for now).
In a real application, you’d probably want to use the Digits user ID from the digitsSession to link it to a user account in the backend.
MainActivity
There’s a lot going on in the MainActivity. This makes sense, since it’s the place where the application is initialized and where UI event handlers live. Take a moment to glance through the code and we’ll talk about it below. We’ve removed a bunch of code to highlight the portions that are used for Text-to-Speech and Speech-to-Text services.
public class MainActivity extends AppCompatActivity {
    ...
    @Override
    protected void onCreate(Bundle savedInstanceState) {
        super.onCreate(savedInstanceState);
        ...
        this.mSpeechToText = new SpeechToText(this, new TextHandler() {
            @Override
            public void onText(String text) {
                MainActivity.this.doPublish(text, null);
            }
        });
        this.mTextToSpeech = new TextToSpeech(this);
        ...
        this.mChatListAdapter = new ChatListAdapter(this, this.mUsername, this.mTextToSpeech);
        ...
        this.mChatCallback = new ChatPnCallback(this.mChatListAdapter);
        ...
        initPubNub();
        initChannels();
    }
    ...
    @Override
    public boolean onOptionsItemSelected(MenuItem item) {
        int id = item.getItemId();
        switch (id) {
            case R.id.tts_enabled:
                if (this.mTextToSpeech != null) {
                    mTextToSpeech.toggleEnabled();
                }
                return true;
            case R.id.action_logout:
                logout();
                return true;
        }
        return super.onOptionsItemSelected(item);
    }
    ...
    public void toggleReco(View button) {
        this.mSpeechToText.toggleReco(button);
    }
    public void publish(View view) {
        final EditText mMessage = (EditText) MainActivity.this.findViewById(R.id.new_message);
        String theMessage = mMessage.getText().toString();
        doPublish(theMessage, mMessage);
    }
    private void doPublish(String theMessage, final EditText toClear) {
        final Map<String, String> message = ImmutableMap.<String, String>of("sender", MainActivity.this.mUsername, "message", theMessage, "timestamp", DateTimeUtil.getTimeStampUtc());
        try {
            this.mPubnub.publish(Constants.CHANNEL_NAME, JsonUtil.asJSONObject(message), new Callback() {
                @Override
                public void successCallback(String channel, Object message) {
                    MainActivity.this.runOnUiThread(new Runnable() {
                        @Override
                        public void run() {
                            if (toClear != null) {
                                toClear.setText("");
                            }
                        }
                    });
                    try {
                        Log.v(TAG, "publish(" + JsonUtil.asJson(message) + ")");
                    } catch (Exception e) {
                        throw Throwables.propagate(e);
                    }
                }
                ...
            });
        } catch (Exception e) {
            throw Throwables.propagate(e);
        }
    }
    ...
}
The main UI event handler of note is toggleReco(), which processes the dictation button click.
The onCreateOptionsMenu() and onOptionsItemSelected() should look familiar to Android developers, it’s just initializing and handling menu clicks. Toggling the “enableTts” menu item will enable or disable the text-to-speech handling based on the current setting.
The most important things happening in the onCreate() method with respect to the speech features are as follows:
- Creating a new SpeechToText helper, passing in the current Activity (this is necessary so the helper has Activity context).
- Binding the SpeechToText recognition handler to the
MainActivity.doPublish()action (which auto-sends text upon recognition). - Creating a new TextToSpeech helper (for reading messages out loud).
- Binding the TextToSpeech helper to the ChatListAdapter (so incoming messages from different senders are read out loud).
We’ve also refactored the publish() method to handle two cases: the send() action, as well as the auto-send via dictation.
Stay tuned for more description of the SpeechToText and TextToSpeech helpers below.
ChatPojo, ChatListRowUi, ChatTabFragment, ChatPnCallback, and Presence Features
The Java code for these classes (and the presence feature) is available here and Clicking here and described in the previous article.
The Pojo classes are the most straightforward of the entire app – they are just immutable objects that hold data values as they come in. We make sure to give them toString(), hashCode(), and equals() methods so they play nicely with Java collections.
The ChatListRowUi object just aggregates the UI elements in a chat list row. Right now, these just happen to be TextView instances.
The ChatTabFragment object takes care of instantiating the Chat tab and hooking up the ChatListAdapter.
The ChatPnCallback is the bridge between the PubNub client and our application logic. It takes an inbound messageObject object and turns it into a Pojo value that is forwarded on to the ChatListAdapter instance.
ChatListAdapter
The ChatListAdapter follows the Android Adapter pattern, which is used to bridge data between Java data collections and ListView user interfaces. In the case of PubNub, messages are coming in all the time, unexpected from the point of view of the UI. The adapter is invoked from the ChatPnCallback class: when a chat message comes in, the callback invokes ChatListAdapter.add() with a ChatPojo object containing the relevant data.
In the case of the ChatListAdapter, the backing collection is a simple ArrayList, so all the add() method has to do is:
- Add the item to the collection (actually prepend by doing
insert(0, value)). - Notify the UI thread that the data set changed (this must happen on the UI thread only!).
- If there is a
TextToSpeechTextHandler registered and the message is from a different sender, invoke the text-to-speech feature.
Not too bad!
public class ChatListAdapter extends ArrayAdapter<ChatPojo> {
    ...
    @Override
    public void add(final ChatPojo message) {
        this.values.add(0, message);
        ((Activity) this.context).runOnUiThread(new Runnable() {
            @Override
            public void run() {
                notifyDataSetChanged();
                if (ChatListAdapter.this.extra != null && ChatListAdapter.this.selfUuid != null && !message.getSender().equals(ChatListAdapter.this.selfUuid)) {
                    extra.onText(message.getMessage());
                }
            }
        });
    }
    ...
}
Speech to Text (Dictation)
The speech-to-text feature was easier than we thought it would be, thanks to the Nuance SDK. It makes it super easy to recognize spoken text with Android. The core example is just what you’d find in the Nuance Fabric plugin on-boarding example for speech-to-text. We just refactored it a bit for ease of use and cleaner separation.
public class SpeechToText {
    ...
    /* State Logic: IDLE -> LISTENING -> PROCESSING -> repeat */
    public enum State {
        IDLE,
        LISTENING,
        PROCESSING
    }
    ...
    public SpeechToText(Activity parent, TextHandler textHandler) {
        Uri nuanceUri = Uri.parse(parent.getResources().getString(R.string.com_nuance_url));
        String nuanceAppKey = parent.getResources().getString(R.string.com_nuance_appKey);
        this.parent = parent;
        this.speechSession = Session.Factory.session(parent, nuanceUri, nuanceAppKey);
        this.textHandler = textHandler;
    }
    public void toggleReco(View button) {
        switch (state) {
            case IDLE:
                recognize();
                break;
            case LISTENING:
                stopRecording();
                break;
            case PROCESSING:
                cancel();
                break;
        }
    }
    public void recognize() {
        Transaction.Options options = new Transaction.Options();
        options.setRecognitionType(RecognitionType.DICTATION);
        options.setDetection(DetectionType.Long);
        options.setLanguage(new Language("eng-USA"));
        recoTransaction = speechSession.recognize(options, recoListener);
    }
    public void stopRecording() {
        recoTransaction.stopRecording();
    }
    public void cancel() {
        recoTransaction.cancel();
    }
    private Transaction.Listener recoListener = new Transaction.Listener() {
        ...
        @Override
        public void onRecognition(Transaction transaction, Recognition recognition) {
            String theText = recognition.getText();
            Log.d("SpeechKit", "onRecognition: " + theText);
            state = State.IDLE;
            Toast.makeText(parent.getApplicationContext(), "Recognized: \""
                    + theText + "\"", Toast.LENGTH_LONG).show();
            SpeechToText.this.textHandler.onText(theText + VIA_DICTATION_DISCLAIMER);
        }
        ...
    };
    ...
The first thing to mention is that there are 3 states in the dictation engine: IDLE, LISTENING, and PROCESSING. Depending on the state of the engine, we take different actions when the dictation button is pressed in the UI (for example, starting or canceling dictation).
We set up a speech recognition engine using the API keys in the app configuration.
Then, to recognize text, we set up the options for DetectionType (Short, Long, or None) and language dialect. We use Long because we want to be able to recognize longer passages of speech. For brief commands, Short might be more appropriate. We then call speechSession.recognize() with the options and a reference to our recognition listener which will receive the text via the onRecognition() handler.
Overall, it didn’t take much code at all to add a powerful voice recognition feature. Another cool thing about Nuance is that the SDKs are similar across platforms like iOS, Android and HTML/JavaScript.
Text-to-Speach (Reading Aloud)
The text-to-speech feature is also really easy out-of-the-box. It makes it very fast to speak text out loud on Android. The core example is just what you’d find in the Nuance Fabric plugin on-boarding example for text-to-speech. We just refactored it a bit for ease of use and cleaner separation.
public class TextToSpeech implements TextHandler {
    ...
    @Override
    public void onText(String text) {
        if (!ttsEnabled) {
            return;
        }
        Uri nuanceUri = Uri.parse(parent.getResources().getString(R.string.com_nuance_url));
        String nuanceAppKey = parent.getResources().getString(R.string.com_nuance_appKey);
        speechSession = Session.Factory.session(parent, nuanceUri, nuanceAppKey);
        speechSession.getAudioPlayer().setListener(new AudioPlayer.Listener() {
            ...
        });
        synthesize(text);
    }
    private void synthesize(String text) {
        Transaction.Options options = new Transaction.Options();
        options.setLanguage(new Language("eng-USA"));
        speechSession.getAudioPlayer().play();
        Toast.makeText(parent.getApplicationContext(), "Now Speaking: \""
                + text + "\"", Toast.LENGTH_LONG).show();
        ttsTransaction = speechSession.speakString(text, options, new Transaction.Listener() {
            ...
        });
    }
    ...
}
The first step is to initialize a Speech session using the Nuance API keys from the configuration. Then, we can call the synthesize() function, which sets the speech engine options (for dialect and voice), displays a Toast message to let the user know text is being spoken, and calls the speech engine speakString() method to speak the text.
And… that’s about it! Hopefully this gives a good idea of what all the code in the sample application is for.
Conclusion
Thank you so much for staying with us this far! Hopefully it’s been a useful experience. The goal was to convey our experience in how to build an app that can:
- Authenticate with Twitter or Digits auth.
- Send chat messages to a PubNub channel.
- Enter chat messages via dictation, and read them aloud via text-to-speech.
- Display current and historical chat messages.
- Display a list of what users are online.
If you’ve been successful thus far, you shouldn’t have any trouble extending the app to any of your realtime data processing needs.
Stay tuned, and please reach out anytime if you feel especially inspired or need any help!
Resources
- https://admin.pubnub.com/#/register
- https://www.pubnub.com/docs
- https://www.pubnub.com/docs/android-java/pubnub-java-sdk
- https://www.pubnub.com/docs/java-se-java/pubnub-java-sdk
- https://www.pubnub.com/products/realtime-messaging/
- https://www.pubnub.com/products/presence/
- https://www.pubnub.com/products/storage-and-playback/
- https://www.pubnub.com/blog/pubnub-coming-soon-to-twitter-fabric-platform/
- https://fabric.io/kits/android/nuance
- https://developer.nuance.com/public/index.php?task=home
- https://fabric.io
- https://fabric.io/kits/android/
- https://fabric.io/kits/android/pubnub
- https://fabric.io/kits/android/twitterkit
- https://get.digits.com
- https://fabric.io/kits/android/digits
- https://docs.fabric.io/android/digits/overview.html
- https://developer.nuance.com/public/Help/DragonMobileSDKReference_Android/index.html
- https://developer.nuance.com/public/Help/SpeechKitFrameworkReference_Android/index.html


