IN THIS ARTICLE
This tutorial walks through building chat with our core pub/sub technology (and other PubNub features). We recently launched ChatEngine, a new framework for rapid chat development.
Welcome back to Part 5 of our PubNub series on how to build a complete chat app with PubNub’s AngularJS SDK.
In Part 4: Displaying a Typing Indicator in Your AngularJS Chat App Using Custom State with Presence API, you learned how to add a realtime typing indicator that shows who is currently typing, using custom state attribute with the Presence API.
In this tutorial, we will learn how to use OAuth 2.0 to authenticate users in your app and PubNub Access manager API to secure the communications through the PubNub channels.
This tutorial will walk through three topics:
- Implementing the Github OAuth2 authentication
- Securing access to channels using Access Manager API and the OAuth token
- Implementing the logout feature that is revoking access to the PubNub channels
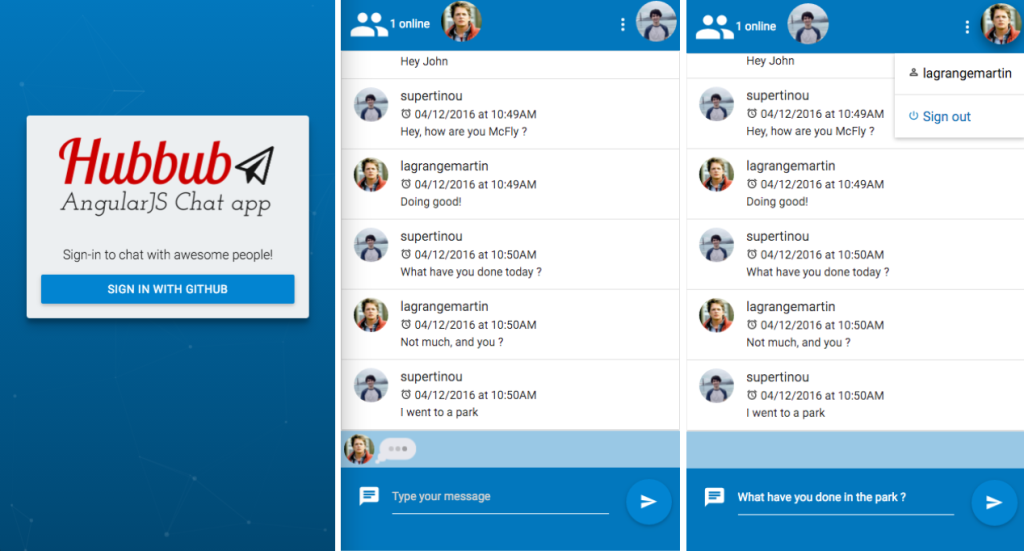
Here’s how our chat app will look at the end of this tutorial:
| Demo: The demo of the AngularJS chat app is available here | |
| Source code: The source code is available in the github repository |
Authentication Design Pattern
In the app, we will use the Github OAuth provider to log in users. Once they are logged in, we will grant access to the PubNub channels. OAuth2 authorization flow is not trivial, but it’s a really convenient way to manage the authorizations in your apps.
Below is a schema of the flow we are going to implement in the application:
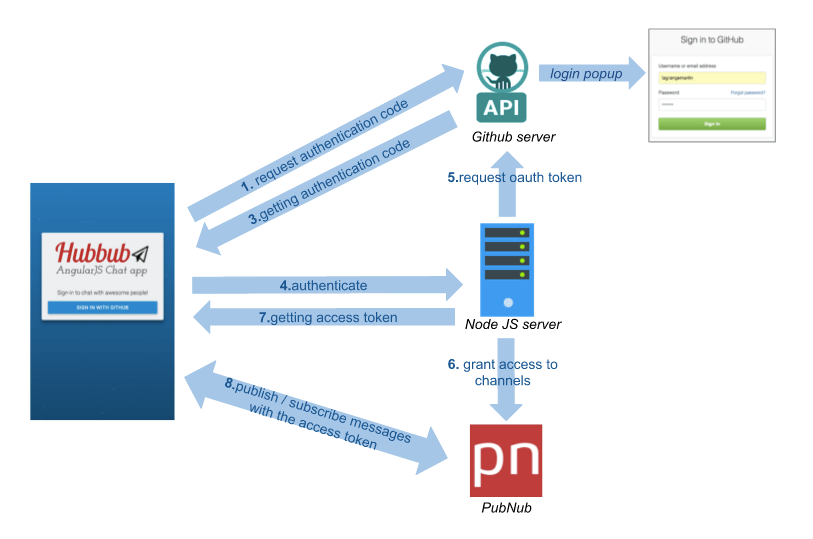
1. The AngularJS app is requesting to GitHub the authorization code by opening the GitHub popup window.
2. Github is issuing an authorization code.
3.-7. The AngularJS app is requesting an Access token to a Node.js Server which is requesting it to the GitHub API, granting access to the PubNub channels using the OAuth token and finally sending it back to the AngularJS app.
8. The AngularJS is using the OAuth token with PubNub in order to be allowed to publish or subscribe to the channels.
As we are going to implement a Node.js server, we need to adjust the directory structure :
→ Isolate the AngularJS app in a client directory.
→ Introduce a server directory
You should get the following directory structure:
angularjs-hubbub/
├── client
├── server
Authenticate the Users with OAuth2
First, we will see how to implement OAuth2 in order to allow the users to login with GitHub.
I picked GitHub as the authentication layer, but you can use the Google or Twitter OAuth provider, your Enterprise LDAP solution, your JWT tokens, or your own custom solution.
What is OAuth2 ?
Unfortunately, it would take a number of blog posts to properly explain OAuth2, but here are the fundamental concepts:
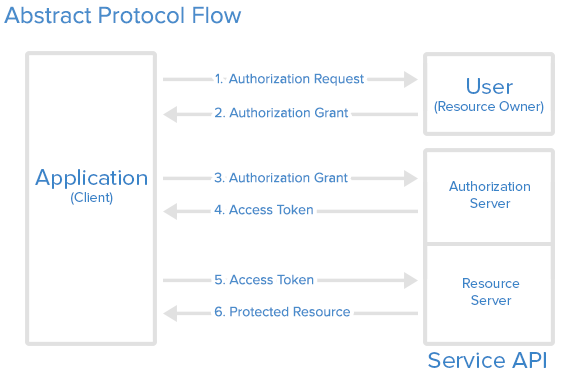
The User (you as a Github user) is requesting an authorization through the Client (the AngularJS app) to the Authorization server (Github) and can communicate with the Resource Server (the Node.js server and the Github API) with the access token that has been issued.
It’s more complicated than just providing a login / password to a Node.js server, but it allow multiple things such as controlling which client is authorized to login, set an authorization lifetime, etc…
Below is the abstract protocol flow:
And this is how we implement OAuth in our application:
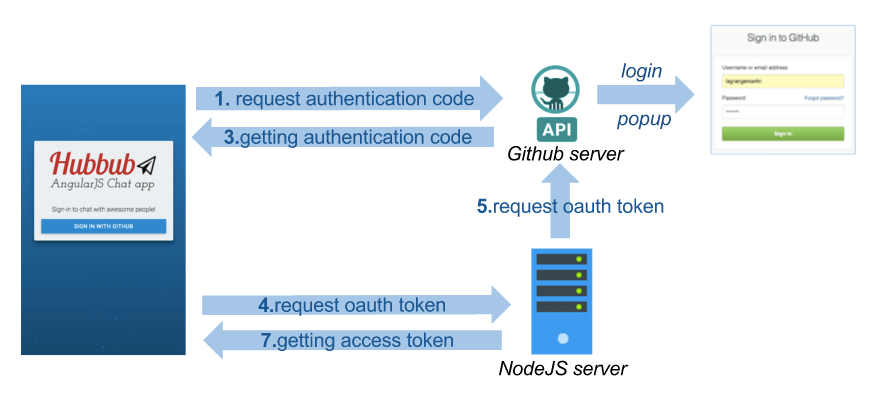
It seems complicated but don’t worry, we will be using libraries that will help us a lot.
Obtaining Your GitHub OAuth2 Keys
In order to implement the authentication with GitHub feature, you will first need to create a GitHub OAuth app:
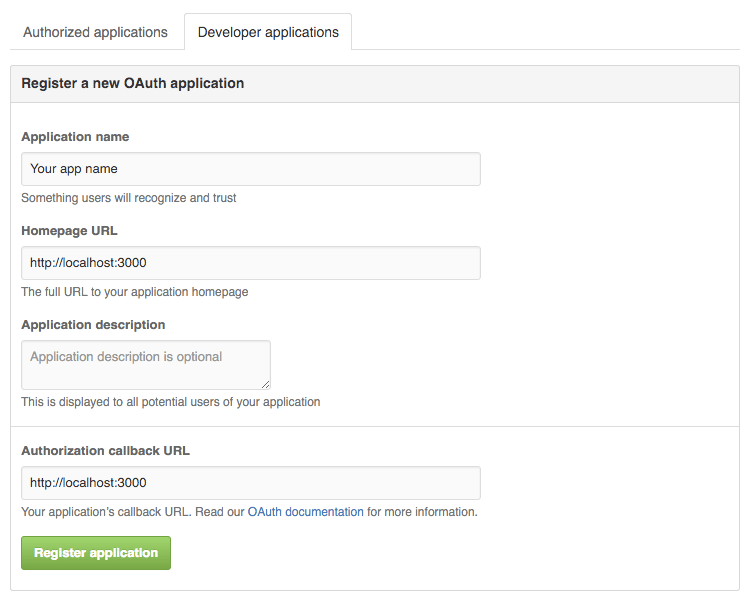
-
- Visit https://github.com/settings/profile
- Select OAuth applications in the left panel
- Go to Developer applications tab, then click on the Register new application button
- Application name: Your app name
- Homepage URL: http://localhost:3000
- Authorization callback URL: http://localhost:3000
- Click on the Register application button
- Get your
Client IDandClient Secret. We will need then in later steps
Configuring the OAuth2 Library
Now that we have created the Github OAuth app, we need to implement the OAuth authentication flow. We will be using the AngularJS Satellizer library that will take care of most of the OAuth2 authentication flow for us.
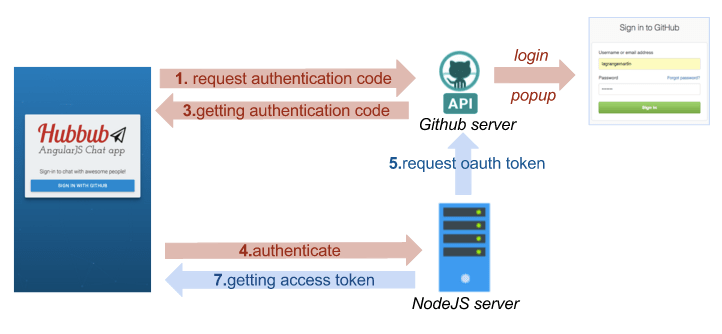
In this diagram, all the arrows in red are describing the steps that are taken care of by the Satellizer library. The only thing we will need is to configure Satellizer the right way and implement a step (described by the blue arrow) in our Node.js server.
→ Install the Satellizer library in your app:
bower install satellizer --save
→ Inject the Satellizer service as a dependency in app.js
→ In app.config.js, configure Satellizer with your Github client ID, the same redirectUri you specified in the Github OAuth app and finally the URL of the server that will be requested to authenticate the user.
.config(['$authProvider', function($authProvider) {
    $authProvider.github({
      clientId: "GITHUB_CLIENT_ID............",
      redirectUri: "http://localhost:9000/",
      url: "http://localhost:3000/auth/github",
    });

    $authProvider.httpInterceptor = true;
}]);
Creating the Login View
Create a “Sign in with Github button” component that we will put in later in the login view.
→ In login/sign-in-with-github-button.html, create a button, that upon clicking, calls an authenticate function of the component:
<button ng-click="authenticate()" >Sign in with github</button>
→ In login/sign-in-with-github-button.directive.js, create the authenticate function that calls the $auth.authenticate(‘github’) function of satellizer and redirects to the home page once logged in.
angular.module('app').directive('signInWithGithubButton', function() {
    return {
        restrict: "E",
        templateUrl: 'components/login/sign-in-with-github-button.html',
        controller: function($scope, $auth, $location, ngNotify) {
            $scope.authenticate = function() {
                $auth.authenticate('github')
                    .then(function(response) {
                        $location.path('/');
                    })
                    .catch(function(response) {
                        ngNotify.set('Authentication failed.', {
                            type: 'error',
                            sticky: true,
                            button: true,
                        });
                    });
            };
        }
    };
});
→ In the app/views folder, create a file called login.html and include the sign-in-with-github-button component.
<div class="login-container">
      <sign-in-with-github-button></sign-in-with-github-button>
</div>
→ Then, in app.routes.js add a route entry that points to the login view:
.when('/login', {
          templateUrl: 'views/login.html'
})
Try this by yourself: go to the login page and click the login button, then authenticate with GitHub.
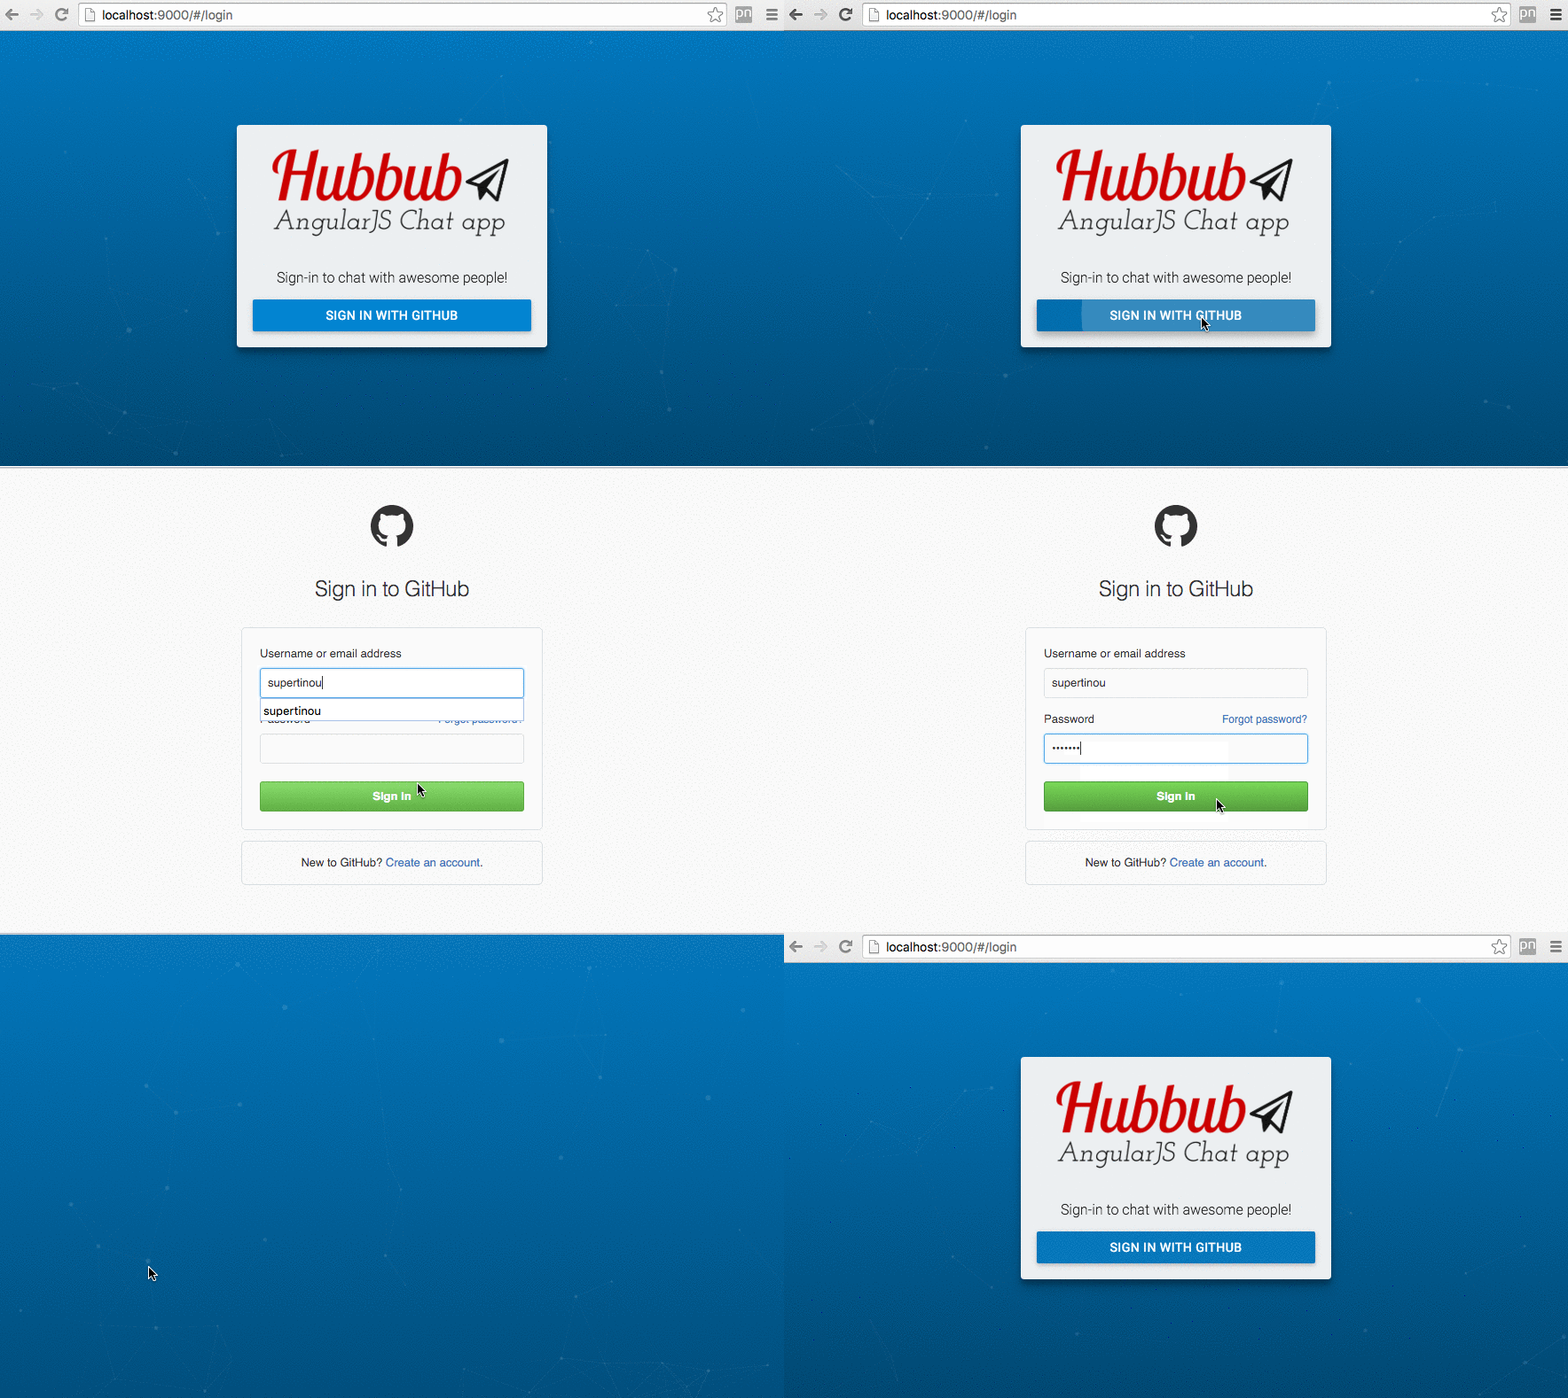
Unfortunately, this will not work yet because Satellizer tries to reach our server at http://localhost:3000/auth/github but there is no server running yet.
So, we are going to implement the server in the next steps.

If you look at the diagram above, we will implement the missing part that is represented by the blue arrows. The server will grab the authorization code from the request made by Satellizer in the AngularJS app, ask github for the access token, then register the user in the database with its access token and send back the access token to the AngularJS app.
Implementing the NodeJS Authentication Server
First, go to the server directory and install node and express
npm install node --save
npm init
npm install express --save
You can use the express generator to create the base of your Express server:
npm install express-generator -g
express .
It generates a number of files and the app.js file will be the endpoint of our server.
Before getting started, we will need to set up two external libraries that will be useful in our app:
- The first one is octonode that is a github API wrapper for NodeJS
- The second one is NeDB, which is a simple database for Node.JS that doesn’t require any dependency or server. It runs on its own.
npm install octonode --save
npm install nedb --save
Then, you need to require the libraries in app.js
→ In app.js, setup NeDB by creating a users datastore that save the user in db/users.db
db = {};
db.users = new Datastore({ filename: 'db/users.db', autoload: true });
→ In app.js, create the endpoint POST /auth/github
app.post('/auth/github', function(req, res) {
  res.status(200).send();
});
For now, this endpoint doesn’t do much more than send back an HTTP status code 200 to the AngularJS app.
→ Finish implementing the endpoint so that it does the following:
- gets the
authorization_codefrom the request that has been sent by the AngularJs app - exchanges the
authorization_codefor the access token by calling the github API:https://github.com/login/oauth/access_token - calls the github API with the access token to get the user profile information (use the octonode wrapper to help you)
- saves the user in the database with its
access tokenif he doesn’t exist already. - sends the
access tokento the client
You should have something similar to the following below:
app.post('/auth/github', function(req, res) {
    var accessTokenUrl = 'https://github.com/login/oauth/access_token';
    var params = {
        code: req.body.code,
        client_id: process.env.GITHUB_CLIENT_ID,
        client_secret: process.env.GITHUB_CLIENT_SECRET,
        redirect_uri: req.body.redirectUri
    };
    // Exchange authorization code for access token.
    request.post({
        url: accessTokenUrl,
        qs: params
    }, function(err, response, token) {
        var access_token = qs.parse(token).access_token;
        var github_client = github.client(access_token);
        // Retrieve profile information about the current user.
        github_client.me().info(function(err, profile) {
            if (err) {
                return res.status(400).send({
                    message: 'User not found'
                });
            }
            var github_id = profile['id'];
            db.users.find({
                _id: github_id
            }, function(err, docs) {
                // The user doesn't have an account already
                if (_.isEmpty(docs)) {
                    // Create the user
                    var user = {
                        _id: github_id,
                        oauth_token: access_token
                    }
                    db.users.insert(user);
                }
                // Update the OAuth2 token
                else {
                    db.users.update({
                        _id: github_id
                    }, {
                        $set: {
                            oauth_token: access_token
                        }
                    })
                }
            });
        });
        res.send({
            token: access_token
        });
    });
});
→ Run the server and try to login again. It’s working and you will be redirected to the chat view.
There are still two things that you need to implement:
- Protecting the chat app so that it redirects to the login page if not authenticated
- Setting the current user to the GitHub user – instead of anonymous robots
Under the hood, satellizer is saving the OAuth token sent back from the server that we will be able to use later. Just call $auth.getToken() to get the token.
Getting the Authenticated GitHub User
Now, we want to switch the anonymous users to the GitHub users currently authenticated.
→ Update the services/current_user.service.js to fetch the GitHub user id from the oauth_token. Instead of returning a random id, the fetch method should return a promise that will be resolved when the user has been fetched.
angular.module('app')
    .factory('currentUser', ['$http', '$auth', function currentUserFactory($http, $auth) {
        var userApiUrl = 'https://api.github.com/user';
        var token = $auth.getToken()
        var authenticatedUser = null
        var fetch = function() {
            return $http({
                    cache: true,
                    method: 'GET',
                    url: userApiUrl
                })
                .then(function(user) {
                    authenticatedUser = user.data;
                    return user.data
                })
        };
        var get = function() {
            return authenticatedUser;
        };
        return {
            fetch: fetch,
            get: get
        }
    }]);
→ In services/message-factory.js, update the message-factory to send the github ID and login
var sendMessage = function(messageContent) {
      // Don't send an empty message
      if (_.isEmpty(messageContent))
          return;
      Pubnub.publish({
          channel: self.channel,
          message: {
              uuid: (Date.now() + currentUser.get().id.toString()),
              content: messageContent,
              sender: {
                        uuid: currentUser.get().id.toString(),
                        login: currentUser.get().login
                      },
              date: Date.now()
          },
      });
  };
→ Update the message_factory.js, online_users.service.js and typing-indicator.service.js to use the currentUser.get().id method instead of old currentUser method.
→ Update the message-list, message-item components to display the user GitHub login.
→ Update the user avatar directive in shared/user-avatar.directive.js to display the GitHub avatar of the user.
angular.module('app').directive('userAvatar', function() {
    return {
        restrict: "E",
        template: '<img ng-src="{{avatarUrl}}" alt="{{uuid}}" class="circle">',
        scope: {
            uuid: "@",
        },
        replace: true,
        controller: function($scope) {
            // Generating a uniq avatar for the given uniq string provided using robohash.org service
            $scope.avatarUrl = '//avatars.githubusercontent.com/u/' + $scope.uuid;
        }
    };
});
The Authentication Service
→ Create an authentication service in services/authentication.service.js
→ Create a login function that fetches the current user from the CurrentUserService and set the PubNub uuid with the GitHub ID. Then, start to subscribe to the PubNub message channel.
angular.module('app')
.factory('AuthenticationService', ['Pubnub', '$auth', 'currentUser', '$http',
    function AuthenticationService(Pubnub, $auth, currentUser, $http, config) {
        var channel = "messages";
        var login = function() {
            return currentUser.fetch().then(function() {
                Pubnub.set_uuid(currentUser.get().id)
                Pubnub.subscribe({
                    channel: channel,
                    noheresync: true,
                    triggerEvents: true
                });
            });
        };
        return {
            login: login
        };
    }
]);
Requiring the Authentication
→ In app.routes.js, create a requireAuthentication method that redirects users to the login page if they are not authenticated and login these users through the AuthenticationSevice#login method if they are authenticated.
// Redirect to the login page if not authenticated
var requireAuthentication = function($location, $auth, AuthenticationService) {
    if ($auth.isAuthenticated()) {
        return AuthenticationService.login()
    } else {
        return $location.path('/login');
    }
};
→ Call this method in the resolve statement of the main route.
.when('/', {
    templateUrl: 'views/chat.html',
    resolve: {
        requireAuthentication: requireAuthentication
    }
})
Securing Access to PubNub Channels with Access Manager API
The PubNub Access Manager API
One of the fundamentals of building a successful chat app application is having a great security model. Unfortunately, it also happens to be one of the most difficult and often overlooked features when building a chat app. PubNub Access Manager (PAM) allows you, through a simple API to grant, to audit and revoke user permissions on PubNub channels.
You will need to first activate the PubNub Access Manager add-on in your app. Go to the Admin Dashboard. Select the app you are working on and go to Application add-ons to enable Access Manager.
When Access Manager is enabled, all of the channels for your app will be locked and you will need to grant user permissions to channels. We will walk through all of the details in the next steps.
If you want to learn more about PubNub Access Manager, watch the video below from the University of PubNub
On the Server Side
→ Install the PubNub javascript SDK
cd server
npm install pubnub --save
→ Require and init PubNub with your keys:
var pubnub = require('pubnub');
pubnub = pubnub.init({
    Subscribe_key: 'PUBNUB_SUBSCRIBE_KEY',
    Publish_key: 'PUBNUB_PUBLISH_KEY',
    Secret_key: 'PUBNUB_SECRET_KEY',
    auth_key: 'NodeJS-Server',
    ssl: true
})
→ In server/app.js, create a grantAccess function that grant access to the message channel to an OAauth token.
You will need to grant access to the messages channel as well as the presence channel called messages-pnpres
var grantAccess = function(oauth_token, error, success) {
  pubnub.grant({
    channel: ['messages', 'messages-pnpres'],
    auth_key: oauth_token,
    read: true,
    write: true,
    ttl: 0,
    callback: success,
    error: error
  });
};
→ Improve the /auth/github endpoint function in order to grant access to the PubNub channels prior to sending the OAuth token back to the client:
request.post({ url: accessTokenUrl, qs: params }, function(err, response, token) {
   // ... Some code omitted here
   // ...
   var error = function(){ res.status(500).send(); }
   var success = function(){ res.send({token: access_token}); }
   grantAccess(access_token, error, success);
});
On the Client Side
Now that the access_token has been granted to be used to publish and subscribe to the PubNub channels, we need to use it in our AngularJS app if we don’t want to get a forbidden error when subscribing and publishing:
→ In services/authentication.service.js, set the PubNub auth_key with the OAuth token
var login = function() {
    return currentUser.fetch().then(function() {
        // ….
        Pubnub.auth($auth.getToken())
        //…..
    });
};
Logout Feature and Revoking Access to PubNub Channels
In this part, we will learn how to implement the logout feature that revokes a user’s access to the channels.
On the Client Side
→ In services/authentication.service.js, create a logout function that will both logout from the client and the server:
var serverSignout = function() {
    var url = config.SERVER_URL + 'logout'
    return $http({
        method: 'POST',
        url: url
    })
};
var clientSignout = function() {
    $auth.logout()
    Pubnub.unsubscribe({
        channel: channel
    });
    $cacheFactory.get('$http').removeAll();
};
var logout = function() {
    return serverSignout().then(function() {
        clientSignout();
    });
};
→ In app.routes.js, create a logout route that calls the AuthenticationService#logout function:
when('/logout', {
    template: null,
    controller: function(AuthenticationService, $location, ngNotify) {
        AuthenticationService.logout().catch(function(error) {
            // The logging out process failed on the server side
            if (error.status == 500) {
                ngNotify.set('Logout failed.', {
                    type: 'error'
                });
            }
        }).finally(function() {
            $location.path('/login');
        });
    }
})
→ Create a link somewhere in your app to point to the logout route.
On the Server Side
→ In app.js, create an ensureAuthenticated middleware that will ensure for certain route that a user is authenticated before reaching it.
This middleware will ensure the user associated with the OAuth token exists in order to process the request. If it is not the case it will immediately send an http status code 401 back.
function ensureAuthenticated(req, res, next) {
     if (!req.header('Authorization')) {
         return res.status(401).send({
             message: 'Please make sure your request has an Authorization header'
         });
     }
     var token = req.header('Authorization').split(' ')[1];
     // Check if the OAuth2 token has been previously authorized
     db.users.find({
         oauth_token: token
     }, function(err, users) {
         // Unauthorized
         if (_.isEmpty(users)) {
             return res.status(401).send({
                 message: 'Unauthorized'
             });
         }
         // Authorized
         else {
             req.token = token;
             req.user_id = users[0].user_id
             next();
         }
     });
 }
→ Implement the revokeAccess method
var revokeAccess = function(oauth_token, error, success){
      pubnub.revoke({
        channel: ['messages', 'messages-pnpres'],
        auth_key: oauth_token,
        callback: success,
        error: error
      });
  };
→ Implement the logout endpoint and ensure the request goes through the ensureAuthenticated middleware before reaching the logout endpoint.
app.post('/logout', ensureAuthenticated, function(req, res) {

    var error = function(){ res.status(500).send(); }
    var success = function(){
      db.users.update({ oauth_token: req.token }, { $set: { oauth_token: null } } )
      res.status(200).send();
    }
    revokeAccess(req.token, error, success)
  });
→ Try to logout and login.
That’s it! I hope you’ve enjoyed reading this tutorial.
If you have any questions or feedback, don’t hesitate to shoot me an email: martin@pubnub.com
Subscribe to our newsletter and we’ll keep you posted about the next AngularJS tutorials.
In the next tutorial, we are going to learn how to use the channel groups to create a friends list that shows the online status of your friends, but not all of the users in the chat room.
See you in Part 6 !


